C5_BROWSE

 BROWSE()*
 Browse records within a window
------------------------------------------------------------------------------
 Syntax

     BROWSE([<nTop>], [<nLeft>],
        [<nBottom>], [<nRight>]) lSuccess

 Arguments

     <nTop>, <nLeft>, <nBottom>, and <nRight> define the
     window coordinates.  If not specified, the default window coordinates
     are 1, 0 to MAXROW(), and MAXCOL().

 Returns

     BROWSE() returns false (.F.) if there is no database file in use;
     otherwise, it returns true (.T.).

 Description

     BROWSE() is a user interface function that invokes a general purpose
     table-oriented browser and editor for records in the current work area.
     For a list of the navigation keys which are used by BROWSE(), refer to
     the DBEDIT() function.  Note that Browse() is a compatibility function.
     DBEDIT() should be used in its place.  For a more complicated BROWSE(),
     TBROWSE() should be used.

 Notes

     .  Status line: BROWSE() supports a status line in the upper
        right corner of the browse window indicating one of the following:

        BROWSE() Status Line Messages
        ---------------------------------------------------------------------
        Message   Meaning
        ---------------------------------------------------------------------
        <new>     Append mode
        <bof>     Top of file
        <delete>  Current record is deleted
        Record    Record number display
        ---------------------------------------------------------------------

     .  BROWSE() has the following three modes:

        -  Browsing: This is the default mode of BROWSE().  Pressing any
           DBEDIT() navigation key moves the highlight to a new column or
           row.

        -  Field edit: Pressing Return on any field enters field edit
           using a GET.  Pressing Return terminates the edit mode, saving the
           changes.  Esc terminates without saving changes.  Since the field
           edit mode uses GET, all navigation and editing keys are READ keys.

        -  Append: GOing BOTTOM with Ctrl+PgDn and then pressing Down
           arrow enters append mode with the indicating message "<new>" on
           the status line.  A new blank record is then inserted.  Pressing
           Up arrow terminates the append mode, saving the new record if data
           has been entered.  If no data has been entered, the new record is
           not saved.

 Examples

     .  This is an example of browsing a file:

        USE File1 NEW
        BROWSE()

 Files   Library is EXTEND.LIB, source file is SOURCE\SAMPLE\BROWSE.PRG

See Also: DBEDIT()


HbRun

HbRun is a console interpreter and program ( command file / script file / .prg / .hrb ) runner for the Harbour Language.

Addendum: a clarification by Przemek:

HBRUN is a simple wrapper to Harbour compiler so the same syntax as in
Cl*pper is supported:

DO <filename>[.prg]

only .prg is accepted as extension and it’s default so you do not
have to set it explicitly.

( In Harbour Users Google group, under “hbmk2 and the Dot Prompt” topic:

It can work as interpreter when invoked without parameters or can execute xBase / Harbour source code in .prg file or compiled Harbour Portable Objects (.hrb) file given as parameter.

Type of file is recognized by extension used with <file> parameter. If not given then .hrb is used.

In other words, HbRun can be use in both interpret  and batch mode.

Regarding parameter given or not, when calling HbRun this ‘mode’ determined by program itself. If a parameter ( usually a .prg or .hrb file name ) given, program run in ‘batch’ mode, runs (executes) given script file and end. If no parameter given, program enter interpreter mode.

Using HbRun as an interpreter, may be very useful, productive, and educative for xBase programmers. Too many xBase programmers was learned everything, including   DBF file system and xBase programming language by famous “dot prompt”. Today many xBase programmers uses HbRun daily basis.

When HbRun begin, open a console screen with two basic area: status bars at top and dot prompt line at bottom.

Status bars :

 hbrunStatLines

Dot prompt is quite simple visually: a dot and a  line in inverse color beginning with a blinking cursor :

 hbRunDotPrompt

You may enter here a command to see the result.

For example “DIR” command will give a list of database (.dbf) files in current directory:

hbRun_Dir

SET COLO TO “GR+/N” command will remember you old days :

hbRun_Dir2

The DIR command can be used with DOS style “filter / skeleton” parameter :

DIR *.PRG
DIR *.*

etc.

Inspecting any table ( .dbf file ) is very simple:

USE CLIENTS
BROWSE ()

 hbrunBrowse

 Expand a little:

SET COLO TO “GB+/N”
USE CLIENTS
BROWSE( 3, 10, 24, 60 )

hbrunBrowse2

If you plan to use this snap frequently, make a .prg file (say brwclien.prg) with this three line and run it with DO command:

DO BRWCLIEN

Sometime LIST command may be better:

LIST CL_ID, CLI_SNAM, CLI_NAME, CLI_TLF

hbrun_list

 You can add FOR clause to the LIST command:

LIST CL_ID, CLI_SNAM, CLI_NAME, CLI_TLF FOR RECN() < 10

or

LIST CL_ID, CLI_SNAM, CLI_NAME, CLI_TLF FOR EMPTY( CLI_TLF )

The structure info of a table frequently requires while daily work to xBase Programmers.

Here three small programs for obtain structure info of a table. Usage is quite simple: open ( USE ) your table and enter DO <prgFileName>; for example:

USE CLIENT
DO LISTSTRU
or
DO DISPSTRU
or
DO SAVESTRU

 Notes :

–      To avoid some possible screen metric conflicts caused by default console (DOS box) settings of OS, may be useful some adjusting before invoke HbRun; such as:

MODE CON LINES=48 COLS=128

–       “?” command may be useful as a built-in calculator :

? 2*2           // 4
? 2**8          // 256
? SQRT( 81 )    // 9

–      HbRun keep a “history” for commands entered (for a limited count of commands of course). You can access (and re-enter when required) by using up and down keys. Moreover this history may be usable after re-invoke HbRun.

–      Though Harbour Language is essential, some legal Harbour commands / functions may be un-recognizable by HbRun.

–      Though some legal statements works in interpret mode, may not works in batch mode (such as Browse() ).

Last Note : No further explanation required for experienced xBase programmers; try, see and learn.

~~~~~~~~~~~~~~~~~~~~~~~~~~~~~~~~~~~~~~~~~~~~~~~~~~~~

Examples :

 
/*
 DispStru.prg 

 Display structure of current table ( .dbf file ) on screen.

*/
MEMVAR ASTRUCT, NTOTLEN
IF EMPTY( ALIAS() )
   SETCOLOR( "R/N" )
   ? "No active table in the current work area !", LTRIM( STR( SELECT() ) )
ELSE 
   @ 3, 0 CLEA TO MAXROW() - 1, MAXCOL()
   aStruct := DBSTRUCT()
   nTotLen := 1
   AEVAL( aStruct, { | a1Field | nTotLen += a1Field[ 3 ] } )
   AEVAL( aStruct, { | a1Field, n1FieldNo | ;
   aStruct[ n1FieldNo ] := STR( n1FieldNo, 3 ) + " " +;
                           PADR( a1Field[ 1 ], 12 ) +;
                           PADC( a1Field[ 2 ], 4 ) +;
                           PADL( a1Field[ 3 ], 5 ) +;
                           PADL( a1Field[ 4 ], 3 ) } )
   ? "Structure of database :", DBINFO( 10 )
   ? "Number of data records :", LTRIM( STR( LASTREC() ) )
   ? "Date of last update :", LUPDATE()
   ? "Fld Name Type Width Dec"
   ? "--- ---------- ---- ----- ---"
   @ 21,0 SAY "** Total ** " + PADL( nTotLen, 6 )
   ACHOICE( 8, 0, 20, 30, aStruct ) 
ENDIF
~~~~~~~~~~~~~~~~~~~~~~~~~~~~~~~~~~~~~~~~~~~~~~~~~~~~
/*
 ListStru.prg 

 List structure of current table ( .dbf file ) on screen.

*/
MEMVAR ASTRUCT, NTOTLEN
IF EMPTY( ALIAS() )
   SETCOLOR( "R/N" )
   ? "No active table in the current work area !", LTRIM( STR( SELECT() ) )
ELSE 
   @ 3, 0 CLEA TO MAXROW() - 1, MAXCOL()
   aStruct := DBSTRUCT()
   nTotLen := 1
   AEVAL( aStruct, { | a1Field | nTotLen += a1Field[ 3 ] } ) 
   AEVAL( aStruct, { | a1Field, n1FieldNo | ;
   aStruct[ n1FieldNo ] := STR( n1FieldNo, 3 ) + " " +;
                           PADR( a1Field[ 1 ], 12 ) +;
                           PADC( a1Field[ 2 ], 4 ) +;
                           PADL( a1Field[ 3 ], 5 ) +;
                           PADL( a1Field[ 4 ], 3 ) } )
   ? "Structure of database :", DBINFO( 10 )
   ? "Number of data records :", LTRIM( STR( LASTREC() ) )
   ? "Date of last update :", LUPDATE()
   ? "Fld Name Type Width Dec"
   ? "--- ---------- ---- ----- ---"
   AEVAL( aStruct, { | c1Field | QOUT( c1Field ) } ) 
   ? "** Total ** ", PADL( nTotLen, 5 )
ENDIF
~~~~~~~~~~~~~~~~~~~~~~~~~~~~~~~~~~~~~~~~~~~~~~~~~~~~
/*
SaveStru.prg

 Save structure of current table ( .dbf file ) to a file.

 Notes :

 - This program uses ListStru.prg
 - Name of target file constructed at line 18; 
   if required you may use alternate ways or
   simply using a constant.
*/
MEMVAR AlteFName
IF EMPTY( ALIAS() )
   SETCOLOR( "R/N" )
   ? "No active table in the current work area !", LTRIM( STR( SELECT() ) )
ELSE 
   AlteFName := LEFT( ALIAS(), 4 ) + "STRU" 
   SET ALTE TO &AlteFName
   SET ALTE ON
   DO LISTSTRU
   SET ALTE OFF
   SET ALTE TO
ENDIF
~~~~~~~~~~~~~~~~~~~~~~~~~~~~~~~~~~~~~~~~~~~~~~~~~~~~

HMG Samples

About HMG Samples

Language Related

 Arrays

Array Arithmetic

Load / Save ANY array

Conversion

DOS -> Windows Character Conversion

National Issues

National Alternate Collating Sequence

National Change Case

 Windows

Tracking Mouse

Controls

Browse

Quick Search    

Combo box

Dynamic ComboBox

Edit Box

Word wrap in EditBox

 Grid

Get Data Into Grid via IDE

Text Box

Auto fill in text box

Search in and Fill Box (SFilBox) 

Tree

Tree Menu

Two Methods for Tree

Functions

 Drives, Directories and Files

Drives and Directories

Directory List

Fill Directory List

PutFile() with default file name

Messages

HMG Message Functions

Message for multiple values

Message Extended

Where Is It ?

Improvements in Message functions

Miscellaneous

Is application running ?

Get Process ID

Simple Error Handling

Funny

Cuckoo Clock

Untouchable window

Warn Lazy User

Pegs Game

Drawing

Play Draw

Draw Border

Printing

 Text Mode

Using printer under Windows 

Obsolete ways

Send to File

Print File

GUI Mode

HMG Print

 HMG Print ( Mini Print ) for beginners in 10 easy steps

Print a plain text file by HMG Print – 1

HMG Report

HMG HPDF

HMG_HPDF — Bill

Unicode

HMG Unicode

Utilities

Color Codes

DB Validate 

Hex View

Mini Agenda

DBA : Data Base Assistant

Low-Level DBU

x-Base Modul List

Mini Search Machine (2014) 

TBrowse & TBColumn basics

TBrowse and TBColumn basics (.pdf)

Working version of sample program in this article.


TBr_Bass

C5 UI Commands & Functions

C5 User Interface Commands and Functions

Global Settings :

SET CENTURY :

Modify the date format to include or omit century digits

SET CENTURY on | OFF | <xlToggle>

SET COLOR* :

Define screen colors

SET COLOR | COLOUR TO [[<standard>]
    [,<enhanced>] [,<border>] [,<background>]
    [,<unselected>]] | (<cColorString>)

SET CONFIRM :

Toggle required exit key to terminate GETs

SET CONFIRM on | OFF | <xlToggle>

SET CONSOLE :

Toggle console display to the screen

SET CONSOLE ON | off | <xlToggle>

SET CURSOR :

Toggle the screen cursor on or off

SET CURSOR ON | off | <xlToggle>

SET DATE :

Set the date format for input and display

SET DATE FORMAT [TO] <cDateFormat>
SET DATE [TO] AMERICAN | ansi | british | french
    | german | italian | japan | usa

SET DECIMALS :

Set the number of decimal places displayed

SET DECIMALS TO [<nDecimals>]

SET DELIMITERS :

Toggle or define GET delimiters

SET DELIMITERS on | OFF | <xlToggle>
SET DELIMITERS TO [<cDelimiters> | DEFAULT]

SET DEVICE :

Direct @…SAYs to the screen or printer

SET DEVICE TO SCREEN | printer

SET EPOCH :

Control the interpretation of dates with no century digits

SET EPOCH TO <nYear>

SET FIXED :

Toggle fixing of the number of decimal digits displayed

SET FIXED on | OFF | <xlToggle>

SETBLINK() :

Toggle asterisk (*) interpretation in SET COLOR

SETBLINK([<lToggle>]) --> lCurrentSetting

SETCOLOR() :

Return the current colors and optionally set new colors

SETCOLOR([<cColorString>]) --> cColorString

SETCURSOR() :

Set the cursor shape

SETCURSOR([<nCursorShape>]) --> nCurrentSetting

SETMODE() :

Change display mode to specified number of rows and columns

SETMODE(<nRows>, <nCols>) --> lSuccess

SETPOS() :

Move the cursor to a new position

SETPOS(<nRow>, <nCol>) --> NIL

User Input :

CLEAR TYPEAHEAD :

Empty the keyboard buffer

CLEAR TYPEAHEAD

INKEY() :

Extract a character from the keyboard buffer

 
INKEY( [ <nSeconds> ] ) --> nInkeyCode

KEYBOARD :

Stuff a string into the keyboard buffer

KEYBOARD <cString>

LASTKEY() :

Return the INKEY() value of the last key in the buffer

LASTKEY() --> nInkeyCode

NEXTKEY() :

Read the pending key in the keyboard buffer

NEXTKEY() --> nInkeyCode

SET TYPEAHEAD :

Set the size of the keyboard buffer

SET TYPEAHEAD TO <nKeyboardSize>

Basic :

?/?? :

Display one or more values to the console

? | ?? [<exp list>]

@…BOX :

Draw a box on the screen

@ <nTop>, <nLeft>, <nBottom>, <nRight>
  BOX <cBoxString> [COLOR <cColorString>]

@…CLEAR :

Clear a rectangular region of the screen

@ <nTop>, <nLeft> [CLEAR
  [TO <nBottom>, <nRight>]]

@…SAY :

Display data at a specified screen or printer row and column

@ <nRow>, <nCol>
    [SAY <exp>
    [PICTURE <cSayPicture>]
    [COLOR <cColorString>]]
    GET <idVar>
    [PICTURE <cGetPicture>]
    [COLOR <cColorString>]
    [WHEN <lPreExpression>]
    [RANGE* <dnLower>, <dnUpper>] |
    [VALID <lPostExpression>]

@…TO :

Draw a single or double line box

@ <nTop>, <nLeft>
    TO <nBottom>, <nRight> [DOUBLE] [COLOR
    <cColorString>]

ACCEPT :

Place keyboard input into a memory variable

ACCEPT [<expPrompt>] TO <idVar>

INPUT :

Enter the result of an expression into a variable

INPUT [<expPrompt>] TO <idVar>


ALERT() :

Display a simple modal dialog box

ALERT( <cMessage>, [<aOptions>] ) --> nChoice

CLEAR SCREEN :

Clear the screen and home the cursor

CLEAR [SCREEN] | CLS

COL() :

Return the screen cursor column position

COL() --> nCol

COLORSELECT()

                Activate attribute in current color settings

   COLORSELECT(<nColorIndex>) --> NIL

DEVOUT() :

Write a value to the current device

DEVOUT(<exp>, [<cColorString>]) --> NIL

DEVOUTPICT() :

Write a value to the current device using a picture clause

DEVOUTPICT(<exp>, <cPicture>, [<cColorString>]) --> NIL

           DEVPOS() :

Move the cursor or printhead to a new position depending on the

current device

        DEVPOS(<nRow>, <nCol>) --> NIL

DISPBEGIN() :

Begin buffering screen output

DISPBEGIN() --> NIL

DISPBOX() :

Display a box on the screen

DISPBOX(<nTop>, <nLeft>, <nBottom>, <nRight>,
    [<cnBoxString>], [<cColorString>]) --> NIL

DISPCOUNT() :

Return the number of pending DISPEND() requests

DISPCOUNT() --> nDispCount

DISPEND() :

Display buffered screen updates

DISPEND() --> NIL

DISPOUT() :

Write a value to the display

DISPOUT(<exp>, [<cColorString>]) --> NIL

OUTERR() :

Write a list of values to the standard error device

OUTERR(<exp list>) --> NIL

OUTSTD() :

Write a list of values to the standard output device

OUTSTD(<exp list>) --> NIL

QOUT() :

Display a list of expressions to the console

QOUT([<exp list>]) --> NIL
QQOUT([<exp list>]) --> NIL

RESTORE SCREEN* :

Display a saved screen

RESTORE SCREEN [FROM <cScreen>]

RESTSCREEN() :

Display a saved screen region to a specified location

RESTSCREEN([<nTop>], [<nLeft>],
    [<nBottom>], [<nRight>], <cScreen>) --> NIL

ROW() :

Return the screen row position of the cursor

ROW() --> nRow

SAVE SCREEN* :

Save current screen to a buffer or variable

SAVE SCREEN [TO <idVar>]

SAVESCREEN() :

Save a screen region for later display

SAVESCREEN([<nTop>], [<nLeft>],
    [<nBottom>], [<nRight>]) --> cScreen

SCROLL() :

Scroll a screen region up or down

SCROLL([<nTop>], [<nLeft>],
     [<nBottom>], [<nRight>], [<nVert>] [<nHoriz>])
 --> NIL

TYPE :

Display or print the contents of a text file

TYPE <xcFile> [TO PRINTER] [TO FILE <xcOutFile>]

Advanced :

ACHOICE() :

Execute a pop-up menu

ACHOICE(<nTop>, <nLeft>, <nBottom>, <nRight>,
    <acMenuItems>,
    [<alSelectableItems> | <lSelectableItems>],
    [<cUserFunction>],
    [<nInitialItem>],
    [<nWindowRow>]) --> nPosition

BROWSE()* :

Browse records within a window

BROWSE([<nTop>], [<nLeft>],
    [<nBottom>], [<nRight>]) --> lSuccess

DBEDIT() :

Browse records in a table format

DBEDIT( [<nTop>], [<nLeft>],
    [<nBottom>], <nRight>],
    [<acColumns>],
    [<cUserFunction>],
    [<acColumnSayPictures> | <cColumnSayPicture>],
    [<acColumnHeaders> | <cColumnHeader>],
    [<acHeadingSeparators> | <cHeadingSeparator>],
    [<acColumnSeparators> | <cColumnSeparator>],
    [<acFootingSeparators> | <cFootingSeparator>],
    [<acColumnFootings> | <cColumnFooting>]) --> NIL

DISPLAY :

Display records to the console

DISPLAY <exp list>
    [TO PRINTER] [TO FILE <xcFile>]
    [<scope>] [WHILE <lCondition>]
    [FOR <lCondition>] [OFF]

LIST :

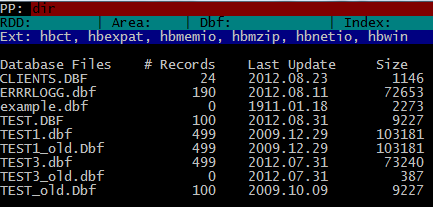
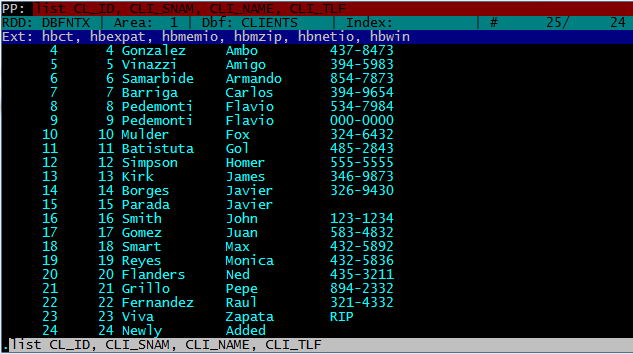
List records to the console

LIST <exp list>
    [TO PRINTER] [TO FILE <xcFile>]
    [<scope>] [WHILE <lCondition>]
    [FOR <lCondition>] [OFF]

LABEL FORM :

Display labels to the console

LABEL FORM <xcLabel>
    [TO PRINTER] [TO FILE <xcFile>] [NOCONSOLE]
    [<scope>] [WHILE <lCondition>] [FOR <lCondition>]
    [SAMPLE]

REPORT FORM :

Display a report to the console

REPORT FORM <xcReport>
    [TO PRINTER] [TO FILE <xcFile>] [NOCONSOLE]
    [<scope>] [WHILE <lCondition>] [FOR <lCondition>]
    [PLAIN | HEADING <cHeading>] [NOEJECT] [SUMMARY]

TEXT :

Display a literal block of text

TEXT [TO PRINTER] [TO FILE <xcFile>]
    <text>...
ENDTEXT

GET System :

Standard :

@…GET :

Create a new Get object and display it on the screen

@ <nRow>, <nCol>
    [SAY <exp>
    [PICTURE <cSayPicture>]
    [COLOR <cColorString>]]
    GET <idVar>
    [PICTURE <cGetPicture>]
    [COLOR <cColorString>]
    [WHEN <lPreExpression>]
    [RANGE* <dnLower>, <dnUpper>] |
    [VALID <lPostExpression>]

CLEAR GETS :

Release Get objects from the current GetList array

CLEAR GETS

READ :

Activate full-screen editing mode using Get objects

READ [SAVE]

READEXIT() :

Toggle Uparrow and Downarrow as READ exit keys

READEXIT([<lToggle>]) --> lCurrentState

READINSERT() :

Toggle the current insert mode for READ and MEMOEDIT()

READINSERT([<lToggle>]) --> lCurrentMode

READKEY()* :

Determine what key was used to terminate a READ

READKEY() --> nReadkeyCode

READMODAL() :

Activate a full-screen editing mode for a GetList

READMODAL(<aGetList>) --> NIL

READVAR() :

Return the current GET/MENU variable name

READVAR() --> cVarName

SET ESCAPE :

Toggle Esc as a READ exit key

SET ESCAPE ON | off | <xlToggle>

SET FORMAT :

Activate a format when READ is executed

SET FORMAT TO [<idProcedure>[.<ext>]]

SET INTENSITY :

Toggle enhanced display of GETs and PROMPTs

SET INTENSITY ON | off | <xlToggle>

SET SCOREBOARD :

Toggle the message display from READ or MEMOEDIT()

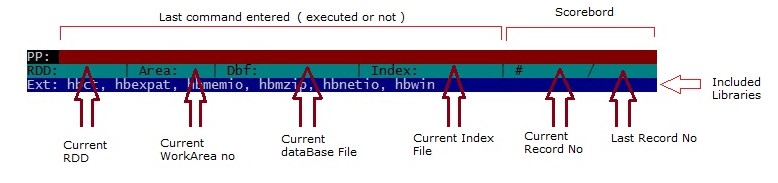
SET SCOREBOARD ON | off | <xlToggle>

UPDATED() :

Determine if any GET changed during a READ

UPDATED() --> lChange

Getsys.prg Functions :

GETACTIVE() :

Return the currently active Get object

GETACTIVE() --> objGet

GETAPPLYKEY() :

Apply a key to a Get object from within a Get reader

GETAPPLYKEY(<oGet>, <nKey>) --> NIL

GETDOSETKEY() :

Process SET KEY during Get editing

GETDOSETKEY(<oGet>) --> NIL

GETPOSTVALIDATE() :

Postvalidate the current Get object

GETPOSTVALIDATE(<oGet>) --> lSuccess

GETPREVALIDATE() :

Prevalidate a Get object

GETPREVALIDATE(<oGet>) --> lSuccess

GETREADER() :

Execute standard READ behavior for a Get object

GETREADER(<oGet>) --> NIL

READFORMAT() :

Return, and optionally set, the format file code block

READFORMAT([<bFormat>]) --> bCurrentFormat

READKILL() :

Return, and optionally set, the READ terminate flag

READKILL([<lKillRead>]) --> lCurrentSetting

READUPDATED() :

Return, and optionally set, whether a Get changed

READUPDATED([<lChanged>]) --> lCurrentSetting

GET Class :

Class Function :

GetNew() : Create a new Get object

Exported Instance Variables :

badDate : Indicates if the editing buffer contains an invalid date
block : Code block to associate Get with a variable
buffer : Character value that defines the editing buffer
cargo : User-definable variable
changed : Indicates whether the Get:buffer has changed
clear : Indicates whether the editing buffer should be cleared
col : Get column number
colorSpec : Display attributes string
decPos : Decimal point position within the editing buffer
exitState : Means by which the user exited the Get
hasFocus : Indicates whether or not the Get object has input focus
minus : Indicates whether or not a minus sign has been entered
name : Get variable name
original : Character string containing the original value of the Get
picture : PICTURE string
pos : Current cursor position within the editing buffer
postBlock : Code block to validate a newly entered value
preBlock : Code block to decide if editing is permitted
reader : Contains a block to affect READ behavior on a Get object
rejected : Indicates if last insert/overStrike character was rejected
row : Get row number
subscript : Information about array Get objects .
type : Get variable data type
typeOut : Indicates attempt to move the cursor out of editing buffer

Exported Methods :

State Change Methods :

assign() : Assigns the editing buffer contents to the Get variable
colorDisp() : Changes a Get object’s color and then redisplay it
display() : Displays the Get on the screen .
killFocus() : Takes input focus away from the Get object
reset() : Resets the internal state information of the Get
setFocus() : Gives input focus to the Get object
undo() : Sets the Get variable back to Get:original
unTransform() : Converts character value to its original data type
updateBuffer() : Updates the editing buffer and redisplays the Get
varGet() : Returns the current value of the Get variable
varPut() : Sets the Get variable to the passed value

Cursor Movement Methods :

end() : Moves the cursor to the rightmost position
home() : Moves the cursor to the leftmost position
left() : Moves the cursor left one character
right() : Moves the cursor right one character
toDecPos() : Moves the cursor to the immediate right of Get:decPos
wordLeft() : Moves the cursor left one word
wordRight() : Moves the cursor right one word

Editing Methods :

backspace() : Moves the cursor to the left and deletes one character
delete() : Deletes the character under the cursor
delEnd() : Deletes from current cursor position to the end of the Get
delLeft() : Deletes the character to the left of the cursor
delRight() : Deletes the character to the right of the cursor
delWordLeft() : Deletes the word to the left of the cursor
delWordRight() : Deletes the word to the right of the cursor

Text Entry Methods :

insert() : Inserts characters into the editing buffer
overStrike() : Overwrites characters in the editing buffer

Menu System :

@…PROMPT :

Paint a menu item and define a message

@ <nRow>, <nCol> PROMPT <cMenuItem>
     [MESSAGE <cExpression>]

MENU TO :

Execute a lightbar menu for defined PROMPTs

     MENU TO <idVar>

          MENUMODAL :

Activate a top bar menu

         MENUMODAL(<oTopBar>, <nSelection>, <nMsgRow>,
             <nMsgLeft>, <nMsgRight>, <cMsgColor>) --> MenuID

SET MESSAGE :

Set the @…PROMPT message line row

SET MESSAGE TO [<nRow> [CENTER | CENTRE]]

SET INTENSITY :

Toggle enhanced display of GETs and PROMPTs

SET INTENSITY ON | off | <xlToggle>

SET WRAP :

Toggle wrapping of the highlights in MENUs

SET WRAP on | OFF | <xlToggle>

Browse Classes :

TBrowse :

Provides objects for browsing table-oriented data.

Description :

A TBrowse object is a general purpose browsing mechanism for table-oriented data. TBrowse objects provide a sophisticated architecture for acquiring, formatting, and displaying data. Data retrieval and file positioning are performed via user-supplied code blocks, allowing a high degree of flexibility and interaction between the browsing mechanism and the underlying data source. The format of individual data items can be precisely controlled via the TBColumn data retrieval code blocks; overall display formatting and attributes can be controlled by sending appropriate messages to the TBrowse object.

A TBrowse object relies on one or more TBColumn objects. A TBColumn object contains the information necessary to define a single column of the browse table (see TBColumn class in this chapter).

During operation, a TBrowse object retrieves data by evaluating code blocks. The data is organized into rows and columns and displayed within a specified rectangular region of the screen. The TBrowse object maintains an internal browse cursor. The data item on which the browse cursor rests is displayed in a highlighted color. (The actual screen cursor is also positioned to the first character of this data item.)

Initially, the browse cursor is placed on the data item at the top left of the browse display. Messages can then be sent to the TBrowse object to navigate the displayed data, causing the browse cursor to move. These messages are normally sent in response to user keystrokes.

New data is automatically retrieved as required by navigation requests. When navigation proceeds past the edge of the visible rectangle, rows or columns beyond that edge are automatically brought into view. When new rows are brought into view, the underlying data source is repositioned by evaluating a code block.

Note: TBrowse objects do not clear the entire window before output during redisplay operations. Part of the window may still be cleared when data from the existing display is scrolled.

Class Functions :

TBrowseNew() :

Create a new TBrowse object

 TBrowseNew(<nTop>, <nLeft>, <nBottom>, <nRight>)
 --> objTBrowse

Returns a new TBrowse object with the specified coordinate settings. The TBrowse object is created with no columns and no code blocks for data positioning. These must be provided before the TBrowse object can be used.

TBrowseDB() :

Create a new TBrowse object for browsing a database file

 TBrowseDB(<nTop>, <nLeft>, <nBottom>, <nRight>)
 --> objTBrowse

Returns a new TBrowse object with the specified coordinate settings and default code blocks for data source positioning within database files. The default code blocks execute the GO TOP, GO BOTTOM, and SKIP operations.

Note that TBrowseDB() creates an object with no column objects. To make the TBrowse object usable, you must add a column for each field to be displayed

Exported Instance Variables:

autoLite : Logical value to control highlighting
cargo : User-definable variable
colCount : Number of browse columns
colorSpec : Color table for the TBrowse display
colPos : Current cursor column position
colSep : Column separator character
footSep : Footing separator character
freeze : Number of columns to freeze
goBottomBlock : Code block executed by TBrowse:goBottom()
goTopBlock : Code block executed by TBrowse:goTop()
headSep : Heading separator character
hitBottom : Indicates the end of available data
hitTop : Indicates the beginning of available data
leftVisible : Indicates position of leftmost unfrozen column in display
nBottom : Bottom row number for the TBrowse display
nLeft : Leftmost column for the TBrowse display
nRight : Rightmost column for the TBrowse display
nTop : Top row number for the TBrowse display
rightVisible : Indicates position of rightmost unfrozen column in display
rowCount : Number of visible data rows in the TBrowse display
rowPos : Current cursor row position
skipBlock : Code block used to reposition data source
stable : Indicates if the TBrowse object is stable

Exported Methods:

Cursor Movement Methods :

down() : Moves the cursor down one row
end() : Moves the cursor to the rightmost visible data column
goBottom() : Repositions the data source to the bottom of file
goTop() : Repositions the data source to the top of file
home() : Moves the cursor to the leftmost visible data column
left() : Moves the cursor left one column
pageDown() : Repositions the data source downward
pageUp() : Repositions the data source upward
panEnd() : Moves the cursor to the rightmost data column
panHome() : Moves the cursor to the leftmost visible data column
panLeft() : Pans left without changing the cursor position
panRight() : Pans right without changing the cursor position
right() : Moves the cursor right one column
up() : Moves the cursor up one row

Miscellaneous Methods :

addColumn() : Adds a TBColumn object to the TBrowse object
colorRect() : Alters the color of a rectangular group of cells
colWidth() : Returns the display width of a particular column
configure() : Reconfigures the internal settings of the TBrowse object
deHilite() : Dehighlights the current cell
delColumn() : Delete a column object from a browse
forceStable() : Performs a full stabilization .
getColumn() : Gets a specific TBColumn object
hilite() : Highlights the current cell
insColumn() : Insert a column object in a browse
invalidate() : Forces redraw during next stabilization
refreshAll() : Causes all data to be refreshed during the next stabilize
refreshCurrent() : Causes the current row to be refreshed on next stabilize
setColumn() : Replaces one TBColumn object with another
stabilize() : Performs incremental stabilization

TBColumn :

Provides the column objects TBrowse objects.

Description :

A TBColumn object is a simple object containing the information needed to fully define one data column of a TBrowse object (see the TBrowse reference in this chapter). TBColumn objects have no methods, only exported instance variables.

Class Function :

TBColumnNew() :

Create a new TBColumn object.

TBColumnNew(<cHeading>, <bBlock>) --> objTBColumn

Exported Instance Variables :

block : Code block to retrieve data for the column
cargo : User-definable variable
colorBlock : Code block that determines color of data items
colSep : Column separator character
defColor : Array of numeric indexes into the color table
footing : Column footing
footSep : Footing separator character
heading : Column heading
headSep : Heading separator character
width : Column display width

Example :

This example is a code fragment that creates a TBrowse object and adds some TBColumn objects to it:

USE Customer NEW
//
// Create a new TBrowse object
objBrowse := TBrowseDB(1, 1, 23, 79)
//
// Create some new TBColumn objects and
// add them to the TBrowse object
objBrowse:addColumn(TBColumnNew( "Customer", ;
                    {|| Customer->Name} ))
objBrowse:addColumn(TBColumnNew( "Address", ;
                    {|| Customer->Address} ))
objBrowse:addColumn(TBColumnNew( "City", ;
                    {|| Customer->City} ))
.
. <statements to actually browse the data>
.
CLOSE Customer

For a simple and working sample look at here.

Browse by IDE

BROWSE is a control a few complicated than others. However HMG-IDE successfully support it.

In this sample we will build a Browse based application in a few steps using HMG-IDE.

Step – 1 : Make a folder for this sample.

Step – 2 : Copy TEST.DBF and TEST.DBT from \hmg\SAMPLES\TUTORIAL folder to your new folder.

Step – 3 : Run HMG-IDE and chose “New Project”.

IDE will ask you location and name for the new project; denote the folder you had build in the first step and give a name, say “IDEBrowse”.

IDE will build a new main module named “Main.Prg” and a new main form named “Main.fmg”

Step – 4 :

Double click “Main.prg” in the “Modules” tab of “Project Browser” window for editing this “main” module:

IDE send this module (.prg) file to your programing editor.

You will see your main program written by IDE :

#include <hmg.ch>

Function Main
 Load Window Main
 Main.Center
 Main.Activate
Return

Step – 5 :

Since BROWSE is a table based control, we must have a table and files opening/closing routines; these aren’t duties of IDE.

So add this two little procedures to the main.prg for opening and closing table:

Procedure OpenTables()
Use Test Shared
Return
Procedure CloseTables()
Use
Return


 Step – 6 :

Now, it’s time for making some arrangements on the form:

Title :

– Click  “Object Inspector [Main.Fmg]\Form\Properties\Title” :


– Give a “Title”, say “IDE Browse Sample” to form :


On Init Procedure :

– By clicking “Object Inspector [Main.Fmg]\Form\Events\OnInit” ;


– Assign OpenTables() procedure name to this event:

On Release Procedure :

– By clicking “Object Inspector [Main.Fmg]\Form\Events\OnRelease”;

– Assign CloseTables() procedure name to this event:

Step – 7 :

Now, we can place BROWSE control in our form:

– Click BROWSE button in the Toolbox:

– Then click anywhere in the form :

– Re-size control by dragging “resize” mark at the lower rigth corner :


 – If required, change placement of control by using “replace” mark ( at the upper-left corner )


– By using these two marks, you can place control in the form whatever you like:


 Step – 8 :

And now, we will make some arrangements on the BROWSE control :

After activating ( by clicking on it ) BROWSE control;

By selecting “Object Inspector[Main.Fmg]\Browse_1\Properties” give these properties to Browse_1 control:

– “Fields” property :

{‘Test->Code’,’Test->First’,’Test->Last’,’Test->Birth’,’Test->Married’,’Test->Bio’}

– “Headers” property :

{ ‘Code’, ‘First Name’, ‘Last Name’, ‘Birth Date’, ‘Married’, ‘Biography’ }

– “Widths” property :

{ 150, 150, 150, 150, 150, 150 }

– “Work Area” property :

Test

Note that “array” properties requires open and close curly-braces (‘{}’),  character properties doesn’t requires quotation marks (“”).

.
If you want allow editing  abilities to user, you have change default values (.F.) of these properties to .T.

 ALLOWEDIT
 ALLOWAPPEND
 ALLOWDELETE
 

Last Step :

That is All !

Click “Run” button ( or select “Run” from Project menu or simply press F5 key) for see results :


You have now a BROWSE based HMG application generated  by IDE.

When you use “Run” command or attempt to closing   your form by clicking “X” button, IDE ask you saving it ( if any change you have made ). You may also use Project\Save Form menu command.

Since IDE is a “Two-Way Form Designer”, you can edit .fmg files by double clicking its name in the “Forms” tab   of “Project Browser” window.

And since .fmg files are pure HMG source code, you can open a .fmg file by your editor to see  form source  code generated by IDE. Inspecting this code may be useful for better understanding and learning HMG.

You can also edit this file manually, but under your own risk ! Some modifications may not suitable to the standards of Form Designer.

HMG IDE Basics

HMG-IDE

Harbour MiniGUI Integrated Development Environment is a comprehensive and highly sophisticated project management and form design tool. It is also extremely facilitated to easily use. HMG-IDE has four windows:

  1. Main Window (Control Panel),
  2. Project Browser,
  3. Object Inspector and
  4. Form Design Board.

You may use IDE for project management, for form design purpose or for both.

HMG-IDE Main Window ( Control Panel )

The main window is constituted on a menu bar and a tool box, having many command buttons with descriptive tool tips. This tool box may consider two sections:  project management tools and form design tools. Form design tools are divided into a “main controls” area and a “builders” area.

The project management tools allow you all project based works with interactive manner. This includes building and running projects without complex batch processing and environment configuration tasks. Project management tools buttons are:

Project Management Buttons

Project Browser

The Project Browser window’s tabs: Project Browser Tabs

  1. Modules,
  2. Forms,
  3. Resources,
  4. Reports,
  5. Configuration,
  6. Include and
  7. Tables

You can view, select and inspect all project elements in this window. Whenever you add or exclude a project element (module (program source file), form, resource, report …), IDE automatically updates the project browser.

Object Inspector 

The Object Inspector window is for view and change properties and events of GUI elements in your forms. Object Inspector

You can observe and modify properties and events value of graphical elements of your form in the Object Inspector window.

Form Window

The form window is a chalk board for designing forms and directing its graphical elements. New or existing, when you open a form, this windows also opened by IDE. With only two clicks you can easily place controls on your form: the first on desired button of control in form design tool box and the second one is anywhere in form you like. After placed, you can resize and change its place by dragging.

HMG IDE FormWindow

Controls :

In GUI programming jargon, GUI elements are called as control. HMG offers tons of controls and HMG-IDE successfully supports all of them.

At the beginning you have a form (window) and then you can easily replace any control onto this form. Simply click button of control to used, and then click any place on form to indicate placement (upper left corner) of control.

In short, you can build a complete form by only two clicks for each control. For example, suppose that we want putting an image control on our form; the button of image control is here:

First click this “image” button the toolbar of HMG-IDE, and then click anywhere in the form. This clicked point in the form, will be left upper corner of control; in this case : image.

This isn’t image itself, only a place-holder for image control.

When you placed a control in your form, IDE assign default values to its properties and events.

You can change the placement of control dragging by mouse with upper left corner ( point no: 1) of this place-holder and resize it with lower down corner ( point no: 2 ).

As first placed and whenever you select (click) any control in the form, this control come active in Object Inspector.   And as following on Object Inspector, every control has many properties and events. Since IDE assigned default values to all properties and events of that control, we don’t have learning meaning of all of them, at least at the beginning.

Whenever you change these values interactively on the form, IDE also updates them internally. You can observe and modify them in the Object Inspector window. HMG forms are designed “two way” manner. Saved in a readable format; in fact they are pure HMG source codes, neither binary nor cryptic. You can separately open,  inspect and also modify them. When opened by IDE, they are automatically converted to visual form.

Yes, you can edit .fmg file out of HMG, via any text editor when necessary. But please be careful, some points may be left out standards of IDE, though they have legal syntax.

IDE Toolbar :

IDE Toolbar ( indicated in above image by “Form Design Tools” ) has a button for each control. Every button has its own tool-tip; when mouse cursor keep over a button, tool-tip become visible and say name of this control.

Anyway here long name of all control is here:

Builders :

HMG-IDE has several builders for some relatively complex controls: You can use these features for placing  appropriate controls in your form: