Relations and differences …

Q: What are relations and differences between this 3 services you’ve been provided: Harbour Compiler, Harbour HMG, HMG-IDE. We need to know exactly when and why use them?

Short Answer :

Harbour : Is a multi-platform open source compiler for xBase programming language, as a continuation of Clipper Programming Language. You can use Harbour with or without HMG; as pure console mode or with another GUI facility.

HMG / MiniGUI : is also an open source GUI Library developed by Roberto Lopez, for Harbour Compiler, designed exclusively Windows platform only. You can’t use HMG without Harbour.

HMG-IDE is a free utility developed by Roberto Lopez, builder of HMG. An Integrated Development Environment including a project builder and a form designer; plus a DB Manager. You can use HMG library with or without HMG-IDE.

As you easily see and cited here with this three products we have a comprehensive and complete Windows programming toolkit or Clipper for Windows ➡

Long Answer

An explanation about HMG …

An explanation about Harbour, HMG and HMG-IDE

By Sri  Rathinagiri » Mon Sep 08, 2014 12:44 pm

Clipper programmers sometimes find it difficult to accommodate with HMG. The reason is the difference between TUI (Text User Interface) and GUI. In GUI, the program control is in the hands of the user and it is event driven. User can click on anything (say minimize button, maximize button, even another program running behind or any controls). So, it is our duty to design the whole window and wait for user’s action and write procedures for each and every action of the user.

GUI offers many innovative controls like Grid, Combobox, Button, Spinner etc., as against only textbox in TUI. So, we have to eventually accommodate events for all these controls.

Now, coming to HMG as not only a GUI library but a bundle of all. Even though HMG is directly based on the latest Harbour versions, HMG comes as a bundle. You need not install any other software to build a windows application. Full stop. 🙂 It contains the GUI library, PRG compiler, C Compiler and all the supporting software products to successfully build an application.

People (at least me) sometimes misunderstand GUI and OOP as one and the same. GUI and OOP are different and independent to each other. GUI can be made to work with or without OOP and vice versa. HMG is based on Win32 API system. Win32 API system works on handles and hooks. Every window/control in HMG is provided with a handle (like the file handle in clipper) and events are hooked on that particular handle. Once any hooked event is fired by the user (say a click of a button) immediately Win32 API searches for a CallBack function which is provided by the developer via HMG. The beauty of HMG would be, the developer is made free from handling all these internal affairs, handles, hooks and callback procedures. Instead he can concentrate on what is to be done if the event is fired.

You will be astonished to see how a ‘define window’ statement in HMG invokes 100s of lines of Harbour and C code. Please see the source folder of HMG if you want to know in detail.

Again, the advantage of HMG is, you need not include any dlls with your executable code as it is based on Win32 API. The application would run in XP to Windows version 8 (even in Windows 97 some cases).

Now coming to your questions.

1) How to get a lot of of source codes containing of samples to handle screen-menus ; from basic up to complex/advanced screen-menus?

To answer this questions, pls help us by showing links which permit us to download. And by sharing your source-code available for public.

Screenshoot attached herein, is a sample screen handle we need to implement on our application, ASAP. Being programmers for long time, we need any advanced skill in order to satisfy our users/clients currently still using our DOS-apps-versions.

You can start with Your HMG Directory\SAMPLES\Basics\TUTORIAL folder. It contains various tutorials for basic programmers. Then you can see basic and controls sub-folders of samples. I don’t think that any advanced skill set is required to satisfy our existing DOS clients. Actually ther will be happy to update their programs to Windows version as it is user friendly and more flexible.

2) How to avoid one app/EXE is double-run by users in the same computer?

This problem never arise under DOS who own a single window. I noticed when exercising HMG-ID (executing IDE.EXE) to build project, the RUN (F5) function fails to detect the problem. that’s way HMG-IDE made run-time error as if the mistake came from source program.

Yes, it is a valid point. In HMG-IDE previous version there was an error marking ‘Is the program still running?’. I don’t know what happened to that in the recent versions. I will request Claudio to look into this. Thanks for reporting.

3) Why stable version release from official Harbour-Project differ from this forum?

The project says the latest stable version is 3.0.0. while this forum says HMG 3.3.1. Any clarification in this matter is urgently needed to avoid confusion.

Because they are entirely different projects. As I have discussed earlier, HMG is based on Harbour. But it is a bundle by itself. Some major implementations have been made after the versions HMG 3.0. Introducing Unicode in 3.1. Made it to a stable version in 3.2. And the latest and significant achievement is HMG in 64 Bits, which made it to 3.3 series.

HMG Extended is also developed and released parallelly and they have their own version numbering system.

IMHO, we can use the latest stable versions for the development.

4) Pls help us describe what the differences between this 3 services you’ve been provided: Harbour Compiler, Harbour Mini GIU, Harbour-IDE. We need to know exactly when and why use them?

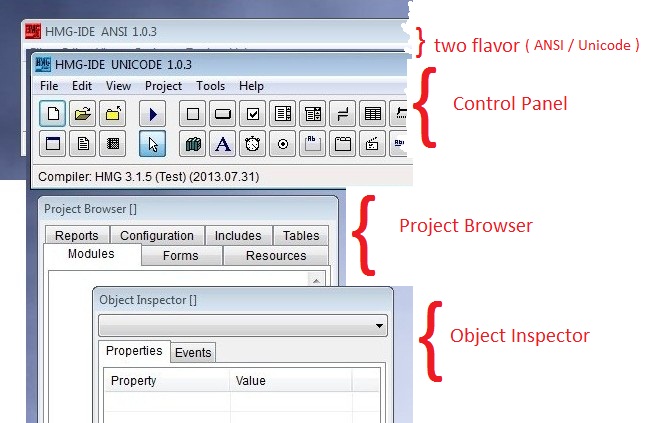
Harbour compiler is the core. Habour MiniGUI is the Win32 wrapper library to access the GUI aspects of the programs. HMG IDE is a tool to develop and build our software in Harbour MiniGUI.

You can use simply Harbour if you need only console mode. If you want GUI support, you can use Harbour MiniGUI and its build.bat ( even without using HMG IDE at all).

If you need Forms Designer and an easy build system, you can use HMG IDE which can co-ordinate your forms, database, resources (icons, pictures etc) and linking other third party libraries.

Sri Rathinagiri
Sivakasi, India

~~~~~~~~~~~~~~~~~~~~~~~~~~~~~~~~~~~~~~~~~~~~~~~~~~~~~~~~~~~~~~~~~~~~~~~~~~~~~

Courtesy of author, this article borrowed from here.

HMG-IDE In Short

HMG-IDE Harbour MiniGUI Integrated Development Environment is a comprehensive and highly sophisticated project management utility. It is also extremely facilitated to easily use.

It’s possible to build and manage an entire project from scratch under this utility; without needing cryptic batch command ( .bat ) file, without interesting endless compiler / linker switches, etc.

HMG-IDE is more than a project maker :

  •  A clever form editor
  •  A database files ( Tables ) manager
  •  A report builder / editor

HMG-IDE_InShort

HMG-IDE come as two flawor : ANSI and Unicode versions. Dont worry about it, this two version works almost exectly same; only difference is Unicode supoort. You may use either depending on either your need to Unicode or not.

HMG-IDE has four part :

Control Panel : This main window is constituted on a menu bar and a tool box, having many command buttons with descriptive tool tips.

Project Browser : You can view, select and inspect all project elements in this window. henever you add or exclude a project element (module (program source file), form, resource, report …), IDE automatically updates the project browser.

Object Inspector : This window is for view and change properties and events of GUI elements in your forms.

Form design board : A chalk board for designing forms and directing its graphical elements.


How I can make an .exe ?

Making .exe (executable) means building application. So you may find answer of this question here.

Anyway I will work to re-describe the process by a simpler way:

Almost every HMG sample have two .bat file: build.bat and ide.bat and using these files are quite simple:

Open command / console window, go to directory ( by CD command) of the sample you want to compile, and enter a simple command :

build demo <- will build demo.exe from demo.prg
or
ide demo <- open HMG-IDE with demo.prg

( IDE will wait your “run” command by pressing “run” button.)

So you may use this two .bat files for your projects too.

Copy build.bat and / or ide.bat to your working <dir>, and modify them this way:

build.bat :

call c:\hmg\build.bat <myProject> | <myProgram>

ide.bat :

c:\hmg\ide\ide.exe <myProject> | <myProgram>

Note : in this syntax “|” means “or”; you don’t need enter both project and program file names nor this sign; simply enter either one or other.

Change:

– “c:\hmg\” depending on your environment (installation); such as c:\hmg.3.1.1\ or antything else;

– <myProject> | <myProgram> to your project / program file name.

Project file is a text file with “.hbp” extension and contains a list of name(s) of your program file(s).

After building such .hbp file, you may open it from directly HMG-IDE ( by “open project command) and again, you may build your .exe by  pressing “run” button.

HMG-IDE as a DB Manager

HMG-IDE as a Database Manager


Beside other capabilities, HMG-IDE is a clever and practical database manager. You can easily build, open, browse and modify structure of tables (.dbf files).

Building a new table :

1° : Select “New Table” in Project menu :

NewTable

2°  “Table Name” input box will be open; enter a name for new table and press “Ok”:

 NewTableName

3° “Table Modify” page will be open :

TableModify

Define here structure of your new table.

After pressing “Save” button, you will see name of new table in “Tables” tab of project browser:

TablesTab

4° You can use the table by double-click its name in the “Tables” tab of project browser; “Table Edit” page will be open:

 TableEdit

 5° As seen, you can browse or modify structure of the table by pressing appropriate button. Modify structure page is same as the above 3.th step. Browse page is like this :

TableBrowse

Open an existing table :

If your table is in same folder of project ( .hbp) file IDE will open it automatically.  For open tables from other places use “Import File” option of project menu :

ImportFile

In this case, HMG-IDE will copy this table to your project folder.

Basic Controls – 3

( Status Bar, Check Box )

We are continuing with Viva_HMG.hbp, Main.prg and Main.fmg.

While using a table and while navigating between its records, we need some extra info to show to user: Name of table, current record and record count in the table. So user always feels comfortable by knowing where is he / she; which table, which record?

The status bar control is convenient for this purpose and though this is a quite simple control, IDE has a builder for it: Status bar builder.

When you choose this builder ( after open the .fmg file by IDE of course ), a dialog box will open:

By using this dialog box we can define a status bar. We can prefer define status bar manually too:

    DEFINE STATUSBAR FONT "Tahoma" SIZE 9
        STATUSITEM "" WIDTH 300
        STATUSITEM "" WIDTH 40
        DATE         WIDTH 90
        CLOCK             WIDTH 90
    END STATUSBAR

After define status bar, we need assign values to its items. We don’t need assign values to DATE and CLOCK items, because these items will be updated by system (HMG) automatically.

First a little procedure :

PROCEDURE InitEdit()

EditReco.StatusBar.Item( 1 ) := cTableFNam

ReadData()

RETURN // InitEdit()

Change ON INIT event of  EditReco form from ReadData() to InitEdit(.

And add this line at end of ReadData() procedure.

 EditReco.StatusBar.Item( 2 ) := LTRIM( STR( RECN() ) ) + "\" + ;
                                 LTRIM( STR( LASTREC() ) )

Let’s look at the result :

Whenever active record change, Item( 2 ) of Status Bar will be updated ( 5/25 ) in above picture.

In this step, user must use “Save” button every time current record edited.  Whereas “Read” process is different; whenever current record changed, values of text boxes automatically updated. What about automatic save? May be, we can do this; but user may don’t want such automation. Asking a question like “Do you want save?” every change doesn’t a good way.

The better way may be: put a control to form such “Auto save” with On / Off option.

Yes, fortunately we have such control: Check Box.

We can replace a Check Box control to EditReco form with chbAutoSave name and Auto Save caption:

Now, how we will implement Auto Save process?.

By adding a little IF clause to ACTION events of navigation buttons:

Top : (IF(EditReco. chbAutoSave.Value , SaveData(), ), DBGOTOP(), ReadData() )

Next : (IF(EditReco. chbAutoSave.Value , SaveData(), ), DBSKIP(), ReadData() )

Previous : ( IF(EditReco. chbAutoSave.Value , SaveData(), ), DBSKIP( -1 ), ReadData() )

Last : (IF(EditReco. chbAutoSave.Value , SaveData(), ), DBGOBOTTOM(), ReadData() )

To be continued …

Download source files

Basic Controls – 1

( Image, Label and Button )

We are continuing with Viva_HMG.hbp, Main.prg and Main.fmg. First, let’s enlarge our form: width: 650, height: 550; and then place an image: First click “image” button the toolbar of HMG-IDE, and then click anywhere in the form. This clicked point in the form, will be left upper corner of control; in this case : image. IDE always first places controls with its default values. Our image is 405 x 340 pixel size:

We need assign a size to image control so it can hold properly our image. We can manually set these values and assign name of image file:

Background color of our form didn’t well-matched with this image. Let’s change it to white:

In this step, if we run the program we will see like this :

The STRETCH option of IMAGE control allows assigning size values to the control other than original image sizes. In this case quality of image may decrease. We need also avoiding distortion too; that is keeping fixed aspect ratio of image.

By assigning same width / height values of form and image; we can use an image as back-ground image of form. But in this case we can’t place other control onto image: because controls must not be overlap to each other. Under certain circumstances system not obstructs this. But the beneath control can’t seen.

The LABEL control is an exception of this rule by TRANSPARENT option. If a label is transparent, the beneath control may be seen partially.

Let’s add a label to our form:

The big “A” symbol in the toolbar of IDE represent LABEL. First click this button and then top of our form:

The placeholder of LABEL is primitive situation for now. We have added a new and adjusted  both to our needs:


If we built and run our project after set these values, appearance will be like this:

Since two controls (labels) have been overlapped, constructing this “shadow” effect will be a few painful. You can edit .fmg file out of HMG, via any text editor when necessary.

Labels probably are most used controls in GUI programming. This control simply displays any text onto form. For xBase programmers we can say this is GUI counterpart of @ …,… SAY command. As all other GUI controls, we use coordinate system to indicate placement of control. In addition we can set size ( width, height ), back and fore color values, font properties and others as well as we need.

Labels also have ALIGNEMENT property with LEFT, RIGHT and CENTER option. In this sample used LEFT.

In addition, LABEL control supports ACTION event too. This means you can instruct a LABEL control to do an action when user clicked it; same as BUTTON.

Last control to use in this sample is button.

Beside menus, buttons are handy controls for doing an action when user clicked. Let’s see how :

The button for BUTTON in the IDE Tool Bar is this:

As precedents, one click to this button and another one to form, under image:

And two more :

Now we can tailor these buttons to our needs:

First let’s change names and captions given by IDE:

btnOpenFile, btnEditRec and btnExit to names and Open File, Edit Record and Exit to captions, consecutively:

It’s time to assign ACTIONs to this buttons.

MsgInfo( “Open File”) to ACTION of btnOpenFile

MsgInfo( “Edit Record”) to ACTION of , btnEditRec,

ThisWindow.Release to ACTION of btnExit.

And, RUN of course …

Test ACTIONs of buttons by clicking: first two will repeat the sentences in their captions via MsgInfo() function  and the last will terminate program. Yes, we are using RELEASE method to the main window for terminate running program, instead of QUIT or CANCEL commands.

That’s all for now !

Downloads source files

Working with IDE

Since HMG-IDE is an Integrated Development Environment, it’s possible building an entire project from scratch under HMG-IDE.

But this doesn’t mean “without coding”.

So, we can develop all GUI necessities of our project via HMG-IDE; but what, always we will need some little coding.

Then we can begin our project by building a project file. This is the very first and the easiest step:

Simply run IDE.exe and then select “New Project”.

When IDE ask, select (or build a new) a working folder and give a name (say Viva_HMG) to the project. .hbp extension will be assigned by IDE to project file.

Whenever IDE build a new project, automatically build and open a module file with name Main.prg and a form file with name Main.fmg.

Module file open by your text editor and form file open by IDE itself.

The content of your module file will be like this :

#include <hmg.ch>
Function Main
        Load Window Main
        Main.Center
        Main.Activate
Return

Basic rules :

– Every HMG project have one ( and only one ) “MAIN” procedure / function

– For using GUI controls, every HMG project have one ( and only one ) “MAIN” form.

So, names of both module and form files are “Main“.

File names doesn’t mandatory;

– only name of first procedure / function of first module file must be “Main” and

– “Window Type” property of one form must be “MAIN“.

You can see “module” tab of Project Browser window “(Main)” sign adjacent to the Main.prg and at the bottom line of “Properties” tab of Object Inspector “Window Type” property of “Main” form already set “MAIN” by IDE.

Now, we can work on our first form.

First we can give a name to it.

But what happening?

There isn’t “Name” in the properties list of our form !

Yes, this is correct; because:

– Basic rule 3: Every HMG form has their own name. Only exception is: a form to be LOAD, has a unchangeable name: TEMPLATE.

In other hand, you give an “alias” to a loaded form. The way of this is using “AS” close in the LOAD command. FE:

Load Window Main AS frmIDEBS_01

In this case you have change “Center” and “Activate” commands too :

frmIDEBS_01.Center
frmIDEBS_01.Activate

If you don’t use an “alias” in that way, you will use in all references of form by its file name; in this example : “Main”.

Now, its time to give a “Title” to the form.

For this, we will use “TITLE” property of form:

Double click “Title” and give a title in the open Input Box, say “It’s a Wonderful Life”

We can change easily background color of form:

Double click BackColor in the properties list.

Click “Custom“.

In the Color Select Form select your favorite background color or simply enter these tree values. : 64, 220, 210

Press RUN button and look to your application in work.

That’s all !  

Download source files

Building a HMG application

How I can build a HMG applications ?

Build.Bat / HMG-IDE

– BUILD.BAT

The easiest way is to use the ‘build.Bat’ file located at \hmg folder.

Usage:

Build [/i|/r|/d|/cs|/ci/cr] <PrgFile> | <filelist.hbp> [config.hbc]

[/i] : incremental build

[/r] : incremental build (rebuild all)
[/cs] : Console/mixed mode (std build)

[/ci] : Console/mixed mode (incremental build)

[/cr] : Console/mixed mode (incremental rebuild all)
[/d] : Debug mode (gui and console)

<filelist.hbp> : A text file with .hbp extension containing a source list.

<configfile.hbc>: A text file with configuration parameters as additional libs, include paths and lib paths.

<configfile.hbc> Syntax:

incpaths = incpath1 incpath2 … incpathn

libpaths = libpath1 libpath2 … libpathn

libs = lib1 lib2 … libn

mt = yes (multi-threading support)
– library names must not include ‘lib’ prefix nor ‘.a’ extension.

– ‘build.bat’ will create an ‘error.log’ file in the app folder when build process ends with an error condition.

– <.hbc> files in the current folder are automatically processed.

Sample: \HMG\SAMPLES\MULTI.PRG

– HMG IDE

This programming environment allows visual form editing and application build.

Environment settings (HMG Folder, Program Editor, etc.) are stored in ‘.ini’ files, located at IDE folder.You can interactively change default settings (Main Menu->Tools->Preferences).

In IDE, all build customizations must be handled by the user from ‘Configuration’ (project browser) tab. It is direct edit of the project .hbc file. Look at hbmk2 help for details. By default two gt drivers are ALWAYS linked: GTGUI (as default) and GTWIN (Windows console). To create console/mixed mode apps. you only must add this line to your main .prg: HB_GT_WIN_DEFAULT

When upgrading HMG, please, clean previous build data from your projects using incremental building. From command line, you must add the -clean parameter. From IDE, use the ‘Reset project incremental data’ option from the project menu.

~~~~~~~~~~~~~~~~~~~~~~~~~~~~~~~~~~~~~~~~

Note:  This post borrowed from official HMG Docs.

Browse by IDE

BROWSE is a control a few complicated than others. However HMG-IDE successfully support it.

In this sample we will build a Browse based application in a few steps using HMG-IDE.

Step – 1 : Make a folder for this sample.

Step – 2 : Copy TEST.DBF and TEST.DBT from \hmg\SAMPLES\TUTORIAL folder to your new folder.

Step – 3 : Run HMG-IDE and chose “New Project”.

IDE will ask you location and name for the new project; denote the folder you had build in the first step and give a name, say “IDEBrowse”.

IDE will build a new main module named “Main.Prg” and a new main form named “Main.fmg”

Step – 4 :

Double click “Main.prg” in the “Modules” tab of “Project Browser” window for editing this “main” module:

IDE send this module (.prg) file to your programing editor.

You will see your main program written by IDE :

#include <hmg.ch>

Function Main
 Load Window Main
 Main.Center
 Main.Activate
Return

Step – 5 :

Since BROWSE is a table based control, we must have a table and files opening/closing routines; these aren’t duties of IDE.

So add this two little procedures to the main.prg for opening and closing table:

Procedure OpenTables()
Use Test Shared
Return
Procedure CloseTables()
Use
Return


 Step – 6 :

Now, it’s time for making some arrangements on the form:

Title :

– Click  “Object Inspector [Main.Fmg]\Form\Properties\Title” :


– Give a “Title”, say “IDE Browse Sample” to form :


On Init Procedure :

– By clicking “Object Inspector [Main.Fmg]\Form\Events\OnInit” ;


– Assign OpenTables() procedure name to this event:

On Release Procedure :

– By clicking “Object Inspector [Main.Fmg]\Form\Events\OnRelease”;

– Assign CloseTables() procedure name to this event:

Step – 7 :

Now, we can place BROWSE control in our form:

– Click BROWSE button in the Toolbox:

– Then click anywhere in the form :

– Re-size control by dragging “resize” mark at the lower rigth corner :


 – If required, change placement of control by using “replace” mark ( at the upper-left corner )


– By using these two marks, you can place control in the form whatever you like:


 Step – 8 :

And now, we will make some arrangements on the BROWSE control :

After activating ( by clicking on it ) BROWSE control;

By selecting “Object Inspector[Main.Fmg]\Browse_1\Properties” give these properties to Browse_1 control:

– “Fields” property :

{‘Test->Code’,’Test->First’,’Test->Last’,’Test->Birth’,’Test->Married’,’Test->Bio’}

– “Headers” property :

{ ‘Code’, ‘First Name’, ‘Last Name’, ‘Birth Date’, ‘Married’, ‘Biography’ }

– “Widths” property :

{ 150, 150, 150, 150, 150, 150 }

– “Work Area” property :

Test

Note that “array” properties requires open and close curly-braces (‘{}’),  character properties doesn’t requires quotation marks (“”).

.
If you want allow editing  abilities to user, you have change default values (.F.) of these properties to .T.

 ALLOWEDIT
 ALLOWAPPEND
 ALLOWDELETE
 

Last Step :

That is All !

Click “Run” button ( or select “Run” from Project menu or simply press F5 key) for see results :


You have now a BROWSE based HMG application generated  by IDE.

When you use “Run” command or attempt to closing   your form by clicking “X” button, IDE ask you saving it ( if any change you have made ). You may also use Project\Save Form menu command.

Since IDE is a “Two-Way Form Designer”, you can edit .fmg files by double clicking its name in the “Forms” tab   of “Project Browser” window.

And since .fmg files are pure HMG source code, you can open a .fmg file by your editor to see  form source  code generated by IDE. Inspecting this code may be useful for better understanding and learning HMG.

You can also edit this file manually, but under your own risk ! Some modifications may not suitable to the standards of Form Designer.