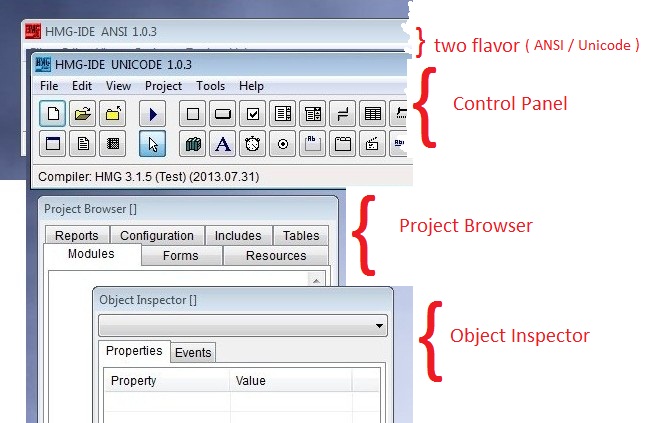
HMG-IDE
Harbour MiniGUI Integrated Development Environment is a comprehensive and highly sophisticated project management and form design tool. It is also extremely facilitated to easily use. HMG-IDE has four windows:

- Main Window (Control Panel),
- Project Browser,
- Object Inspector and
- Form Design Board.
You may use IDE for project management, for form design purpose or for both.
HMG-IDE Main Window ( Control Panel )
The main window is constituted on a menu bar and a tool box, having many command buttons with descriptive tool tips. This tool box may consider two sections: project management tools and form design tools. Form design tools are divided into a “main controls” area and a “builders” area.

The project management tools allow you all project based works with interactive manner. This includes building and running projects without complex batch processing and environment configuration tasks. Project management tools buttons are:

Project Browser
The Project Browser window’s tabs: 
- Modules,
- Forms,
- Resources,
- Reports,
- Configuration,
- Include and
- Tables
You can view, select and inspect all project elements in this window. Whenever you add or exclude a project element (module (program source file), form, resource, report …), IDE automatically updates the project browser.
Object Inspector
The Object Inspector window is for view and change properties and events of GUI elements in your forms. 
You can observe and modify properties and events value of graphical elements of your form in the Object Inspector window.
Form Window
The form window is a chalk board for designing forms and directing its graphical elements. New or existing, when you open a form, this windows also opened by IDE. With only two clicks you can easily place controls on your form: the first on desired button of control in form design tool box and the second one is anywhere in form you like. After placed, you can resize and change its place by dragging.

Controls :
In GUI programming jargon, GUI elements are called as control. HMG offers tons of controls and HMG-IDE successfully supports all of them.
At the beginning you have a form (window) and then you can easily replace any control onto this form. Simply click button of control to used, and then click any place on form to indicate placement (upper left corner) of control.
In short, you can build a complete form by only two clicks for each control. For example, suppose that we want putting an image control on our form; the button of image control is here:

First click this “image” button the toolbar of HMG-IDE, and then click anywhere in the form. This clicked point in the form, will be left upper corner of control; in this case : image.
This isn’t image itself, only a place-holder for image control.
When you placed a control in your form, IDE assign default values to its properties and events.

You can change the placement of control dragging by mouse with upper left corner ( point no: 1) of this place-holder and resize it with lower down corner ( point no: 2 ).
As first placed and whenever you select (click) any control in the form, this control come active in Object Inspector. And as following on Object Inspector, every control has many properties and events. Since IDE assigned default values to all properties and events of that control, we don’t have learning meaning of all of them, at least at the beginning.
Whenever you change these values interactively on the form, IDE also updates them internally. You can observe and modify them in the Object Inspector window. HMG forms are designed “two way” manner. Saved in a readable format; in fact they are pure HMG source codes, neither binary nor cryptic. You can separately open, inspect and also modify them. When opened by IDE, they are automatically converted to visual form.
Yes, you can edit .fmg file out of HMG, via any text editor when necessary. But please be careful, some points may be left out standards of IDE, though they have legal syntax.
IDE Toolbar :
IDE Toolbar ( indicated in above image by “Form Design Tools” ) has a button for each control. Every button has its own tool-tip; when mouse cursor keep over a button, tool-tip become visible and say name of this control.
Anyway here long name of all control is here: 
Builders :
HMG-IDE has several builders for some relatively complex controls:  You can use these features for placing appropriate controls in your form: