RUN

RUN

Run an external program.

Syntax

      RUN <cCommand>

Arguments

<cCommand> Command to execute.

Description

This command runs an external program. Please make sure that you have enough free memory to be able to run the external program. Do not use it to run Terminate and Stay Resident programs (in case of DOS) since that causes several problems.

Examples

      RUN ( "edit " + cMyTextFile )  // Runs an external editor
      RUN command                    // Gives a DOS shell (DOS only)

Compliance

Clipper

Platforms

All

Files

src/rtl/run.c Library is rtl

Seealso

RUN

__Run()

Template

Procedure

Name

__Run()

Category

API

Subcategory

Environment

Oneliner

Run an external program.

Syntax

      __Run( <cCommand> )

Arguments

<cCommand> Command to execute.

Description

This command runs an external program. Ensure that you have enough free memory to be able to run the external program. Do not use it to run ‘Terminate and Stay Resident’ programs (in case of MS-DOS) since that causes several problems.

Note: This function is what the RUN command preprocesses into. It is considered bad form to use this function directly. Use the RUN command instead.

Examples

      __Run( "edit " + cMyTextFile )    // Runs an external editor
      __Run( "command" )                // Gives a OS shell

Compliance

Clipper

Platforms

All

Files

Library is core

Seealso

RUN

Print File

 Send a file to printer

Once builded a file contains lines to print, seems it’s easy sending that file to printer :

COPY FILE command send entire file to another file or a device :

COPY FILE <xcSourceFile> TO <xcTargetFile>|<xcDevice>

Arguments:

<xcSourceFile> is the name of the source file to COPY including the extension.

<xcTargetFile> is the name of the target file including the extension.

<xcDevice> is the name of the device where all subsequent output will be sent. You can specify a device name as a literal character string or a character expression enclosed in parentheses. Additionally, a device can be either local or network. If you COPY TO a non-existing device you create a file with the name of the device. When specifying device names, do not use a trailing colon.

Example :

COPY FILE Prnfile.txt TO LPT1

Remember that above last command doesn’t work under Windows. Almost all Clipper commands and functions are usable in Harbour. You can apply above tests with Harbour too. And the result not changed again. Because problem isn’t compiler, but hardware and OS difference. Harbour offers additional (extended) easy ways to manage printer(s) :

 WIN_PRINTEREXISTS()     (old name: PRINTEREXISTS())
 WIN_PRINTERSTATUS()     (old name: XISPRINTER())
 WIN_PRINTERPORTTONAME() (old name: PRINTERPORTTONAME())
 WIN_PRINTERLIST()       (old name: GETPRINTERS())
 WIN_PRINTERGETDEFAULT() (old name: GETDEFAULTPRINTER())
 WIN_PRINTERSETDEFAULT() (old name: SETDEFAULTPRINTER())
 WIN_PRINTFILERAW()      (old name: PRINTFILERAW())
For sending a file to printer we need only two of above function :
 WIN_PRINTERGETDEFAULT() 
 WIN_PRINTFILERAW()

If we have alredy above Prnfile.txt, sending it to printer seems easy :

 cDefaultPrinter := WIN_PRINTERGETDEFAULT() 
 WIN_PRINTFILERAW( cDefaultPrinter, Prnfile.txt )

Is that all ?

WIN_PRINTFILERAW() returns 1 if sending to printer was successful. If you test this, probably you will get 1.

May be easy like this ?

Unfortunatelly answer is “sometime” …

Although WIN_PRINTFILERAW() said “sending is successful” you may get nothing from printer.

What is meaning of “sometime” ? May be “sometime” in physic ?

In physic no, but in Windows yes !

What ?

Because some printers or some versions of Windows due to something obscure …

… doesn’t support “raw” printing 😦

And a more interesting thing :

You may send your “raw” file to printer via NotePad program of Windows :

cOutFName := "Test_Raw.txt"
cCmd := "NOTEPAD /P " + cOutFName

RUN ( cCmd)

( The “/P” parameter / switch means direct printing;  without NotePad open)

When sent this file by WIN_PRINTFILERAW() to printer noting happen, but by above (notepad) way sending is successful 😦

It seems that NOTEPAD build a “printable” document from our “raw” file and send this document to printer instead of our file.

However, NOTEPAD always add print file name to top, and page number to bottom of document; and treats our “printer control codes” as data, so printers never use them in “right”  way.

Other ways :

EXECUTE FILE "NOTEPAD.EXE" PARAMETERS cFileName

(  EXECUTE FILE   is a HMG command.

SHELLEXECUTE( 0, "print", cFileName )

C5_RUN

 RUN
 Execute a DOS command or program
------------------------------------------------------------------------------
 Syntax

     RUN | !* <xcCommandLine>

 Arguments

     <xcCommandLine> is any executable program including resident DOS
     commands and COMMAND.COM.  It may be specified either as a literal
     string or as a character expression enclosed in parentheses.

 Description

     RUN executes a DOS command or program from within a compiled
     application.  When you RUN a DOS program, Clipper executes another
     copy of COMMAND.COM, passing the DOS command line at the same time.
     This has two implications.  First, you must have enough memory for
     COMMAND.COM (5K for DOS 6.2) and the program you wish to execute.
     Second, COMMAND.COM must be available on the path specified by COMSPEC
     (the default is the root directory of the disk where you boot DOS).  If
     COMMAND.COM is not located on this disk or the disk is changed, SET
     COMSPEC to the new location prior to running the Clipper application.
     Note that SET DEFAULT and SET PATH have no effect on RUN.

     The ! form of the RUN command is provided for compatibility purposes
     only and, therefore, is not recommended.

     Warning!  Do not RUN memory-resident programs from within Clipper
     since you may lose memory when the control returns to your application
     program.

 Examples

     .  This example uses RUN with MEMOREAD() and MEMOWRIT() to create
        a user-defined function that calls a text editor with the current
        memo field:

        lSuccess = EditorMemo("Qedit", "Notes")
        RETURN

        FUNCTION EditorMemo( cEditor, cMemofld )
           IF MEMOWRIT("Clipedit.tmp", &cMemofld.)
              RUN (cEditor + " Clipedit.tmp")
              REPLACE &cMemofld. WITH MEMOREAD("Clipedit.tmp")
              ERASE Clipedit.tmp
              RETURN .T.
           ELSE
              RETURN .F.
           ENDIF

     .  One of the options you may want to give your users is direct
        access to DOS.  Do this with:

        RUN COMMAND

        To make it easier for the user to return to the application program,
        change the DOS prompt in the application batch file like this:

        REM Application Batch File

        ECHO OFF
        PROMPT DOS Access: Type EXIT to return to ;
                 application$_$p$g
        <your application program>
        PROMPT $p$g

        Then, instruct the user to execute the application batch file in
        place of the application .EXE file.

 Files   Library is CLIPPER.LIB.


C5 Commands

 ?|??            Display one or more values to the console
 @...BOX         Draw a box on the screen
 @...CLEAR       Clear a rectangular region of the screen
 @...GET         Create a new Get object and display it
 @...PROMPT      Paint a menu item and define a message
 @...SAY         Display data at a specified screen or printer row and column
 @...TO          Draw a single- or double-line box
 ACCEPT*         Place keyboard input into a memory variable
 APPEND BLANK    Add a new record to the current database file
 APPEND FROM     Import records from a database (.dbf) file or ASCII text file
 AVERAGE         Average numeric expressions in the current work area
 CALL*           Execute a C or Assembler procedure
 CANCEL*         Terminate program processing
 CLEAR ALL*      Close files and release public and private variables
 CLEAR GETS      Release Get objects from the current GetList array
 CLEAR MEMORY    Release all public and private variables
 CLEAR SCREEN    Clear the screen and return the cursor home
 CLEAR TYPEAHEAD Empty the keyboard buffer
 CLOSE           Close a specific set of files
 COMMIT          Perform a solid-disk write for all active work areas
 CONTINUE        Resume a pending LOCATE
 COPY FILE       Copy a file to a new file or to a device
 COPY STRUCTURE  Copy the current .dbf structure to a new database (.dbf) file
 COPY STRU EXTE  Copy field definitions to a .dbf file
 COPY TO         Export records to a database (.dbf) file or ASCII text file
 COUNT           Tally records to a variable
 CREATE          Create an empty structure extended (.dbf) file
 CREATE FROM     Create a new .dbf file from a structure extended file
 DELETE          Mark records for deletion
 DELETE FILE     Remove a file from disk
 DELETE TAG      Delete a tag
 DIR*            Display a listing of files from a specified path
 DISPLAY         Display records to the console
 EJECT           Advance the printhead to top of form
 ERASE           Remove a file from disk
 FIND*           Search an index for a specified key value
 GO              Move the pointer to the specified identity
 INDEX           Create an index file
 INPUT*          Enter the result of an expression into a variable
 JOIN            Create a new database file by merging from two work areas
 KEYBOARD        Stuff a string into the keyboard buffer
 LABEL FORM      Display labels to the console
 LIST            List records to the console
 LOCATE          Search sequentially for a record matching a condition
 MENU TO         Execute a lightbar menu for defined PROMPTs
 NOTE*           Place a single-line comment in a program file
 PACK            Remove deleted records from a database file
 QUIT            Terminate program processing
 READ            Activate full-screen editing mode using Get objects
 RECALL          Restore records marked for deletion
 REINDEX         Rebuild open indexes in the current work area
 RELEASE         Delete public and private memory variables
 RENAME          Change the name of a file
 REPLACE         Assign new values to field variables
 REPORT FORM     Display a report to the console
 RESTORE         Retrieve memory variables from a memory (.mem) file
 RESTORE SCREEN* Display a saved screen
 RUN             Execute a DOS command or program
 SAVE            Save variables to a memory (.mem) file
 SAVE SCREEN*    Save the current screen to a buffer or variable
 SEEK            Search an order for a specified key value
 SELECT          Change the current work area
 SET ALTERNATE   Echo console output to a text file
 SET BELL        Toggle sounding of the bell during full-screen operations
 SET CENTURY     Modify the date format to include or omit century digits
 SET COLOR*      Define screen colors
 SET CONFIRM     Toggle required exit key to terminate GETs
 SET CONSOLE     Toggle console display to the screen
 SET CURSOR      Toggle the screen cursor on or off
 SET DATE        Set the date format for input and display
 SET DECIMALS    Set the number of decimal places to be displayed
 SET DEFAULT     Set the CA-Clipper default drive and directory
 SET DELETED     Toggle filtering of deleted records
 SET DELIMITERS  Toggle or define GET delimiters
 SET DESCENDING  Change the descending flag of the controlling order
 SET DEVICE      Direct @...SAYs to the screen or printer
 SET EPOCH       Control the interpretation of dates with no century digits
 SET ESCAPE      Toggle Esc as a READ exit key
 SET EXACT*      Toggle exact matches for character strings
 SET EXCLUSIVE*  Establish shared or exclusive USE of database files
 SET FILTER      Hide records not meeting a condition
 SET FIXED       Toggle fixing of the number of decimal digits displayed
 SET FORMAT*     Activate a format when READ is executed
 SET FUNCTION    Assign a character string to a function key
 SET INDEX       Open one or more order bags in the current work area
 SET INTENSITY   Toggle enhanced display of GETs and PROMPTs
 SET KEY         Assign a procedure invocation to a key
 SET MARGIN      Set the page offset for all printed output
 SET MEMOBLOCK   Change the block size for memo files
 SET MESSAGE     Set the @...PROMPT message line row
 SET OPTIMIZE    Change the setting that optimizes using open orders
 SET ORDER       Select the controlling order
 SET PATH        Specify the CA-Clipper search path for opening files
 SET PRINTER     Toggle echo of output to printer or set the print destination
 SET PROCEDURE*  Compile procedures and functions into the current object file
 SET RELATION    Relate two work areas by a key value or record number
 SET SCOPE       Change the boundaries for scoping keys in controlling order
 SET SCOPEBOTTOM Change bottom boundary for scoping keys in controlling order
 SET SCOPETOP    Change top boundary for scoping keys in controlling order
 SET SCOREBOARD  Toggle the message display from READ or MEMOEDIT()
 SET SOFTSEEK    Toggle relative seeking
 SET TYPEAHEAD   Set the size of the keyboard buffer
 SET UNIQUE*     Toggle inclusion of non-unique keys into an index
 SET WRAP*       Toggle wrapping of the highlight in menus
 SKIP            Move the record pointer to a new position
 SORT            Copy to a database (.dbf) file in sorted order
 STORE*          Assign a value to one or more variables
 SUM             Sum numeric expressions and assign results to variables
 TEXT*           Display a literal block of text
 TOTAL           Summarize records by key value to a database (.dbf) file
 TYPE            Display the contents of a text file
 UNLOCK          Release file/record locks set by the current user
 UPDATE          Update current database file from another database file
 USE             Open an existing database (.dbf) and its associated files
 WAIT*           Suspend program processing until a key is pressed
 ZAP             Remove all records from the current database file


C5 Flow Control Commands, Statements and Funtions

Commands :

CALL* :

Execute a C or Assembler procedure

CALL <idProcedure> [WITH <exp list>]

CANCEL* :

Terminate program processing

CANCEL* | QUIT

DO* :

Call a procedure

DO <idProcedure> [WITH <argument list>]

QUIT

Terminate program processing

QUIT | CANCEL*

RUN :

Execute a DOS command or program

RUN | !* <xcCommandLine>

SET KEY :

Assign a procedure invocation to a key

SET KEY <nInkeyCode> TO [<idProcedure>]

SET PROCEDURE *:

Compile procedures/functions into the current .OBJ file

SET PROCEDURE TO [<idProgramFile>[.<ext>]]

WAIT* :

Suspend program processing until a key is pressed

WAIT [<expPrompt>] [TO <idVar>]

Statements :

ANNOUNCE :

Declare a module identifier

ANNOUNCE <idModule>

 BEGIN SEQUENCE :

Define a sequence of statements for a BREAK

BEGIN SEQUENCE
       <statements>...
    [BREAK [<exp>]]
       <statements>...
    [RECOVER [USING <idVar>]]
       <statements>...
END [SEQUENCE]

DO CASE :

Execute one of several alternative blocks of statements

DO CASE
   CASE <lCondition1>
       <statements>...
   [CASE <lCondition2>]
       <statements>...
   [OTHERWISE]
       <statements>...
END[CASE]

DO WHILE :

Execute a loop while a condition is true (.T.)

[DO] WHILE <lCondition>
    <statements>...
    [EXIT]
    <statements>...
    [LOOP]
    <statements>...
END[DO]

EXIT PROCEDURE :

Declare an exit procedure

EXIT PROCEDURE <idProcedure>
    [FIELD <idField list> [IN <idAlias>]]
    [LOCAL <identifier> [[:= <initializer>]]]
    [MEMVAR <identifer list>]
    .
    . <executable statements>
    .
[RETURN]

EXTERNAL* :

Declare a list of procedure or user-defined function names

EXTERNAL <idProcedure list>

FOR :

Execute a block of statements a specified number of times

FOR <idCounter> := <nStart> TO <nEnd> [STEP <nIncrement>]
    <statements>...
    [EXIT]
    <statements>...
    [LOOP]
NEXT

FUNCTION :

Declare a user-defined function name and formal parameters

[STATIC] FUNCTION <idFunction>[(<idParam list>)]
    [LOCAL <identifier> [[:= <initializer>], ... ]]
    [STATIC <identifier> [[:= <initializer>], ... ]]
    [FIELD <identifier list> [IN <idAlias>]]
    [MEMVAR <identifier list>]
    .
    . <executable statements>
    .
RETURN <exp>

IF :

Execute one of several alternative blocks of statements

IF <lCondition1>
    <statements>...
[ELSEIF <lCondition2>]
    <statements>...
[ELSE]
    <statements>...
END[IF]

INIT PROCEDURE :

Declare an initialization procedure

INIT PROCEDURE <idProcedure> [(<idParam list>)]
    [FIELD <idField list> [IN <idAlias>]]
    [LOCAL <identifier> [[:= <initializer>]]]
    [MEMVAR <identifer list>]
    .
    . <executable statements>
    .
[RETURN]

NOTE :

Place a single-line comment in a program file

NOTE This is a comment line

PARAMETERS :

Create private parameter variables

PARAMETERS <idPrivate list>

PROCEDURE :

Declare a procedure name and formal parameters

[STATIC] PROCEDURE <idProcedure> [(<idParam list>)]
    [FIELD <idField list> [IN <idAlias>]
    [LOCAL <identifier> [[:= <initializer>], ... ]]
    [MEMVAR <identifier list>]
    [STATIC <identifier> [[:= <initializer>], ... ]]
    .
    . <executable statements>
    .
[RETURN]

REQUEST :

Declare a module request list

REQUEST <idModule list>

RETURN :

Terminate a procedure, user-defined function or program

RETURN [<exp>]

Functions :

BREAK() :

Branch out of a BEGIN SEQUENCE…END construct

BREAK(<exp>) --> NIL

EVAL() :

Evaluate a code block

EVAL(<bBlock>, [<BlockArg list>]) --> LastBlockValue

IF() :

Return the result of an expression based on a condition

[I]IF(<lCondition>, <expTrue>, <expFalse>) --> Value

PCOUNT() :

Determine the position of the last actual parameter passed

PCOUNT() --> nLastArgumentPos

SETKEY() :

Assign an action block to a key

SETKEY(<nInkeyCode>, [<bAction>]) --> bCurrentAction

SETCANCEL() :

Toggle Alt-C and Ctrl-Break as program termination keys

SETCANCEL([<lToggle>]) --> lCurrentSetting

WORD()* :

Convert CALL command numeric parameters from double to int

WORD(<nNumber>) --> NIL

Browse by IDE

BROWSE is a control a few complicated than others. However HMG-IDE successfully support it.

In this sample we will build a Browse based application in a few steps using HMG-IDE.

Step – 1 : Make a folder for this sample.

Step – 2 : Copy TEST.DBF and TEST.DBT from \hmg\SAMPLES\TUTORIAL folder to your new folder.

Step – 3 : Run HMG-IDE and chose “New Project”.

IDE will ask you location and name for the new project; denote the folder you had build in the first step and give a name, say “IDEBrowse”.

IDE will build a new main module named “Main.Prg” and a new main form named “Main.fmg”

Step – 4 :

Double click “Main.prg” in the “Modules” tab of “Project Browser” window for editing this “main” module:

IDE send this module (.prg) file to your programing editor.

You will see your main program written by IDE :

#include <hmg.ch>

Function Main
 Load Window Main
 Main.Center
 Main.Activate
Return

Step – 5 :

Since BROWSE is a table based control, we must have a table and files opening/closing routines; these aren’t duties of IDE.

So add this two little procedures to the main.prg for opening and closing table:

Procedure OpenTables()
Use Test Shared
Return
Procedure CloseTables()
Use
Return


 Step – 6 :

Now, it’s time for making some arrangements on the form:

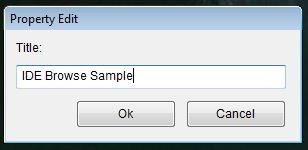
Title :

– Click  “Object Inspector [Main.Fmg]\Form\Properties\Title” :


– Give a “Title”, say “IDE Browse Sample” to form :


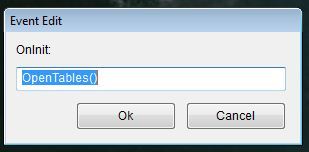
On Init Procedure :

– By clicking “Object Inspector [Main.Fmg]\Form\Events\OnInit” ;


– Assign OpenTables() procedure name to this event:

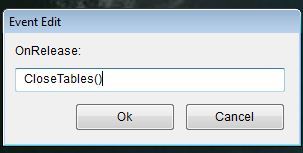
On Release Procedure :

– By clicking “Object Inspector [Main.Fmg]\Form\Events\OnRelease”;

– Assign CloseTables() procedure name to this event:

Step – 7 :

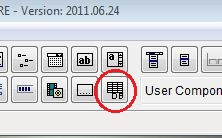
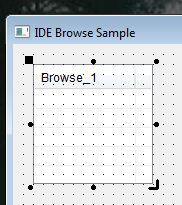
Now, we can place BROWSE control in our form:

– Click BROWSE button in the Toolbox:

– Then click anywhere in the form :

– Re-size control by dragging “resize” mark at the lower rigth corner :


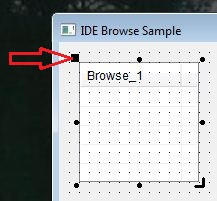
 – If required, change placement of control by using “replace” mark ( at the upper-left corner )


– By using these two marks, you can place control in the form whatever you like:


 Step – 8 :

And now, we will make some arrangements on the BROWSE control :

After activating ( by clicking on it ) BROWSE control;

By selecting “Object Inspector[Main.Fmg]\Browse_1\Properties” give these properties to Browse_1 control:

– “Fields” property :

{‘Test->Code’,’Test->First’,’Test->Last’,’Test->Birth’,’Test->Married’,’Test->Bio’}

– “Headers” property :

{ ‘Code’, ‘First Name’, ‘Last Name’, ‘Birth Date’, ‘Married’, ‘Biography’ }

– “Widths” property :

{ 150, 150, 150, 150, 150, 150 }

– “Work Area” property :

Test

Note that “array” properties requires open and close curly-braces (‘{}’),  character properties doesn’t requires quotation marks (“”).

.
If you want allow editing  abilities to user, you have change default values (.F.) of these properties to .T.

 ALLOWEDIT
 ALLOWAPPEND
 ALLOWDELETE
 

Last Step :

That is All !

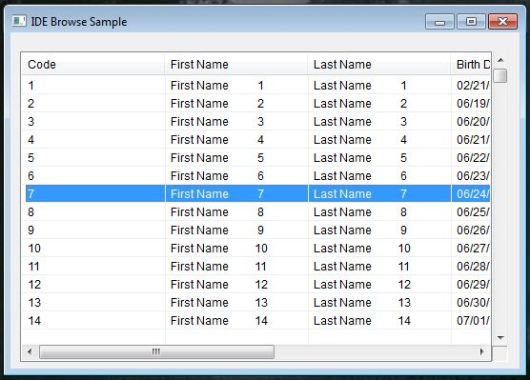
Click “Run” button ( or select “Run” from Project menu or simply press F5 key) for see results :


You have now a BROWSE based HMG application generated  by IDE.

When you use “Run” command or attempt to closing   your form by clicking “X” button, IDE ask you saving it ( if any change you have made ). You may also use Project\Save Form menu command.

Since IDE is a “Two-Way Form Designer”, you can edit .fmg files by double clicking its name in the “Forms” tab   of “Project Browser” window.

And since .fmg files are pure HMG source code, you can open a .fmg file by your editor to see  form source  code generated by IDE. Inspecting this code may be useful for better understanding and learning HMG.

You can also edit this file manually, but under your own risk ! Some modifications may not suitable to the standards of Form Designer.