Contributed works of Grigory Filatov
Adaptation FiveWin TsBrowse class
Color Table
Center Window’s Title
Closes application when no activity
Copy Protection (Get BIOS Name)
GetFonts
Get list of all controls
Since HMG-IDE is an Integrated Development Environment, it’s possible building an entire project from scratch under HMG-IDE.
But this doesn’t mean “without coding”.
So, we can develop all GUI necessities of our project via HMG-IDE; but what, always we will need some little coding.
Then we can begin our project by building a project file. This is the very first and the easiest step:
Simply run IDE.exe and then select “New Project”.
When IDE ask, select (or build a new) a working folder and give a name (say Viva_HMG) to the project. .hbp extension will be assigned by IDE to project file.
Whenever IDE build a new project, automatically build and open a module file with name Main.prg and a form file with name Main.fmg.
Module file open by your text editor and form file open by IDE itself.
The content of your module file will be like this :
#include <hmg.ch>
Function Main
        Load Window Main
        Main.Center
        Main.Activate
Return
Basic rules :
– Every HMG project have one ( and only one ) “MAIN” procedure / function
– For using GUI controls, every HMG project have one ( and only one ) “MAIN” form.
So, names of both module and form files are “Main“.
File names doesn’t mandatory;
– only name of first procedure / function of first module file must be “Main” and
– “Window Type” property of one form must be “MAIN“.
You can see “module” tab of Project Browser window “(Main)” sign adjacent to the Main.prg and at the bottom line of “Properties” tab of Object Inspector “Window Type” property of “Main” form already set “MAIN” by IDE.
Now, we can work on our first form.
First we can give a name to it.
But what happening?
There isn’t “Name” in the properties list of our form !
Yes, this is correct; because:
– Basic rule 3: Every HMG form has their own name. Only exception is: a form to be LOAD, has a unchangeable name: TEMPLATE.
In other hand, you give an “alias” to a loaded form. The way of this is using “AS” close in the LOAD command. FE:
Load Window Main AS frmIDEBS_01
In this case you have change “Center” and “Activate” commands too :
frmIDEBS_01.Center
frmIDEBS_01.Activate
If you don’t use an “alias” in that way, you will use in all references of form by its file name; in this example : “Main”.
Now, its time to give a “Title” to the form.
For this, we will use “TITLE” property of form:
Double click “Title” and give a title in the open Input Box, say “It’s a Wonderful Life”
We can change easily background color of form:
Double click BackColor in the properties list.
Click “Custom“.
In the Color Select Form select your favorite background color or simply enter these tree values. : 64, 220, 210
Press RUN button and look to your application in work.
BROWSE is a control a few complicated than others. However HMG-IDE successfully support it.
In this sample we will build a Browse based application in a few steps using HMG-IDE.
Step – 1 : Make a folder for this sample.
Step – 2 : Copy TEST.DBF and TEST.DBT from \hmg\SAMPLES\TUTORIAL folder to your new folder.
Step – 3 : Run HMG-IDE and chose “New Project”.
IDE will ask you location and name for the new project; denote the folder you had build in the first step and give a name, say “IDEBrowse”.
IDE will build a new main module named “Main.Prg” and a new main form named “Main.fmg”
Step – 4 :
Double click “Main.prg” in the “Modules” tab of “Project Browser” window for editing this “main” module:
IDE send this module (.prg) file to your programing editor.
You will see your main program written by IDE :
#include <hmg.ch>
Function Main
 Load Window Main
 Main.Center
 Main.Activate
Return
Step – 5 :
Since BROWSE is a table based control, we must have a table and files opening/closing routines; these aren’t duties of IDE.
So add this two little procedures to the main.prg for opening and closing table:
Procedure OpenTables()
Use Test Shared
Return
Procedure CloseTables()
Use
Return
Step – 6 :
Now, it’s time for making some arrangements on the form:
Title :
– Click “Object Inspector [Main.Fmg]\Form\Properties\Title” :

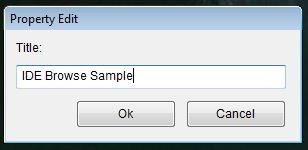
– Give a “Title”, say “IDE Browse Sample” to form :

On Init Procedure :
– By clicking “Object Inspector [Main.Fmg]\Form\Events\OnInit” ;

– Assign OpenTables() procedure name to this event:
On Release Procedure :
– By clicking “Object Inspector [Main.Fmg]\Form\Events\OnRelease”;
– Assign CloseTables() procedure name to this event:
Step – 7 :
Now, we can place BROWSE control in our form:
– Click BROWSE button in the Toolbox:
– Then click anywhere in the form :
– Re-size control by dragging “resize” mark at the lower rigth corner :

– If required, change placement of control by using “replace” mark ( at the upper-left corner )
– By using these two marks, you can place control in the form whatever you like:
Step – 8 :
And now, we will make some arrangements on the BROWSE control :
After activating ( by clicking on it ) BROWSE control;
By selecting “Object Inspector[Main.Fmg]\Browse_1\Properties” give these properties to Browse_1 control:
– “Fields” property :
{‘Test->Code’,’Test->First’,’Test->Last’,’Test->Birth’,’Test->Married’,’Test->Bio’}
– “Headers” property :
{ ‘Code’, ‘First Name’, ‘Last Name’, ‘Birth Date’, ‘Married’, ‘Biography’ }
– “Widths” property :
{ 150, 150, 150, 150, 150, 150 }
– “Work Area” property :
Test
Note that “array” properties requires open and close curly-braces (‘{}’), character properties doesn’t requires quotation marks (“”).
.
If you want allow editing abilities to user, you have change default values (.F.) of these properties to .T.
 ALLOWEDIT
 ALLOWAPPEND
 ALLOWDELETE
Last Step :
That is All !
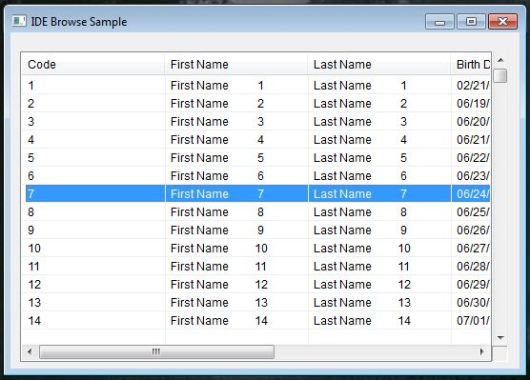
Click “Run” button ( or select “Run” from Project menu or simply press F5 key) for see results :

You have now a BROWSE based HMG application generated by IDE.
When you use “Run” command or attempt to closing your form by clicking “X” button, IDE ask you saving it ( if any change you have made ). You may also use Project\Save Form menu command.
Since IDE is a “Two-Way Form Designer”, you can edit .fmg files by double clicking its name in the “Forms” tab of “Project Browser” window.
And since .fmg files are pure HMG source code, you can open a .fmg file by your editor to see form source code generated by IDE. Inspecting this code may be useful for better understanding and learning HMG.
You can also edit this file manually, but under your own risk ! Some modifications may not suitable to the standards of Form Designer.
MsgMulti ( aka MsM) is a message function accept multiple and any type of data.
Download here ( source only ).
Another alternative to get an user’s choice is the COMBOBOX.
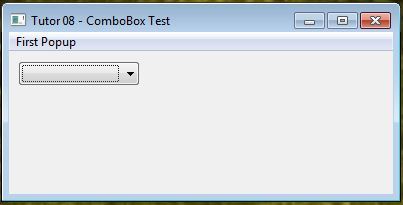
@ 10, 10 COMBOBOX Combo_1 ITEMS {'Option 1','Option 2','Option 3'}
Using a ComboBox, is similar to ListBox.
#include "hmg.ch"
Function Main
DEFINE WINDOW Win_1 ;
   AT 0,0 ;
   WIDTH 400 ;
   HEIGHT 200 ;
   TITLE 'Tutor 08 - ComboBox Test' ;
   MAIN
   DEFINE MAIN MENU
      POPUP "First Popup"
         ITEM 'Change ComboBox Value' ACTION ;
               Win_1.Combo_1.Value := 2
         ITEM 'Retrieve ComboBox Value' ACTION ;
             MsgInfo ( Str(Win_1.Combo_1.Value))
         SEPARATOR
         ITEM 'Add Combo Item' ACTION ;
             Win_1.Combo_1.AddItem ('New List Item')
         ITEM 'Remove Combo Item' ACTION ;
             Win_1.Combo_1.DeleteItem (2)
         ITEM 'Change Combo Item' ACTION ;
             Win_1.Combo_1.Item (1) := 'New Item Text'
         ITEM 'Get Combo Item Count' ACTION ;
             MsgInfo (Str(Win_1.Combo_1.ItemCount))
      END POPUP
   END MENU
   @ 10, 10 COMBOBOX Combo_1 ITEMS {'Option 1','Option 2','Option 3'}
END WINDOW
ACTIVATE WINDOW Win_1
Return

I’ll not be original, so this program will display a ‘Hello World’ message 🙂
#include "hmg.ch"
Function Main
   DEFINE WINDOW Win_1 ;
      AT 0,0 ;
      WIDTH 400 ;
      HEIGHT 200 ;
      TITLE 'Tutor 01 - Hello World!' ;
      MAIN
   END WINDOW
   ACTIVATE WINDOW Win_1
Return
– #include “hmg.ch” : Inclusion of header file, required every HMG program.
– DEFINE WINDOW command: Will create the main window for the program.
– Win_1: Is the name of the window.
– AT 0,0: Indicates the window position ( row=0, column=0 )
– WIDTH 400: Means that the window will have 400 pixels width.
– HEIGHT 200: Means that the window will have 200 pixels height.
– TITLE ‘Hello World!’: Indicates the text in the window title bar.
– MAIN: Indicates that we are defining the main application window (a main window is required for all HMG applications)
– ACTIVATE WINDOW Form_1: Will show the window and start the event
loop.
That’s all !