Quick Start to Migration

Chapter I – Text to text conversion

In Clipper world, “migration” means “convert a DOS based Clipper program to Windows”. This is a dream of every Clipper – DOS programmer.

 Before all, we need clarify some terms:

May be found multiple ways for convert a DOS based Clipper program to Windows. In general, DOS programs are runs in “text” mode and Windows program runs in “Graphic” mode; and this is what meant by term “migration”.

Converting a text mode program to directly GUI (Graphical User Interface) is a painful job. First, we need to find a Compiler with GUI support, or a GUI library usable with a specific compiler. If we have more than one opportunity ( yes, it is so ) we need make a choice between them.

For make a right selection we need learn, understand specialties of each option and differences between them.

Believe me, this is an endless way 😦

Instead, let’s begin with simpler thing: convert a DOS text mode program to Windows text mode program.

Question: Without GUI, what meaning will be to migrate from DOS to Windows?

Answer: Good question and like all good question, answer isn’t easy.

First, modern OSs moves away day to day from DOS conditions; memory problems, screen problems, codepage problems, etc… By the time, building / running 16 bit executable becomes more difficult day to day.

Whereas Harbour already is a 32 / 64 bit compiler.

Second, all DOS Compilers for Clipper are commercial and registration required products; furthermore they are almost out of sold for this days; what compiler you could use?

And third, Harbour is best free compiler and the best way to use a free GUI tool for xBase language.

So, beginning with using Harbour in text mode is the best start point, I think.

First step is downloading and install HMG or Harbour. If you didn’t past this step yet please refer previous articles in this section or “Links” page of this blog.

The easiest way for using Harbour compiler is calling hbmk2, the wonderful project maker for Harbour compiler.

Depending your installation, hbmk2 may be in different locations; such as C:\Harbour\bin or c:\hmg\harbour\bin or anything else.

Hereafter I will assume that your hbmk2 is in C:\hmg\Harbour\bin. If your installation is different, please modify above examples.

Second step is assign an empty folder (directory) for work / test affairs; say C:\test.

And the third step is copying your Clipper program(s) to this folder.

But don’t rush; we have some precautions:

– Better way is starting with a single-program project; if you haven’t written a new one. Don’t uses for now projects have multiple program file.

 – Your program may have some “national” characters and these characters may be differently shown between DOS and Windows. If so, you may want fix manually these differences via a Windows based text editor. Or use a program if you have one. Harbour has a clever tool (HB_OEMTOANSI() function) is usable for this purpose.

 – In Clipper it’s possible a program file without module (procedure / function) definition. If you have such file(s), enclose your code with PROCEDURE — RETURN statement pair.

– Every Harbour project must have one and only one MAIN module (procedure / function). The first procedure / function in your single program file will be considered as MAIN module of your project. (In HMG, name of this module must be “main” also).

– Almost all Clipper commands, statement, functions, pseudo functions, manifest constants etc are usable almost in the same ways with Clipper. May be exist some very few and very rare differences, and of course solving methods for its.

For compile process we will use command box (DOS / console window) of Windows. You can open a console window, with the menu Start -> Run -> cmd or selecting it in the “Command Prompt” from the Start Menu \ All Programs.

 – “Command / console window” size may not appropriate for easy use. You may

      – use a MODE ( DOS ) command :

         MODE CON LINES=54 COLS=148

       or

   – adding a SetMode() statement at the beginning of MAIN module of your project. For example:

       SetMode( 25,  80 )  // 25 line 80 column same as standard 
                           // DOS screen ( but not full screen ! )
       SetMode( 48, 128 )  // 48 line 128 column, may be more readable

Now, we are ready to begin: Enter this command in console window :

 C:\hmg\harbour\bin hbmk2 <mainPrgName>

You don’t need any SET command (such as PATH etc) before this command; hbmk2 will find all necessary paths / files.

For running executable after compile, add a -run switch to the command line :

 C:\hmg\harbour\bin hbmk2 <mainPrgName> -run

Of course, you need supply name of your main .prg file in place of <mainPrgName>.

Note that you don’t need a separate “linking” step; hbmk2 will do everything for you.

You may use this

 C:\hmg\harbour\bin hbmk2 <mainPrgName>

command via a batch ( .bat ) command file (such as “build.bat”) too. In this way you can apply compiling process without console window; run .bat file by double click in the Windows Explorer. In this case you may need add a PAUSE command at end of .bat file.

That’s all.

You know, a program file may contains more than one module (procedure / function). So you may develop your project by adding new modules to your single program file.

In this step you don’t need trying extra features, extensions of Harbour. Before that adventure your primary need is to convert existing project Clipper to Harbour.

When you reach a level of multiple-program file project:

– Basic rules are the same: the first module in the your program file is MAIN module of your project.

If your .prg files contains:

  SET PROCEDURE TO <procedure_File_Name>

 and / or

   #include <procedure_File_Name>

 you may or may not continue using these statement.

 – The shortest way for compiling a multiple-file project is use a .hbp ( Harbour Projet ) file. This is a text file and its simplest form is a file contains list of your .prg files. For example:

myprog01.prg
myprog02.prg
myprog03.prg
myprog04.prg

and the compile command is the same :

  C:\hmg\harbour\bin hbmk2 <mainProjectFileName>

In this case you don’t need to use SET PROC… and #include … statement and this is the better way.

Because hbmk2 applies “incremental” compiling, that is compiles only modified files.

Under normal circumstances, any module in any program file is callable in anywhere in the project. If you have some modules that exclusive to this program file, you may use STATIC keyword at the beginning of PROCEDURE / FUNCTION statement. For example:

STATIC FUNCTION OpenTable()

With this syntax you will prevent calling this module outside of this .prg file and the possibility of using this module name into other .prg files.

Example :

Take “A typical Harbour Program” in the “Harbour Sample” page.

As seen at .pdf file by given link, this sample program borrowed from official reference guide of a Clipper compiler. That is, in fact this is a Clipper program and it will may compile with Harbour and run without any modification.

Let’s try.

– Copy and paste this sample and save in your PC with a name say “typical.prg”.

– Comment out the line for now.

 #include "Database.prg" // Contains generic database functions

– Call hbmk2:

 C:\hmg\harbour\bin hbmk2 typical -run

 Note: While working / playing on programs, you may encounter some error messages like:

  Error F0029  Can't open #include file xxx
  Error E0002  Redefinition of procedure or function xxx
  Error: Referenced, missing, but unknown function(s): xxx
  undefined reference to HB_FUN_xxx

 Please don’t panic !

    “Error” is salt and pepper of programming play ! 😉

 The worst situation isn’t getting error, but is unable to stay !

   The “HB_FUN_xxx” may be seen weird at first meet. The “HB_FUN_” is a prefix given by system ( compiler ) to your function; so you need search erroneous point into tour program files without this prefix.

Now, let’s continue to our “typical” program:

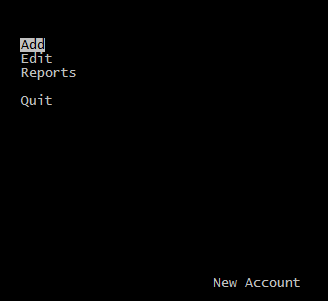
If you compile the program with commented out #include … line, possibly it will work, by opening main menu:

Typical_1

But what’s that?

When selected a menu item (except “Quit”) we can’t see other than an empty screen!

Again, don’t panic!

This situation too is not very rare !

If you use vertical scroll bar of command / console window, you will notice that your screen is considerably much longer than seen !

To avoid this conflict, ( as stated above ) we need use a SetMode() function call at top of our Main() procedure ( but AFTER LOCAL statement ! ) :

  SetMode( 24, 79 )

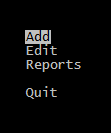
 And now everything is OK.

Typical_2

In fact, not really everything, we have a few “fine adjustment”.

Cut and paste the section after “// Database.prg” to a separate “Database.prg” file, un-comment the “#include …” line and then re-compile.

In this case we have a “multiple prg” project. As stated earlier, better way is using a .hbp file instead of “#include …” statements.

Now comment out ( or delete now ) the #include line.

Build a new text file with name “typical.hbp” and with this content :

Typical.prg
DataBase.prg

And recall hbmk2 without any modification :

C:\hmg\harbour\bin hbmk2 typical -run

That’s all !

Congratulations !

Now you have a multiple-prg project  !
HMG Samples

About HMG Samples

Language Related

 Arrays

Array Arithmetic

Load / Save ANY array

Conversion

DOS -> Windows Character Conversion

National Issues

National Alternate Collating Sequence

National Change Case

 Windows

Tracking Mouse

Controls

Browse

Quick Search    

Combo box

Dynamic ComboBox

Edit Box

Word wrap in EditBox

 Grid

Get Data Into Grid via IDE

Text Box

Auto fill in text box

Search in and Fill Box (SFilBox) 

Tree

Tree Menu

Two Methods for Tree

Functions

 Drives, Directories and Files

Drives and Directories

Directory List

Fill Directory List

PutFile() with default file name

Messages

HMG Message Functions

Message for multiple values

Message Extended

Where Is It ?

Improvements in Message functions

Miscellaneous

Is application running ?

Get Process ID

Simple Error Handling

Funny

Cuckoo Clock

Untouchable window

Warn Lazy User

Pegs Game

Drawing

Play Draw

Draw Border

Printing

 Text Mode

Using printer under Windows 

Obsolete ways

Send to File

Print File

GUI Mode

HMG Print

 HMG Print ( Mini Print ) for beginners in 10 easy steps

Print a plain text file by HMG Print – 1

HMG Report

HMG HPDF

HMG_HPDF — Bill

Unicode

HMG Unicode

Utilities

Color Codes

DB Validate 

Hex View

Mini Agenda

DBA : Data Base Assistant

Low-Level DBU

x-Base Modul List

Mini Search Machine (2014) 

Using code blocks, again

Using code blocks again (.pdf)

The Clipper conversion process

The Clipper conversion process (.pdf)

Design of Clipper

build the truly reusable routine

ADir() Function

/*
ADIR()*

Fill a series of arrays with directory information
——————————————————————————
Syntax :

ADIR( [<cFilespec>],
      [<aFilenames>],
      [<aSizes>],
      [<aDates>],
      [<aTimes>],
      [<aAttributes>]) --> nFiles

Arguments :

<cFilespec> is the path specification of files to include in the scan of the DEFAULT directory. It is a standard file specification that can include the wildcard characters * and ?, as well as a drive and path reference. If omitted, the default specification is *.*.

<aFilenames> is the array to fill with the file names matching <cFilespec>. Each element contains the file name and extension as a character string in all uppercase letters.

<aSizes> is the array to fill with the sizes of the corresponding files in the <aFilenames> array. Each element is a numeric data type.

<aDates> is the array to fill with the dates of the corresponding files in the <aFilenames> array. Each element is a date data type.

<aTimes> is the array to fill with the times of the corresponding files in the <aFilenames> array. Each element filled contains a character string of the form: hh:mm:ss.

<aAttributes> is the array to fill with attributes of the corresponding files in the <aFilenames> array. Each element is a character string. If <aAttributes> is specified, hidden, system, and directory files are included as well as normal files. If <aAttributes> is not specified, only normal files are included.

Returns :

ADIR() returns the number of files matching the directory skeleton described in <cFilespec>.

Description :

ADIR() is an array function that performs two basic operations. First, it returns the number of files matching the file specification. Second, it fills a series of arrays with file names, sizes, dates, times, and attributes.

ADIR() is a compatibility function and therefore not recommended. It is superseded by the DIRECTORY() function which returns all file information in a multidimensional array.

Notes :

Directories: If you specify the <aAttributes> argument and <cFilespec> is *.*, directories will be included in <aFilenames>. In the <aAttributes> array, directories are indicated with an attribute value of “D”. If ADIR() is executed within a subdirectory, the first two entries of the <aFilenames> array are “.” and “..”, the parent and current directory aliases. The date and time of last update are reported for directories, but the size of a directory is always zero.

Examples :

This example creates an array to hold the names of all .txt files in the current DEFAULT directory, then uses AEVAL() to list them to the console:

 LOCAL aFiles[ADIR("*.TXT")]
 ADIR("*.TXT", aFiles)
 AEVAL(aFiles, { |element| QOUT(element) } )

Remarks :

ADIR() is an obsolete function with some drawbacks.

– Requires five separate arrays for each file specification : name, size, date, time and attrribute.

– Each of these array must be length of exact file count. Return value of function is number of files, so you need call this function twice : first for obtain number of files and second for actual file info.

– Including directories is depend of existence of <aAttributes>, and <aAttributes> require been length of exact file count.

So if you want to see directories you need call this function triple ( see below sample ).

As a result, as indicated in “Description” above, using DIRECTORY() instead of ADIR() may be more convenient.

*/

PROC Main()
LOCAL cFileSpec := "C:\hb32\*.*"
LOCAL aFileNames := ARRAY( ADIR( cFileSpec ) )
LOCAL nFileCount := LEN( aFileNames )
LOCAL aFileSizes := ARRAY( nFileCount ),;
      aFileDates := ARRAY( nFileCount ),;
      aFileTimes := ARRAY( nFileCount ),;
      aFileAttrb := ARRAY( nFileCount )
LOCAL nMaxFNmLen := 0
SET CENT ON
SET DATE GERM
nFileCount := ADIR( cFileSpec, aFileNames, aFileSizes,;
                    aFileDates, aFileTimes, aFileAttrb )
ASIZE( aFileNames, nFileCount )
ASIZE( aFileSizes, nFileCount )
ASIZE( aFileDates, nFileCount )
ASIZE( aFileTimes, nFileCount )
ASIZE( aFileAttrb, nFileCount )
ADIR( cFileSpec, aFileNames, aFileSizes, aFileDates,;
                 aFileTimes, aFileAttrb )
AEVAL( aFileNames, { | c1FName | nMaxFNmLen := ;
                      MAX( nMaxFNmLen, LEN( c1FName ) ) } )
AEVAL( aFileNames, { | c1FName, i1 | ;
                       QOUT( PADR( c1FName, nMaxFNmLen + 1 ),;
                       TRAN( aFileSizes[ i1 ], "999,999,999" ),;
                             aFileDates[ i1 ],;
                             aFileTimes[ i1 ],;
                             aFileAttrb[ i1] ) } )
?
WAIT "End of ADIR.prg"
RETU // ADir.Main()

/*

Result of ADIR.prg :
 .                   0  13.09.2012 02:07:15 D
 ..                  0  13.09.2012 02:07:15 D
 addons              0  13.09.2012 02:07:07 D
 bin                 0  13.09.2012 02:07:12 D
 ChangeLog   8,848,829  12.09.2012 01:59:44 A
 comp                0  13.09.2012 02:07:12 D
 contrib             0  13.09.2012 02:07:16 D
 COPYING        47,456  12.09.2012 01:59:44 A
 doc                 0  13.09.2012 02:07:07 D
 extras              0  13.09.2012 02:07:15 D
 include             0  13.09.2012 02:07:07 D
 INSTALL        79,968  12.09.2012 01:59:44 A
 lib                 0  13.09.2012 02:07:14 D
 NEWS          108,058  12.09.2012 01:59:44 A
 RELNOTES        9,832  18.04.2012 04:00:10 A
 tests               0  13.09.2012 02:07:15 D
 TODO            2,924  12.09.2012 01:59:44 A
 uninstall.exe 104,646  13.09.2012 02:07:12 A
End of ADIR.prg

*/

PICTURE function / template

What is PICTURE function – template ?

@…SAY comand display data at a specified screen or printer row and column with syntax :

@ <nRow>, <nCol> SAY <exp> [PICTURE <cSayPicture>] [COLOR <cColorString>]

@…SAY command output can be formatted using the PICTURE clause with a <cSayPicture>. This performs the same action as the TRANSFORM() function. A <cSayPicture> may consist of a function and/or a template. A PICTURE function imposes a rule on the entire @…SAY output. A PICTURE template defines the length of the @…SAY output and the formatting rule for each position within the output.

Function string:

A PICTURE function string specifies formatting rules which apply to the SAY’s entire display value, rather than to particular character positions within it.

The function string consists of the @ character, followed by one or more additional characters, each of which has a particular meaning (see table below).

The function string must not contain spaces.

A function string may be specified alone or with a template string. If both are present, the function string must precede the template string, and the two must be separated by a single space.

SAY and TRANSFORM() PICTURE Format Functions
---------------------------------------------------------------------
Function Action
---------------------------------------------------------------------
B Displays numbers left-justified
C Displays CR after positive numbers
D Displays dates in SET DATE format
E Displays dates and numbers in British format
R Nontemplate characters are inserted
X Displays DB after negative numbers
Z Displays zeros as blanks
( Encloses negative numbers in parentheses
! Converts alphabetic characters to uppercase
---------------------------------------------------------------------

 Template string:

A PICTURE template string specifies formatting rules on a character-by-character basis. The template string consists of a series of characters, some of which have special meanings (see table below). Each position in the template string corresponds to a position in the displayed SAY value. Characters in the template string that do not have assigned meanings are copied verbatim into the displayed SAY value. If you use the @R picture function, characters without special PICTURE template string meaning are inserted between characters of the display value; otherwise, they overwrite the corresponding characters of the display value. You may specify a template string alone or with a function string. If both are present, the function string must precede the template string, and the two must be separated by a single space.

SAY and TRANSFORM() Template Symbols
---------------------------------------------------------------------
Template Action
---------------------------------------------------------------------
A,N,X,9,# Displays digits for any data type
L Displays logicals as "T" or "F"
Y Displays logicals as "Y" or "N"
! Converts alphabetic characters to uppercase
$ Displays a dollar sign in place of a leading space in a number
* Displays an asterisk in place of a leading space in a number
. Specifies a decimal point position
, Specifies a comma position
---------------------------------------------------------------------

Examples :

This example uses an @…SAY with a PICTURE clause to display formatted output:

nNetIncome = 7125.50
nNetLoss = -125.50
cPhone = "2134567890"
cName = "Kate Mystic"
@ 1, 1 SAY nNetIncome PICTURE "@E 9,999.99" // Result: 7.125,50
@ 2, 1 SAY nNetLoss PICTURE "@)" // Result: (125.50)
@ 3, 1 SAY cPhone PICTURE "@R (999)999-9999" // Result: (213)456-7890
@ 4, 1 SAY cName PICTURE "@!" // Result: KATE MYSTIC

This example is a small label printing program that uses SET DEVICE to direct output to the printer and SETPRC() to suppress automatic EJECTs:

USE Salesman INDEX Salesman NEW
SET DEVICE TO PRINTER
DO WHILE !EOF() // Print all records
   @ 2, 5 SAY RTRIM(FirstName) + ", " + LastName
   @ 3, 5 SAY Street
   @ 4, 5 SAY RTRIM(City) + ", " + State + " " + PostalCode
   @ 6, 0 SAY SPACE(1) // Move to label bottom
   SETPRC(0, 0) // Suppress page eject
   SKIP // Next record
ENDDO
SET DEVICE TO SCREEN
CLOSE Salesman

C5 Flow Control Commands, Statements and Funtions

Commands :

CALL* :

Execute a C or Assembler procedure

CALL <idProcedure> [WITH <exp list>]

CANCEL* :

Terminate program processing

CANCEL* | QUIT

DO* :

Call a procedure

DO <idProcedure> [WITH <argument list>]

QUIT

Terminate program processing

QUIT | CANCEL*

RUN :

Execute a DOS command or program

RUN | !* <xcCommandLine>

SET KEY :

Assign a procedure invocation to a key

SET KEY <nInkeyCode> TO [<idProcedure>]

SET PROCEDURE *:

Compile procedures/functions into the current .OBJ file

SET PROCEDURE TO [<idProgramFile>[.<ext>]]

WAIT* :

Suspend program processing until a key is pressed

WAIT [<expPrompt>] [TO <idVar>]

Statements :

ANNOUNCE :

Declare a module identifier

ANNOUNCE <idModule>

 BEGIN SEQUENCE :

Define a sequence of statements for a BREAK

BEGIN SEQUENCE
       <statements>...
    [BREAK [<exp>]]
       <statements>...
    [RECOVER [USING <idVar>]]
       <statements>...
END [SEQUENCE]

DO CASE :

Execute one of several alternative blocks of statements

DO CASE
   CASE <lCondition1>
       <statements>...
   [CASE <lCondition2>]
       <statements>...
   [OTHERWISE]
       <statements>...
END[CASE]

DO WHILE :

Execute a loop while a condition is true (.T.)

[DO] WHILE <lCondition>
    <statements>...
    [EXIT]
    <statements>...
    [LOOP]
    <statements>...
END[DO]

EXIT PROCEDURE :

Declare an exit procedure

EXIT PROCEDURE <idProcedure>
    [FIELD <idField list> [IN <idAlias>]]
    [LOCAL <identifier> [[:= <initializer>]]]
    [MEMVAR <identifer list>]
    .
    . <executable statements>
    .
[RETURN]

EXTERNAL* :

Declare a list of procedure or user-defined function names

EXTERNAL <idProcedure list>

FOR :

Execute a block of statements a specified number of times

FOR <idCounter> := <nStart> TO <nEnd> [STEP <nIncrement>]
    <statements>...
    [EXIT]
    <statements>...
    [LOOP]
NEXT

FUNCTION :

Declare a user-defined function name and formal parameters

[STATIC] FUNCTION <idFunction>[(<idParam list>)]
    [LOCAL <identifier> [[:= <initializer>], ... ]]
    [STATIC <identifier> [[:= <initializer>], ... ]]
    [FIELD <identifier list> [IN <idAlias>]]
    [MEMVAR <identifier list>]
    .
    . <executable statements>
    .
RETURN <exp>

IF :

Execute one of several alternative blocks of statements

IF <lCondition1>
    <statements>...
[ELSEIF <lCondition2>]
    <statements>...
[ELSE]
    <statements>...
END[IF]

INIT PROCEDURE :

Declare an initialization procedure

INIT PROCEDURE <idProcedure> [(<idParam list>)]
    [FIELD <idField list> [IN <idAlias>]]
    [LOCAL <identifier> [[:= <initializer>]]]
    [MEMVAR <identifer list>]
    .
    . <executable statements>
    .
[RETURN]

NOTE :

Place a single-line comment in a program file

NOTE This is a comment line

PARAMETERS :

Create private parameter variables

PARAMETERS <idPrivate list>

PROCEDURE :

Declare a procedure name and formal parameters

[STATIC] PROCEDURE <idProcedure> [(<idParam list>)]
    [FIELD <idField list> [IN <idAlias>]
    [LOCAL <identifier> [[:= <initializer>], ... ]]
    [MEMVAR <identifier list>]
    [STATIC <identifier> [[:= <initializer>], ... ]]
    .
    . <executable statements>
    .
[RETURN]

REQUEST :

Declare a module request list

REQUEST <idModule list>

RETURN :

Terminate a procedure, user-defined function or program

RETURN [<exp>]

Functions :

BREAK() :

Branch out of a BEGIN SEQUENCE…END construct

BREAK(<exp>) --> NIL

EVAL() :

Evaluate a code block

EVAL(<bBlock>, [<BlockArg list>]) --> LastBlockValue

IF() :

Return the result of an expression based on a condition

[I]IF(<lCondition>, <expTrue>, <expFalse>) --> Value

PCOUNT() :

Determine the position of the last actual parameter passed

PCOUNT() --> nLastArgumentPos

SETKEY() :

Assign an action block to a key

SETKEY(<nInkeyCode>, [<bAction>]) --> bCurrentAction

SETCANCEL() :

Toggle Alt-C and Ctrl-Break as program termination keys

SETCANCEL([<lToggle>]) --> lCurrentSetting

WORD()* :

Convert CALL command numeric parameters from double to int

WORD(<nNumber>) --> NIL

Procedure and Function Terms

Activation :

The commencement of execution of a procedure. Each call to a procedure is referred to as an activation of that procedure. If the procedure in turn calls another procedure (or calls itself recursively), a new activation is said to have occurred. The earlier activation is then referred to as a pending activation.

Pending activations are often referred to as higher-level activations or higher-level procedures. When one procedure calls another (i.e., creates a new activation), the latter is often referred to as a lower-level activation or a lower-level procedure.

See Also : Activation Record, Activation Stack, Function, Procedure

Activation Record :

An internal data structure that contains information pertaining to an activation.

See Also : Activation, Activation Stack

Activation Stack :

An internal data structure that contains an activation record for the current activation and all pending activations.

See Also : Activation, Activation Record, Stack

Calling Program :

The procedure, or user-defined function that transferred control to the currently executing procedure or function. When the current procedure or user-defined function terminates with a RETURN statement, this is where control will return.

Function :

An executable block of code with an assigned name. Alternately, the collection of source code statements that define a function. Certain functions are supplied as part of Clipper; others are defined by the programmer using the FUNCTION or PROCEDURE declaration statements. The latter are referred to as user-defined functions.

The terms procedure and function are generally interchangeable. By convention, a function returns a value, while a procedure does not.

See Also: Activation, Parameter, Procedure

Identifier :

A name that identifies a function, procedure, variable, constant or other named entity in a source program. In Clipper language, identifiers must begin with an alphabetic character and may contain alphabetic characters, numeric characters, and the underscore character.

Information Hiding :

A fundamental programming principle that states that functions and programs should conceal their inner workings from other functions and programs. Stated simply: a function should possess only the knowledge necessary for it to accomplish its task. When one function calls another, the calling function should possess only the knowledge explicitly required to call the other function.

See Also: Encapsulation, Lexical Scoping, Modularity, Side Effect

Primitive :

A simple, low-level function used by other high-level functions or programs to perform a more complex task.

Procedure :

An executable block of code with an assigned name. Alternately, the collection of source code statements that define a procedure. In Clipper language, this can be a source file (.prg), a format file (.fmt), an explicitly declared procedure (PROCEDURE), or an explicitly declared function (FUNCTION).

The terms procedure and function are generally interchangeable. By convention, a function returns a value, while a procedure does not.

See Also: Activation, Function, Parameter

Return Value :

The value or reference returned by a function or method from a function call or message send.

Source Code :

The textual representation of a program or procedure.

See Also: Object File, Program File

User-defined Function :

See : Function

Word :

A series of characters in a match pattern or result pattern. Source text matches a word in a match pattern if the text is identical to the word or is an acceptable abbreviation of it. A word that appears in a result pattern is copied unmodified into the result text.

Selected Chapters (PDF)

Basic Concepts

The Structure of a Clipper Program

Functions and Procedures

Control Structures

Variables

Expressions and Data Types

Operators

The Macro (&) Operator

Arrays

Code Blocks

Objects and Messages

The Database System

The Input-Output System

The Keyboard System

The Low-Level File System

The Browse System

The Get System

Serial Communications with CA-Clipper Tools

Network Programming

Using The Extend System

Extend Functions

DOS Errors

Clipper and Networking