SP_STRIP_PATH

STRIP_PATH()

  Short:
  ------
  STRIP_PATH() Strip path and optionally extension from a
  filespec

  Returns:
  --------
  <cFile> => file name with path and optionally
  extension stripped

  Syntax:
  -------
  STRIP_PATH(cInSpec, [lStripExt])

  Description:
  ------------
  Returns <cInSpec>, the name of a file with its path
  stripped.

  [lStripExt] if True will strip the extension as well.
  Default is false.

  Examples:
  ---------
   ?STRIP_PATH("C:\HAIRY\CRITTERS\MONKEY.DBF")
   //  => returns "MONKEY.DBF"

   ?STRIP_PATH("C:\HAIRY\CRITTERS\MONKEY.DBF",.T.)
   //  => returns "MONKEY"

  Source:
  -------
  S_STRPAT.PRG


SP_GETDFP

GETDFP()

  Short:
  ------
  GETDFP() Gets SET DEFAULT path

  Returns:
  --------
  SET DEFAULT path as string

  Syntax:
  -------
  GETDFP()

  Description:
  ------------
  Retrieves and returns SET DEFAULT path from Clipper.
  Appends a "\" if needed. If no SET DEFAULT is active, returns an
  empty string ""

  Examples:
  ---------
   // using ERASE, for instance

   ERASE (getdfp()+tempfile)

  See Also :
  ---------
   SET DEFAULT

 Source: ------- 
    S_GETDFP.PRG


FT_GETE

FT_GETE()
 Return the entire current environment

 Syntax

      FT_GETE( [ @<xReceiveVar> ] ) -> nNumStrings

 Arguments

     <xReceiveVar> is the variable to receive the environment data.

     <xReceiveVar> can be a character type variable, in which case
     the function will place all environment strings in the variable
     separated by carriage return/line feeds (chr 13 + chr(10)).

     <xReceiveVar> can be an array type, in which case the function
     will place each string in an array element.  The array MUST be
     declared with the proper number of elements prior to passing it
     to the function.  This can be done by calling FT_GETE() without
     parameters first to get the number of strings in the environment.

     Note that the argument MUST be passed by reference. Since arrays
     are by nature passed by reference, the "@" symbol is optional when
     passing an array.

     If no argument is passed, FT_GETE() merely returns the number
     of strings in the environment.

 Returns

     FT_GETE() returns the total number of strings found in the
     current program's environment.

 Description

     This function stores ALL of the current program's environment
     variables in either a block of text lines or in an array.  It is
     useful for looking at the entire environment at once, or recording
     a snapshot of it to a file for later inspection, such as when a
     program error occurs.  If the value of ONE SPECIFIC variable is
     desired, use Clipper's built-in GETE() function.

     This function uses the undocumented internal variable "_environ",
     as well as the functions _strcpy(), _strcat(), and _strlen() from
     CLIPPER.LIB

 Examples

     Get the environment in text form and browse it:

        cEnvBlock   := ""
        nNumStrings := FT_GETE(@cEnvBlock)
        @  0, 0 to MAXROW() - 1, MAXCOL()
        @  MAXROW(), 0 say 'Browse strings, press ESC to exit...'
        MEMOWRIT(cEnvBlock, 1, 1, MAXROW() - 2,MAXCOL() - 1, .F.)

     Get the environment in text form and write it to a file:

        cEnvBlock := ""
        FT_GETE(@cEnvBlock)
        MEMOWRIT("ENVIRON.TXT", cEnvBlock)

     Get the environment in Array form:

        aEnvArray := ARRAY(FT_GETE())
        FT_GETE(aEnvArray)
        ? aEnvArray[1]       // "COMSPEC=C:\COMMAND.COM"
        ? aEnvArray[2]       // "PATH=C:\;C:\DOS;C:\UTIL;C:\CLIP50\BIN"
          ... etc ...

 Source: GETENVRN.C

 Author: Rick Whitt

Quick Start to Migration

Chapter I – Text to text conversion

In Clipper world, “migration” means “convert a DOS based Clipper program to Windows”. This is a dream of every Clipper – DOS programmer.

 Before all, we need clarify some terms:

May be found multiple ways for convert a DOS based Clipper program to Windows. In general, DOS programs are runs in “text” mode and Windows program runs in “Graphic” mode; and this is what meant by term “migration”.

Converting a text mode program to directly GUI (Graphical User Interface) is a painful job. First, we need to find a Compiler with GUI support, or a GUI library usable with a specific compiler. If we have more than one opportunity ( yes, it is so ) we need make a choice between them.

For make a right selection we need learn, understand specialties of each option and differences between them.

Believe me, this is an endless way 😦

Instead, let’s begin with simpler thing: convert a DOS text mode program to Windows text mode program.

Question: Without GUI, what meaning will be to migrate from DOS to Windows?

Answer: Good question and like all good question, answer isn’t easy.

First, modern OSs moves away day to day from DOS conditions; memory problems, screen problems, codepage problems, etc… By the time, building / running 16 bit executable becomes more difficult day to day.

Whereas Harbour already is a 32 / 64 bit compiler.

Second, all DOS Compilers for Clipper are commercial and registration required products; furthermore they are almost out of sold for this days; what compiler you could use?

And third, Harbour is best free compiler and the best way to use a free GUI tool for xBase language.

So, beginning with using Harbour in text mode is the best start point, I think.

First step is downloading and install HMG or Harbour. If you didn’t past this step yet please refer previous articles in this section or “Links” page of this blog.

The easiest way for using Harbour compiler is calling hbmk2, the wonderful project maker for Harbour compiler.

Depending your installation, hbmk2 may be in different locations; such as C:\Harbour\bin or c:\hmg\harbour\bin or anything else.

Hereafter I will assume that your hbmk2 is in C:\hmg\Harbour\bin. If your installation is different, please modify above examples.

Second step is assign an empty folder (directory) for work / test affairs; say C:\test.

And the third step is copying your Clipper program(s) to this folder.

But don’t rush; we have some precautions:

– Better way is starting with a single-program project; if you haven’t written a new one. Don’t uses for now projects have multiple program file.

 – Your program may have some “national” characters and these characters may be differently shown between DOS and Windows. If so, you may want fix manually these differences via a Windows based text editor. Or use a program if you have one. Harbour has a clever tool (HB_OEMTOANSI() function) is usable for this purpose.

 – In Clipper it’s possible a program file without module (procedure / function) definition. If you have such file(s), enclose your code with PROCEDURE — RETURN statement pair.

– Every Harbour project must have one and only one MAIN module (procedure / function). The first procedure / function in your single program file will be considered as MAIN module of your project. (In HMG, name of this module must be “main” also).

– Almost all Clipper commands, statement, functions, pseudo functions, manifest constants etc are usable almost in the same ways with Clipper. May be exist some very few and very rare differences, and of course solving methods for its.

For compile process we will use command box (DOS / console window) of Windows. You can open a console window, with the menu Start -> Run -> cmd or selecting it in the “Command Prompt” from the Start Menu \ All Programs.

 – “Command / console window” size may not appropriate for easy use. You may

      – use a MODE ( DOS ) command :

         MODE CON LINES=54 COLS=148

       or

   – adding a SetMode() statement at the beginning of MAIN module of your project. For example:

       SetMode( 25,  80 )  // 25 line 80 column same as standard 
                           // DOS screen ( but not full screen ! )
       SetMode( 48, 128 )  // 48 line 128 column, may be more readable

Now, we are ready to begin: Enter this command in console window :

 C:\hmg\harbour\bin hbmk2 <mainPrgName>

You don’t need any SET command (such as PATH etc) before this command; hbmk2 will find all necessary paths / files.

For running executable after compile, add a -run switch to the command line :

 C:\hmg\harbour\bin hbmk2 <mainPrgName> -run

Of course, you need supply name of your main .prg file in place of <mainPrgName>.

Note that you don’t need a separate “linking” step; hbmk2 will do everything for you.

You may use this

 C:\hmg\harbour\bin hbmk2 <mainPrgName>

command via a batch ( .bat ) command file (such as “build.bat”) too. In this way you can apply compiling process without console window; run .bat file by double click in the Windows Explorer. In this case you may need add a PAUSE command at end of .bat file.

That’s all.

You know, a program file may contains more than one module (procedure / function). So you may develop your project by adding new modules to your single program file.

In this step you don’t need trying extra features, extensions of Harbour. Before that adventure your primary need is to convert existing project Clipper to Harbour.

When you reach a level of multiple-program file project:

– Basic rules are the same: the first module in the your program file is MAIN module of your project.

If your .prg files contains:

  SET PROCEDURE TO <procedure_File_Name>

 and / or

   #include <procedure_File_Name>

 you may or may not continue using these statement.

 – The shortest way for compiling a multiple-file project is use a .hbp ( Harbour Projet ) file. This is a text file and its simplest form is a file contains list of your .prg files. For example:

myprog01.prg
myprog02.prg
myprog03.prg
myprog04.prg

and the compile command is the same :

  C:\hmg\harbour\bin hbmk2 <mainProjectFileName>

In this case you don’t need to use SET PROC… and #include … statement and this is the better way.

Because hbmk2 applies “incremental” compiling, that is compiles only modified files.

Under normal circumstances, any module in any program file is callable in anywhere in the project. If you have some modules that exclusive to this program file, you may use STATIC keyword at the beginning of PROCEDURE / FUNCTION statement. For example:

STATIC FUNCTION OpenTable()

With this syntax you will prevent calling this module outside of this .prg file and the possibility of using this module name into other .prg files.

Example :

Take “A typical Harbour Program” in the “Harbour Sample” page.

As seen at .pdf file by given link, this sample program borrowed from official reference guide of a Clipper compiler. That is, in fact this is a Clipper program and it will may compile with Harbour and run without any modification.

Let’s try.

– Copy and paste this sample and save in your PC with a name say “typical.prg”.

– Comment out the line for now.

 #include "Database.prg" // Contains generic database functions

– Call hbmk2:

 C:\hmg\harbour\bin hbmk2 typical -run

 Note: While working / playing on programs, you may encounter some error messages like:

  Error F0029  Can't open #include file xxx
  Error E0002  Redefinition of procedure or function xxx
  Error: Referenced, missing, but unknown function(s): xxx
  undefined reference to HB_FUN_xxx

 Please don’t panic !

    “Error” is salt and pepper of programming play ! 😉

 The worst situation isn’t getting error, but is unable to stay !

   The “HB_FUN_xxx” may be seen weird at first meet. The “HB_FUN_” is a prefix given by system ( compiler ) to your function; so you need search erroneous point into tour program files without this prefix.

Now, let’s continue to our “typical” program:

If you compile the program with commented out #include … line, possibly it will work, by opening main menu:
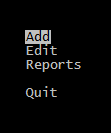
Typical_1

But what’s that?

When selected a menu item (except “Quit”) we can’t see other than an empty screen!

Again, don’t panic!

This situation too is not very rare !

If you use vertical scroll bar of command / console window, you will notice that your screen is considerably much longer than seen !

To avoid this conflict, ( as stated above ) we need use a SetMode() function call at top of our Main() procedure ( but AFTER LOCAL statement ! ) :

  SetMode( 24, 79 )

 And now everything is OK.

Typical_2

In fact, not really everything, we have a few “fine adjustment”.

Cut and paste the section after “// Database.prg” to a separate “Database.prg” file, un-comment the “#include …” line and then re-compile.

In this case we have a “multiple prg” project. As stated earlier, better way is using a .hbp file instead of “#include …” statements.

Now comment out ( or delete now ) the #include line.

Build a new text file with name “typical.hbp” and with this content :

Typical.prg
DataBase.prg

And recall hbmk2 without any modification :

C:\hmg\harbour\bin hbmk2 typical -run

That’s all !

Congratulations !

Now you have a multiple-prg project  !

File Terms

Binary File :

A file that contains an unformatted sequence of bytes. Carriage return, linefeed, or end of file characters have no special meaning in a binary file. Binary files include executable files, graphics files, or data files.

See Also: Text File

Delimited File :

A text file that contains variable-length database records with each record separated by a carriage return/linefeed pair ( CHR(13) + CHR(10) ) and terminated with an end of file mark ( CHR(26) ). Each field within a delimited file is variable length, not padded with either leading or trailing spaces, and separated by a comma. Character strings are optionally delimited to allow for embedded commas.

See Also: Database, SDF File, Text File

Directory :

The major operating system facility for cataloging files. A directory contains a list of files and references to child directories (subdirectories), and is identified by name. Directories can be nested forming a hierarchical tree structure. The operating system provides a number of facilities that allow users to create and delete directories.

See Also: Disk, File, Path, Volume

Drive :

A disk drive or a letter (normally followed by a colon) that designates a disk drive. On most computers, the letters A and B refer to floppy disk drives; other letters refer to fixed disk drives or logical drives (e.g., fixed disk partitions or network drives).

Extension :

A filename extension normally used for identifying the type or originating program of a file.

See Also: Drive, Filename, Path

File :

A file is an organized collection of bytes stored on disk, maintained by the operating system, and referenced by name. Its internal structure is solely determined by its creator.

See Also : Binary File, Database, Text File

File Handle :

An integer numeric value returned from FOPEN() or FCREATE() when a file is opened or created. This value is used to identify the file for other operations until it is closed.

Filename :

The name of a disk file that may optionally include a drive designator, path, and extension.

See Also: Drive, Extension, Path

Path :

A literal string that specifies the location of a disk directory in the tree structured directory system. A path specification consists of the following elements: an optional disk drive letter followed by a colon, an optional backslash indicating that the path starts at the root directory of the specified drive, the names of all the directories from the root directory to the target directory, separated by backslash () characters. Example: C:CLIPPERINCLUDE. A path list is a series of path specifications separated by semicolons.

SDF File :

A text file that contains fixed-length database records with each record separated by a carriage return/linefeed pair (CHR(13) + CHR(10)) and terminated with an end of file mark (CHR(26)). Each field within an SDF file is fixed-length with character strings padded with trailing spaces and numeric values padded with leading spaces. There are no field separators.

Separator :

The character or set of characters that differentiate fields or records from one another. In Clipper language, the DELIMITED and SDF file types have separators. The DELIMITED file uses a comma as the field separator and a carriage return/linefeed pair as the record separator. The SDF file type has no field separator, but also uses a carriage return/linefeed pair as the record separator.

See Also: Delimiter

Subdirectory :

See : Directory

Text File :

A file consisting entirely of ASCII characters. Each line is separated by a carriage return/linefeed pair (CHR(13) + CHR(10)) and the file is terminated with a end of file mark (CHR(26)).

See Also: Delimited File, Program File, SDF File

Volume :

A unit of disk storage uniquely identified by a label and of fixed size. A hard disk can be partitioned into one or more volumes by an operation system utility. Volumes are subdivided into one or more directories organized in tree structure.

See Also: Directory, Disk

How I can migrate ?

How I can migrate DOS  to Windows ?

By principle, Harbour  can compile every Clipper Language program; and Harbour applications can run under Windows ( besides many other platforms ) with no problem. This is one of main goals of Harbour project.

Furthermore, Harbour compiled executables will be 32 bit, not 16 😉

Maybe your application include many ( or too many ) .prg file; no problem; (almost) no modification required on your source code; nor extra scripts for compile. ( Thanks to Viktor Szakáts for really wonderful MAKE utility : HBMK2. )

Only  care is :  if “main” prg of your application doesn’t have a “main” module , add one PROCEDURE or  FUNCTION statement to most top of your “main” .prg.

PROC MAIN

That’s all 🙂

You can build your application via HMG by a .bat file (or direct command in the DOS box) such as :

CALL C:\hmg\build.bat /c <mainPrgName>

or via Harbour:

SET PATH=C:\harbour\bin;C:\hmg\mingw\bin;%PATH%
hbmk2 <mainPrgName> -RUN

or the simplest way :

    C:\harbour\bin hbmk2 <mainPrgName> -RUN

( hbmk2 will find all necessary  paths / files 🙂 )

Of course, you need supply name of your main .prg file in place of <mainPrgName>. You may also want to  change  “C:\hmg” and “C:\hmg\harbour” according to your install configuration.

Please be careful about PATH command : If you call the the .bat file from Windows explorer, no problem. If you are working on command (DOS) box, calling repetitively .bat file may cause problem by grown of PATH . In this case you may build a separate .bat for only PATH command and call it only once at beginning of DOS session.

If you want convert a text (console) based application to GUI ( Graphical User Interface ) based Windows application, this is another thing and there isn’t any automatic way for this.  You have need first a GUI library can be used into Harbour. After selecting which library is convenient to your needs and learning  this library, you may begin planing steps of converting process. Writing your application from scratch may be longest but most secure way.

There are links to some articles  about migration in the Links page; looking at this will be useful.