Quick Start to Migration

Chapter I – Text to text conversion

In Clipper world, “migration” means “convert a DOS based Clipper program to Windows”. This is a dream of every Clipper – DOS programmer.

 Before all, we need clarify some terms:

May be found multiple ways for convert a DOS based Clipper program to Windows. In general, DOS programs are runs in “text” mode and Windows program runs in “Graphic” mode; and this is what meant by term “migration”.

Converting a text mode program to directly GUI (Graphical User Interface) is a painful job. First, we need to find a Compiler with GUI support, or a GUI library usable with a specific compiler. If we have more than one opportunity ( yes, it is so ) we need make a choice between them.

For make a right selection we need learn, understand specialties of each option and differences between them.

Believe me, this is an endless way 😦

Instead, let’s begin with simpler thing: convert a DOS text mode program to Windows text mode program.

Question: Without GUI, what meaning will be to migrate from DOS to Windows?

Answer: Good question and like all good question, answer isn’t easy.

First, modern OSs moves away day to day from DOS conditions; memory problems, screen problems, codepage problems, etc… By the time, building / running 16 bit executable becomes more difficult day to day.

Whereas Harbour already is a 32 / 64 bit compiler.

Second, all DOS Compilers for Clipper are commercial and registration required products; furthermore they are almost out of sold for this days; what compiler you could use?

And third, Harbour is best free compiler and the best way to use a free GUI tool for xBase language.

So, beginning with using Harbour in text mode is the best start point, I think.

First step is downloading and install HMG or Harbour. If you didn’t past this step yet please refer previous articles in this section or “Links” page of this blog.

The easiest way for using Harbour compiler is calling hbmk2, the wonderful project maker for Harbour compiler.

Depending your installation, hbmk2 may be in different locations; such as C:\Harbour\bin or c:\hmg\harbour\bin or anything else.

Hereafter I will assume that your hbmk2 is in C:\hmg\Harbour\bin. If your installation is different, please modify above examples.

Second step is assign an empty folder (directory) for work / test affairs; say C:\test.

And the third step is copying your Clipper program(s) to this folder.

But don’t rush; we have some precautions:

– Better way is starting with a single-program project; if you haven’t written a new one. Don’t uses for now projects have multiple program file.

 – Your program may have some “national” characters and these characters may be differently shown between DOS and Windows. If so, you may want fix manually these differences via a Windows based text editor. Or use a program if you have one. Harbour has a clever tool (HB_OEMTOANSI() function) is usable for this purpose.

 – In Clipper it’s possible a program file without module (procedure / function) definition. If you have such file(s), enclose your code with PROCEDURE — RETURN statement pair.

– Every Harbour project must have one and only one MAIN module (procedure / function). The first procedure / function in your single program file will be considered as MAIN module of your project. (In HMG, name of this module must be “main” also).

– Almost all Clipper commands, statement, functions, pseudo functions, manifest constants etc are usable almost in the same ways with Clipper. May be exist some very few and very rare differences, and of course solving methods for its.

For compile process we will use command box (DOS / console window) of Windows. You can open a console window, with the menu Start -> Run -> cmd or selecting it in the “Command Prompt” from the Start Menu \ All Programs.

 – “Command / console window” size may not appropriate for easy use. You may

      – use a MODE ( DOS ) command :

         MODE CON LINES=54 COLS=148

       or

   – adding a SetMode() statement at the beginning of MAIN module of your project. For example:

       SetMode( 25,  80 )  // 25 line 80 column same as standard 
                           // DOS screen ( but not full screen ! )
       SetMode( 48, 128 )  // 48 line 128 column, may be more readable

Now, we are ready to begin: Enter this command in console window :

 C:\hmg\harbour\bin hbmk2 <mainPrgName>

You don’t need any SET command (such as PATH etc) before this command; hbmk2 will find all necessary paths / files.

For running executable after compile, add a -run switch to the command line :

 C:\hmg\harbour\bin hbmk2 <mainPrgName> -run

Of course, you need supply name of your main .prg file in place of <mainPrgName>.

Note that you don’t need a separate “linking” step; hbmk2 will do everything for you.

You may use this

 C:\hmg\harbour\bin hbmk2 <mainPrgName>

command via a batch ( .bat ) command file (such as “build.bat”) too. In this way you can apply compiling process without console window; run .bat file by double click in the Windows Explorer. In this case you may need add a PAUSE command at end of .bat file.

That’s all.

You know, a program file may contains more than one module (procedure / function). So you may develop your project by adding new modules to your single program file.

In this step you don’t need trying extra features, extensions of Harbour. Before that adventure your primary need is to convert existing project Clipper to Harbour.

When you reach a level of multiple-program file project:

– Basic rules are the same: the first module in the your program file is MAIN module of your project.

If your .prg files contains:

  SET PROCEDURE TO <procedure_File_Name>

 and / or

   #include <procedure_File_Name>

 you may or may not continue using these statement.

 – The shortest way for compiling a multiple-file project is use a .hbp ( Harbour Projet ) file. This is a text file and its simplest form is a file contains list of your .prg files. For example:

myprog01.prg
myprog02.prg
myprog03.prg
myprog04.prg

and the compile command is the same :

  C:\hmg\harbour\bin hbmk2 <mainProjectFileName>

In this case you don’t need to use SET PROC… and #include … statement and this is the better way.

Because hbmk2 applies “incremental” compiling, that is compiles only modified files.

Under normal circumstances, any module in any program file is callable in anywhere in the project. If you have some modules that exclusive to this program file, you may use STATIC keyword at the beginning of PROCEDURE / FUNCTION statement. For example:

STATIC FUNCTION OpenTable()

With this syntax you will prevent calling this module outside of this .prg file and the possibility of using this module name into other .prg files.

Example :

Take “A typical Harbour Program” in the “Harbour Sample” page.

As seen at .pdf file by given link, this sample program borrowed from official reference guide of a Clipper compiler. That is, in fact this is a Clipper program and it will may compile with Harbour and run without any modification.

Let’s try.

– Copy and paste this sample and save in your PC with a name say “typical.prg”.

– Comment out the line for now.

 #include "Database.prg" // Contains generic database functions

– Call hbmk2:

 C:\hmg\harbour\bin hbmk2 typical -run

 Note: While working / playing on programs, you may encounter some error messages like:

  Error F0029  Can't open #include file xxx
  Error E0002  Redefinition of procedure or function xxx
  Error: Referenced, missing, but unknown function(s): xxx
  undefined reference to HB_FUN_xxx

 Please don’t panic !

    “Error” is salt and pepper of programming play ! 😉

 The worst situation isn’t getting error, but is unable to stay !

   The “HB_FUN_xxx” may be seen weird at first meet. The “HB_FUN_” is a prefix given by system ( compiler ) to your function; so you need search erroneous point into tour program files without this prefix.

Now, let’s continue to our “typical” program:

If you compile the program with commented out #include … line, possibly it will work, by opening main menu:

Typical_1

But what’s that?

When selected a menu item (except “Quit”) we can’t see other than an empty screen!

Again, don’t panic!

This situation too is not very rare !

If you use vertical scroll bar of command / console window, you will notice that your screen is considerably much longer than seen !

To avoid this conflict, ( as stated above ) we need use a SetMode() function call at top of our Main() procedure ( but AFTER LOCAL statement ! ) :

  SetMode( 24, 79 )

 And now everything is OK.

Typical_2

In fact, not really everything, we have a few “fine adjustment”.

Cut and paste the section after “// Database.prg” to a separate “Database.prg” file, un-comment the “#include …” line and then re-compile.

In this case we have a “multiple prg” project. As stated earlier, better way is using a .hbp file instead of “#include …” statements.

Now comment out ( or delete now ) the #include line.

Build a new text file with name “typical.hbp” and with this content :

Typical.prg
DataBase.prg

And recall hbmk2 without any modification :

C:\hmg\harbour\bin hbmk2 typical -run

That’s all !

Congratulations !

Now you have a multiple-prg project  !

Hash Basics

Definition:

In general, a Hash Table, or Hash Array, or Associative array, or shortly Hash is an array- like data structure, to store some data with an associated key for each; so, ‘atom’ of a hash is a pair of a ‘key’ with a ‘value’. A hash system needs to perform at least three operations:

–      add a new pair,

–      access to value via key

–      the search and delete operations on a key pair

In Harbour, a hash is simply a special array, or more precisely a “keyed” array with special syntax with a set of functions.

Building:

The “=>” operator can be used to indicate literally the relation between <key> <value> pair: <key> => <value>

 We can define and initialize a hash by this “literal” way :

 hDigits_1 := { 1 => 1, 2  => 2, 3  => 3, 4  => 4 }

 or by a special function call:

 hDigits_1 := HB_HASH( 1, 1, 2, 2, 3, 3, 4, 4 )

 Using “add” method may be another way :

hDigits_1 := { => } // Build an empty hash
hDigits_1[ 1] := 1

hDigits_1[ 2] := 2

hDigits_1[ 3] := 3

hDigits_1[ 4] := 4

In this method while evaluating each of above assignments, if given key exits in hash, will be replaced its value; else add a new pair to the hash.

In addition, data can be added to a hash by extended “+=” operator:

   hCountries := { 'Argentina' => "Buenos Aires" }
   hCountries += { 'Brasil'    => "Brasilia" }
   hCountries += { 'Chile'     => "Santiago" }
   hCountries += { 'Mexico'    => "Mexico City" }

Hashs may add ( concatenate ) each other by extended “+” sign :

   hFruits := { "fruits" => { "apple", "chery", "apricot" } }
   hDays   := { "days"   => { "sunday", "monday" } } 
   hDoris := hFruits + hDays

Note:  This “+” and “+=” operators depends xHB lib and needs to xHB lib and xHB.ch.

Typing :

<key> part of a hash may be any legal scalar type : C, D, L, N; and <value> part may be in addition scalar types, any complex type ( array or hash ).

Correction : This definition is wrong ! The correct is :

<key> entry key; can be of type: number, date, datetime, string, pointer.

Corrected at : 2015.12.08; thanks to Marek.

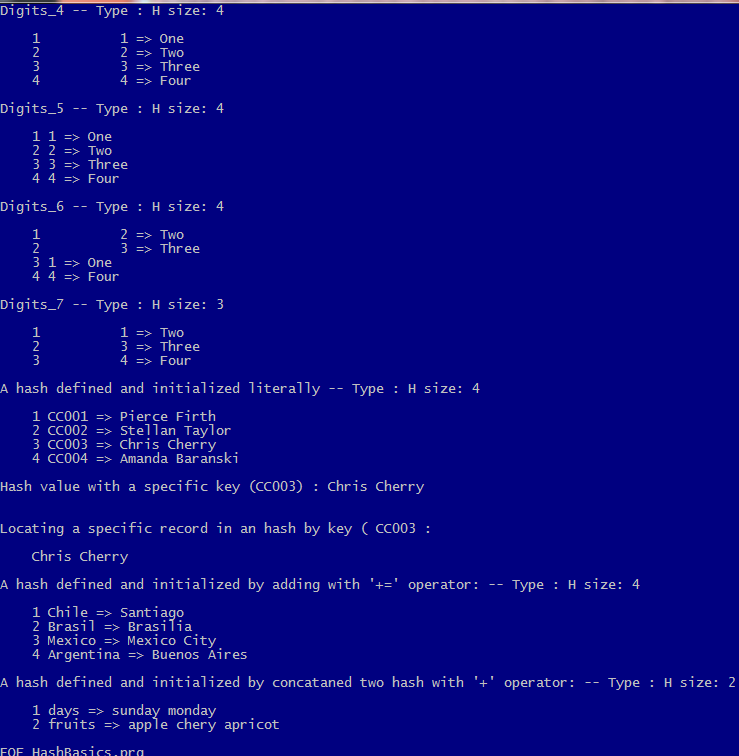
hDigits_2 := {  1  => “One”,  2  => “Two”,  3  => “Three”,  4  => “Four” }

hDigits_3 := { "1" => "One", "2" => "Two", "3" => "Three", "4" => "Four" }
hDigits_4 := { "1" => "One",  2  => "Two",  3  => "Three", "4" => "Four" }
hDigits_5 := {  1  => "One",  1  => "Two",  3  => "Three",  4  => "Four"

All of these examples are legal. As a result, a pair record of a hash may be:

–      Numeric key, numeric value ( hDigits_1 )

–      Numeric key, character value ( hDigits_2 )

–      Character key, character value ( hDigits_3 )

–      Mixed type key ( hDigits_4 )

Duplicate keys (as seen in hDigits_5) is permitted to assign, but not give a result such as double keyed values: LEN( hDigits_5 ) is 3, not 4; because first pair replaced by second due to has same key.

Consider a table-like data for customers records with two character fields: Customer ID and customer name:

Cust_ID Cust_Name
CC001 Pierce Firth
CC002 Stellan Taylor
CC003 Chris Cherry
CC004 Amanda Baranski

We can build a hash with this data :

  hCustomers := { "CC001" => "Pierce Firth",;
 "CC002" => "Stellan Taylor",;
 "CC003" => "Chris Cherry",;
 "CC004" => "Amanda Baranski" }

and list it:

   ?
   ? "Listing a hash :"
   ?
   h1Record := NIL
   FOR EACH h1Record IN hCustomers
      ? cLMarj, h1Record:__ENUMKEY(), h1Record:__ENUMVALUE()
   NEXT

 Accessing a specific record is easy :

 hCustomers[ "CC003" ] // Chris Cherry
*-._.-._.-._.-._.-._.-._.-._.-._.-._.-._.-._.-._.-._.-._.-._.-._.-._.-._.-._.-._.-._.-._.-._.-._.-._.
/*
Hash Basics

*/
#include "xhb.ch"
#define NTrim( n ) LTRIM( STR( n ) )
PROCEDURE Main()
 SET DATE GERM
 SET CENT ON
 SET COLO TO "W/B"

 cLMarj := SPACE( 3 )

 CLS

 hDigits_1 := { => } // Build an empty hash

 hDigits_1[ 1 ] := 1
 hDigits_1[ 2 ] := 2
 hDigits_1[ 3 ] := 3
 hDigits_1[ 4 ] := 4

 ListHash( hDigits_1, "Digits_1" )

 hDigits_2 := HB_HASH( 1, 1, 2, 2, 3, 3, 4, 4 )

 ListHash( hDigits_2, "Digits_2" )

 hDigits_3 := { 1 => 1,;
 2 => 2,;
 3 => 3,;
 4 => 4 }
 ListHash( hDigits_3, "Digits_3" )

 hDigits_4 := { 1 => "One",;
 2 => "Two",;
 3 => "Three",;
 4 => "Four" }
ListHash( hDigits_4, "Digits_4" )

 hDigits_5 := { "1" => "One",;
 "2" => "Two",;
 "3" => "Three",;
 "4" => "Four" }
 ListHash( hDigits_5, "Digits_5" )

 hDigits_6 := { "1" => "One",;
 2 => "Two",;
 3 => "Three",;
 "4" => "Four" }
 ListHash( hDigits_6, "Digits_6" )

 hDigits_7 := { 1 => "One",;
 1 => "Two",; // This line replace to previous due to same key 
 3 => "Three",;
 4 => "Four" }
 ListHash( hDigits_7, "Digits_7" )

 * WAIT "EOF digits"

 hCustomers := { "CC001" => "Pierce Firth",;
 "CC002" => "Stellan Taylor",;
 "CC003" => "Chris Cherry",;
 "CC004" => "Amanda Baranski" }
 ListHash( hCustomers, "A hash defined and initialized literally" )
 ?
 ? "Hash value with a specific key (CC003) :", hCustomers[ "CC003" ] // Chris Cherry
 ?
 cKey := "CC003" 
 ?
 ? "Locating a specific record in an hash by key (", cKey, ":"
 ?
 c1Data := hCustomers[ cKey ]
 ? cLMarj, c1Data

 hCountries := { 'Argentina' => "Buenos Aires" }
 hCountries += { 'Brasil' => "Brasilia" }
 hCountries += { 'Chile' => "Santiago" }
 hCountries += { 'Mexico' => "Mexico City" }

 ListHash( hCountries, "A hash defined and initialized by adding with '+=' operator:" )

 hFruits := { "fruits" => { "apple", "chery", "apricot" } }
 hDays := { "days" => { "sunday", "monday" } } 

 hDoris := hFruits + hDays

 ListHash( hDoris, "A hash defined and initialized by concataned two hash with '+' operator:" )

 ?
 @ MAXROW(), 0
 WAIT "EOF HashBasics.prg"

RETURN // HashBasics.Main()
*-._.-._.-._.-._.-._.-._.-._.-._.-._.-._.-._.-._.-._.-._.-._.-._.-._.-._.-._.-._.-._.-._.-._.-._.-._.
PROCEDURE ListHash( hHash, cComment )

 LOCAL x1Pair := NIL

 cComment := IF( HB_ISNIL( cComment ), '', cComment )

 ? 
 ? cComment, "-- Type :", VALTYPE( hHash ), "size:", NTrim ( LEN( hHash ) ) 
 ?
 FOR EACH x1Pair IN hHash
    nIndex := x1Pair:__ENUMINDEX()
    x1Key := x1Pair:__ENUMKEY()
    x1Value := x1Pair:__ENUMVALUE()
    ? cLMarj, NTrim( nIndex ) 
*   ?? '', VALTYPE( x1Pair )
    ?? '', x1Key, "=>"
*   ?? '', VALTYPE( x1Key ) 
*   ?? VALTYPE( x1Value ) 
    IF HB_ISARRAY( x1Value ) 
       AEVAL( x1Value, { | x1 | QQOUT( '', x1 ) } )
    ELSE 
       ?? '', x1Value
    ENDIF 
 NEXT

RETURN // ListHash()
*-._.-._.-._.-._.-._.-._.-._.-._.-._.-._.-._.-._.-._.-._.-._.-._.-._.-._.-._.-._.-._.-._.-._.-._.-._.

HashBass

Message multiple values

MsgMulti ( aka MsM) is a message function accept multiple and any type of data.

Download here ( source only ).

Your First HMG Program

HMG Tutor 1

Your First HMG Program

I’ll not be original, so this program will display a ‘Hello World’ message 🙂

#include "hmg.ch"
Function Main
   DEFINE WINDOW Win_1 ;
      AT 0,0 ;
      WIDTH 400 ;
      HEIGHT 200 ;
      TITLE 'Tutor 01 - Hello World!' ;
      MAIN
   END WINDOW
   ACTIVATE WINDOW Win_1
Return

 –  #include “hmg.ch” :   Inclusion of header file, required every HMG program.

–    DEFINE WINDOW command: Will create the main window for the program.

–    Win_1: Is the name of the window.

–    AT 0,0: Indicates the window position ( row=0, column=0 )

–    WIDTH 400: Means that the window will have 400 pixels width.

–    HEIGHT 200: Means that the window will have 200 pixels height.

–    TITLE ‘Hello World!’: Indicates the text in the window title bar.

–    MAIN: Indicates that we are defining the main application window (a main window is required for all HMG applications)

–    ACTIVATE WINDOW Form_1: Will show the window and start the event
loop.

That’s all !