Quick Start to Migration

Chapter I – Text to text conversion

In Clipper world, “migration” means “convert a DOS based Clipper program to Windows”. This is a dream of every Clipper – DOS programmer.

 Before all, we need clarify some terms:

May be found multiple ways for convert a DOS based Clipper program to Windows. In general, DOS programs are runs in “text” mode and Windows program runs in “Graphic” mode; and this is what meant by term “migration”.

Converting a text mode program to directly GUI (Graphical User Interface) is a painful job. First, we need to find a Compiler with GUI support, or a GUI library usable with a specific compiler. If we have more than one opportunity ( yes, it is so ) we need make a choice between them.

For make a right selection we need learn, understand specialties of each option and differences between them.

Believe me, this is an endless way 😦

Instead, let’s begin with simpler thing: convert a DOS text mode program to Windows text mode program.

Question: Without GUI, what meaning will be to migrate from DOS to Windows?

Answer: Good question and like all good question, answer isn’t easy.

First, modern OSs moves away day to day from DOS conditions; memory problems, screen problems, codepage problems, etc… By the time, building / running 16 bit executable becomes more difficult day to day.

Whereas Harbour already is a 32 / 64 bit compiler.

Second, all DOS Compilers for Clipper are commercial and registration required products; furthermore they are almost out of sold for this days; what compiler you could use?

And third, Harbour is best free compiler and the best way to use a free GUI tool for xBase language.

So, beginning with using Harbour in text mode is the best start point, I think.

First step is downloading and install HMG or Harbour. If you didn’t past this step yet please refer previous articles in this section or “Links” page of this blog.

The easiest way for using Harbour compiler is calling hbmk2, the wonderful project maker for Harbour compiler.

Depending your installation, hbmk2 may be in different locations; such as C:\Harbour\bin or c:\hmg\harbour\bin or anything else.

Hereafter I will assume that your hbmk2 is in C:\hmg\Harbour\bin. If your installation is different, please modify above examples.

Second step is assign an empty folder (directory) for work / test affairs; say C:\test.

And the third step is copying your Clipper program(s) to this folder.

But don’t rush; we have some precautions:

– Better way is starting with a single-program project; if you haven’t written a new one. Don’t uses for now projects have multiple program file.

 – Your program may have some “national” characters and these characters may be differently shown between DOS and Windows. If so, you may want fix manually these differences via a Windows based text editor. Or use a program if you have one. Harbour has a clever tool (HB_OEMTOANSI() function) is usable for this purpose.

 – In Clipper it’s possible a program file without module (procedure / function) definition. If you have such file(s), enclose your code with PROCEDURE — RETURN statement pair.

– Every Harbour project must have one and only one MAIN module (procedure / function). The first procedure / function in your single program file will be considered as MAIN module of your project. (In HMG, name of this module must be “main” also).

– Almost all Clipper commands, statement, functions, pseudo functions, manifest constants etc are usable almost in the same ways with Clipper. May be exist some very few and very rare differences, and of course solving methods for its.

For compile process we will use command box (DOS / console window) of Windows. You can open a console window, with the menu Start -> Run -> cmd or selecting it in the “Command Prompt” from the Start Menu \ All Programs.

 – “Command / console window” size may not appropriate for easy use. You may

      – use a MODE ( DOS ) command :

         MODE CON LINES=54 COLS=148

       or

   – adding a SetMode() statement at the beginning of MAIN module of your project. For example:

       SetMode( 25,  80 )  // 25 line 80 column same as standard 
                           // DOS screen ( but not full screen ! )
       SetMode( 48, 128 )  // 48 line 128 column, may be more readable

Now, we are ready to begin: Enter this command in console window :

 C:\hmg\harbour\bin hbmk2 <mainPrgName>

You don’t need any SET command (such as PATH etc) before this command; hbmk2 will find all necessary paths / files.

For running executable after compile, add a -run switch to the command line :

 C:\hmg\harbour\bin hbmk2 <mainPrgName> -run

Of course, you need supply name of your main .prg file in place of <mainPrgName>.

Note that you don’t need a separate “linking” step; hbmk2 will do everything for you.

You may use this

 C:\hmg\harbour\bin hbmk2 <mainPrgName>

command via a batch ( .bat ) command file (such as “build.bat”) too. In this way you can apply compiling process without console window; run .bat file by double click in the Windows Explorer. In this case you may need add a PAUSE command at end of .bat file.

That’s all.

You know, a program file may contains more than one module (procedure / function). So you may develop your project by adding new modules to your single program file.

In this step you don’t need trying extra features, extensions of Harbour. Before that adventure your primary need is to convert existing project Clipper to Harbour.

When you reach a level of multiple-program file project:

– Basic rules are the same: the first module in the your program file is MAIN module of your project.

If your .prg files contains:

  SET PROCEDURE TO <procedure_File_Name>

 and / or

   #include <procedure_File_Name>

 you may or may not continue using these statement.

 – The shortest way for compiling a multiple-file project is use a .hbp ( Harbour Projet ) file. This is a text file and its simplest form is a file contains list of your .prg files. For example:

myprog01.prg
myprog02.prg
myprog03.prg
myprog04.prg

and the compile command is the same :

  C:\hmg\harbour\bin hbmk2 <mainProjectFileName>

In this case you don’t need to use SET PROC… and #include … statement and this is the better way.

Because hbmk2 applies “incremental” compiling, that is compiles only modified files.

Under normal circumstances, any module in any program file is callable in anywhere in the project. If you have some modules that exclusive to this program file, you may use STATIC keyword at the beginning of PROCEDURE / FUNCTION statement. For example:

STATIC FUNCTION OpenTable()

With this syntax you will prevent calling this module outside of this .prg file and the possibility of using this module name into other .prg files.

Example :

Take “A typical Harbour Program” in the “Harbour Sample” page.

As seen at .pdf file by given link, this sample program borrowed from official reference guide of a Clipper compiler. That is, in fact this is a Clipper program and it will may compile with Harbour and run without any modification.

Let’s try.

– Copy and paste this sample and save in your PC with a name say “typical.prg”.

– Comment out the line for now.

 #include "Database.prg" // Contains generic database functions

– Call hbmk2:

 C:\hmg\harbour\bin hbmk2 typical -run

 Note: While working / playing on programs, you may encounter some error messages like:

  Error F0029  Can't open #include file xxx
  Error E0002  Redefinition of procedure or function xxx
  Error: Referenced, missing, but unknown function(s): xxx
  undefined reference to HB_FUN_xxx

 Please don’t panic !

    “Error” is salt and pepper of programming play ! 😉

 The worst situation isn’t getting error, but is unable to stay !

   The “HB_FUN_xxx” may be seen weird at first meet. The “HB_FUN_” is a prefix given by system ( compiler ) to your function; so you need search erroneous point into tour program files without this prefix.

Now, let’s continue to our “typical” program:

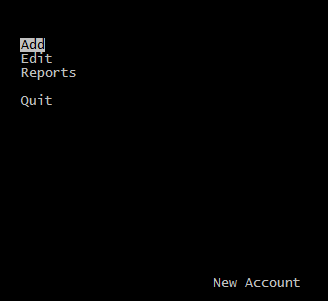
If you compile the program with commented out #include … line, possibly it will work, by opening main menu:

Typical_1

But what’s that?

When selected a menu item (except “Quit”) we can’t see other than an empty screen!

Again, don’t panic!

This situation too is not very rare !

If you use vertical scroll bar of command / console window, you will notice that your screen is considerably much longer than seen !

To avoid this conflict, ( as stated above ) we need use a SetMode() function call at top of our Main() procedure ( but AFTER LOCAL statement ! ) :

  SetMode( 24, 79 )

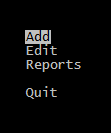
 And now everything is OK.

Typical_2

In fact, not really everything, we have a few “fine adjustment”.

Cut and paste the section after “// Database.prg” to a separate “Database.prg” file, un-comment the “#include …” line and then re-compile.

In this case we have a “multiple prg” project. As stated earlier, better way is using a .hbp file instead of “#include …” statements.

Now comment out ( or delete now ) the #include line.

Build a new text file with name “typical.hbp” and with this content :

Typical.prg
DataBase.prg

And recall hbmk2 without any modification :

C:\hmg\harbour\bin hbmk2 typical -run

That’s all !

Congratulations !

Now you have a multiple-prg project  !
Harbour New Data types

Data type & Syntax extensions in Harbour

In addition to Clipper’s scalar ( Character, Number, Date, Logical, MEMO, Nil ) and complex ( array, CodeBlock )  data types; Harbour has extended data types: pointer as scalar and object and hach as complex type.

For standard data types please refer here and/or here.

In database files (tables) data types of fields are predefined in structure of table.

For extended field types please refer here.

For data items other than fields (such as variables and manifest constants); in general, type of data  determined automatically by system, when assigning a value. The first basic way of this, is assigning a “literal” value.

For a working sample about constants please refer here.

cString := "This is a string" // A character string enclosed by a string delimiter
nNumber := 123.45 // A numeric value combined digits, decimal point and a sign ( + / - )
lTrue   := .T. // A T (tYy) or F (fNn) letter enclosed by two periods (.)
aArray  := {} // Arrays can be assigned literally by enclosed with curly brace

In addition to this basic literal value notations, Harbour has also extended notations:

– Data Types determined by special prefixs

— 0x… : Hexadecimal constant

  nNumber := 0x0A  // 0x prefix implies the string as Hexadecimal String  
                   // and type of resulting value become as Numeric (N) 
  ? nNumber, VALTYPE( nNumber ) // 10 N

— 0d… date constant

    dDate_1 := 0d20121225  // 0d prefix implies the string a date string 
                           // ( instead of using CTOD() )
                           // and type of resulting value become as Date (D) 
    ? dDate_1, VALTYPE( dDate_1 ) // 25.12.2012 D

– Special literal string formats

— d”…” : Date constant

dDate_2 := d"2012-12-26" ? dDate_2, VALTYPE( dDate_2 ) // 26.12.2012 D

— t”…” : Time constant

tTime_1 := dDate_2 + t”01:31:06″

? tTime_1, VALTYPE( tTime_1 ) // 26.12.2012 01:31:06.000 T

— e”…” : Escape sequences

Escape sequences are used to define certain special characters within string literals.

( Prefix by “\” escape sequence codes within that string )

The following escape sequences are available in C and C++ language :

Escape
sequence Description            Representation

   '     single quote          byte 0x27
   "     double quote          byte 0x22
   ?     question mark         byte 0x3f
         backslash             byte 0x5c

         null character        byte 0x00
   a     audible bell          byte 0x07
   b     backspace             byte 0x08
   f     form feed - new page  byte 0x0c
   n     line feed - new line  byte 0x0a
   r     carriage return       byte 0x0d
   t     horizontal tab        byte 0x09
   v     vertical tab          byte 0x0b

   nnn   arbitrary octal value byte nnn
   xnn   arbitrary hexadecimal value byte nn

   unnnn arbitrary Unicode value.
          May result in several characters. code point U+nnnn
   Unnnnnnnn arbitrary Unicode value.
           May result in several characters. code point U+nnnnnnnn

Note that all sequences not available in Harbour.

For the new complex data type Hash, there is a literally assigning way :

hHash := { => }    // => sign indicates the hash

~~~~~~~~~~~~~~~~~~~~~~~~~~~~~~~~~~~~

PROCEDURE Main()
SET CENT ON
SET DATE GERM
CLS

* Data Types determined by special prefixs

** 0x... : Hexadecimal constant

nNumber := 0x0A // 0x prefix implies the string as Hexadecimal String 
// and type of resulting value become as Numeric(D)
? nNumber, VALTYPE( nNumber ) // 10 N
** 0d... date constant 

 dDate_1 := 0d20121225 // 0d prefix implies the string a date string 
                       // ( instead of using CTOD() )
                       // and type of resulting value become as Date (D) 

? dDate_1, VALTYPE( dDate_1 ) // 25.12.2012 D
* Special literal string formats
** d"..." : Date constant
dDate_2 := d"2012-12-26"
? dDate_2, VALTYPE( dDate_2 ) // 26.12.2012 D 

** t"..." : Time constant
tTime_1 := dDate_2 + t"01:31:06"
? tTime_1, VALTYPE( tTime_1 ) // 26.12.2012 01:31:06.000 T

** e"..." : Escape sequences 

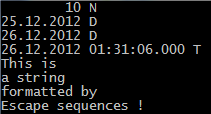
? e"This is\na string\nformatted by\nEscape sequences \x21

/* The result : 
This is
a string
formatted by
Escape sequences !
*/
@ MAXROW(), 0 WAIT "EOF DTS_Exts.prg" 
RETURN // DTS_Exts.Main() 

*~~~~~~~~~~~~~~~~~~~~~~~~~~~~~~~~~~~~~~~~~~~~~~~~~~~~~~~~~~~~~~ DTS_Exts

What is Preprocessor ?

What is Preprocessor and How it Works ?

Preprocessor  Primer ( .pdf )

Preprocessor Primer

What is Preprocessor and How it Works ?

Preprocessor Primer ( .pdf )

C5 Error Handling

C5 Error Handling Commands, Statements and Funtions

Statement :

BEGIN SEQUENCE :

Define a sequence of statements for a BREAK

BEGIN SEQUENCE
    <statements>...
    [BREAK [<exp>]]
    <statements>...
    [RECOVER [USING <idVar>]]
    <statements>...
END [SEQUENCE]

Functions :

ALTD() :

Invoke the Clipper Debugger

ALTD( [ <nAction> ] ) --> NIL

BREAK() :

Branch out of a BEGIN SEQUENCE…END construct

BREAK( <exp> ) --> NIL

DOSERROR() :

Return the DOS error number

DOSERROR( [ <nNewOsCode> ] ) --> nOsCode

ERRORBLOCK() :

Post a code block to execute when a runtime error occurs

ERRORBLOCK( [ <bErrorHandler> ] ) --> bCurrentErrorHandler

ERRORLEVEL() :

Set the Clipper return code

ERRORLEVEL( [ <nNewReturnCode> ] ) --> nCurrentReturnCode

NETERR() :

Determine if a network command has failed

NETERR( [ <lNewError> ] ) --> lError

OUTERR() :

Write a list of values to the standard error device

OUTERR( <exp list> ) --> NIL

PROCLINE() :

Return the source line number of the current or previous activation

PROCLINE( [ <nActivation> ] ) --> nSourceLine

PROCNAME() :

Return the name of the current or previous procedure or user-defined function

PROCNAME( [ <nActivation> ] ) --> cProcedureName

Error Class :

Provides objects containing information about runtime errors.

Description :

An Error object is a simple object that contains information pertaining to a runtime error. Error objects have no methods, only exported instance variables. When a runtime error occurs, CA-Clipper creates a new Error object and passes it as an argument to the error handler block specified with the ERRORBLOCK() function. Within the error handler, the Error object can then be queried to determine the nature of the error condition.

Error objects can also be returned to the RECOVER statement of a BEGIN SEQUENCE construct with a BREAK statement. Here, the error object can be queried for local error handling. For more detailed information and examples refer to the Error Handling Strategies chapter in the Programming and Utilities guide.

Class Function :

ErrorNew() :

Returns a new Error object.

ErrorNew() --> objError

Exported Instance Variables :

args (Assignable) :

An array of function or operator arguments.

Contains an array of the arguments supplied to an operator or function when an argument error occurs. For other types of errors, Error:args contains a NIL value.

canDefault (Assignable) :

Indicates whether or not default recovery is available.

Contains a logical value indicating whether the subsystem can perform default error recovery for the error condition. A value of true (.T.) indicates that default recovery is available. Availability of default handling and the actual default recovery strategy depends on the subsystem and the error condition. The minimum action is simply to ignore the error condition.

Default recovery is requested by returning false (.F.) from the error block invoked to handle the error. Note that Error:canDefault is never true (.T.) if Error:canSubstitute is true (.T.).

canRetry (Assignable) :

Indicates whether or not a retry is possible after an error.

Contains a logical value indicating whether the subsystem can retry the operation that caused the error condition. A value of true (.T.) indicates that a retry is possible. Retry may or may not be available, depending on the subsystem and the error condition.

Retry is requested by returning true (.T.) from the error block invoked to handle the error. Note that Error:canRetry never contains true (.T.) if Error:canSubstitute contains true (.T.).

canSubstitute (Assignable) :

Indicates if a new result can be substituted after an error

Contains a logical value indicating whether a new result can be substituted for the operation that produced the error condition. Argument errors and certain other simple errors allow the error handler to substitute a new result value for the failed operation. A value of true (.T.) means that substitution is possible.

The substitution is performed by returning the new result value from the code block invoked to handle the error. Note that Error:canSubstitute is never true (.T.) if either Error:canDefault or Error:canRetry is true (.T.).

cargo (Assignable) :

User-definable variable.

Contains a value of any data type unused by the Error system. It is provided as a user-definable slot, allowing arbitrary information to be attached to an Error object and retrieved later.

description (Assignable) :

Character description of the error condition.

Contains a character string that describes the error condition. A zero-length string indicates that the subsystem does not provide a printable description for the error. If Error:genCode is not zero, a printable description is always available.

filename (Assignable) :

Name of the file associated with the error

Contains a character value representing the name originally used to open the file associated with the error condition. A zero-length string indicates either that the error condition is not associated with a particular file or that the subsystem does not retain filename information.

genCode (Assignable) :

Error code number.

Contains an integer numeric value representing a CA-Clipper generic error code. Generic error codes allow default handling of similar errors from different subsystems. A value of zero indicates that the error condition is specific to the subsystem and does not correspond to any of the generic error codes. The header file, Error.ch, provides a set of manifest constants for generic error codes.

operation (Assignable) :

Character description of the failed operation.

Contains a character string that describes the operation being attempted when the error occurred. For operators and functions, Error:operation contains the name of the operator or function. For undefined variables or functions, it contains the name of the variable or function. A zero-length string indicates that the subsystem does not provide a printable description of the operation.

osCode (Assignable) :

Operating system error code number

Contains an integer numeric value representing the operating system error code associated with the error condition. A value of zero indicates that the error condition was not caused by an error from the operating system. When Error:osCode is set to a value other than zero DOSERROR() is updated with the same value.

Error:osCode properly reflects the DOS extended error code for file errors. This allows proper distinction between errors which result from sharing violations (e.g., opening EXCLUSIVE when another process has already opened the file) and access violations (e.g., opening read/write when the file is marked read-only).

For a list of DOS error codes please look at here 

severity (Assignable) :

Indicates error severity

Contains a numeric value indicating the severity of the error condition. Four standard values are defined in Error.ch:

Error:severity Values
------------------------------------------------------------
Error.ch        Meaning
------------------------------------------------------------
ES_WHOCARES     The condition does not represent a failure;
                the error is informational.
ES_WARNING      The condition does not prevent further
                operations, but may result in a more serious 
                error later. 
ES_ERROR        The condition prevents further operations without 
                corrective action of some kind. 
ES_CATASTROPHIC The condition requires immediate termination 
                of the application.
------------------------------------------------------------

Note that the Clipper runtime support code only generates errors with severities of ES_WARNING or ES_ERROR

subCode (Assignable) :

Subsystem-specific error code number.

Contains an integer numeric value representing a subsystem-specific error code. A value of zero indicates that the subsystem does not assign any particular number to the error condition.

subSystem (Assignable) :

Character description of the subsystem generating the error.

Contains a character string representing the name of the subsystem generating the error. For errors with basic CA-Clipper operators and functions, the subsystem name “BASE” is given. For errors generated by a database driver, Error:subSystem contains the name of the database driver

tries (Assignable) :

Number of times the failed operation has been attempted.

Contains an integer numeric value representing the number of times the failed operation has been attempted. When Error:canRetry is true (.T.), Error:tries can be used to limit the number of retry attempts. A value of zero indicates that the subsystem does not track the number of times the operation has been tried.

Examples :

. This example demonstrates how a file open operation might be handled in an error handler replicating the default CA-Clipper behavior. When, for example, an attempt to open a database file with a USE command fails, control returns to the statement following the offending command:

#include "Error.ch"
#command RETRY => RETURN (.T.) // Retry operation
#command RESUME => RETURN (.F.) // Default recovery
//
FUNCTION MyError( objError )
   //
   // Handle file open error
   IF objError:genCode == EG_OPEN .AND.;
      objError:canDefault .AND.;
      NETERR()
   //
      RESUME
   ENDIF
  .
  . <other error statements>
  .
RETURN NIL

. This example retries an operation within an error handler a specified number of times:

 #include "Error.ch"
 #command RETRY => RETURN (.T.) // Retry operation
 #command RESUME => RETURN (.F.) // Default recovery
 //
FUNCTION MyError( objError )

 // Handle printer not ready error
 IF objError:genCode == EG_PRINT .AND.;
    objError:canRetry .AND.;
    objError:tries < 25

    RETRY
 ENDIF
 .
 . <other error statements>
 .
 RETURN NIL

. This code fragment returns an error object from an error handler to the RECOVER statement for further processing:

LOCAL objLocal, bLastHandler
// Save current and set new error handler
bLastHandler := ERRORBLOCK({ |objErr| ;
MyHandler(objErr, .T.)})
BEGIN SEQUENCE
   .
   . <operation that might fail>
   .
   RECOVER USING objLocal
   .
   . <send messages to objLocal and handle the error>
   .
END
// Restore previous error handler
ERRORBLOCK( bLastHandler )
FUNCTION MyHandler( objError, lLocalHandler )

    // Handle locally returning the error object
    IF lLocalHandler
       BREAK objError
    ENDIF
    .
    . <other statements to handle the error>
    .
RETURN NIL

Files: Header file is Error.ch, default error handler is in Errorsys.prg.

#include directive

What is #include directive ?

#include

Include a file into the current source file

Syntax :

#include “<headerFileSpec>”

Arguments

<headerFileSpec> specifies the name of another source file to include in the current source file. As indicated in the syntax,  the name must be enclosed in double quotation marks.

<headerFileSpec> may contain an explicit path and file name as well as a file extension. If, however, no path is specified,  the preprocessor searches the following places:

. Source file directory

. Directories supplied with the /I option

. Directories specified in the INCLUDE environment variable

#include directives may be nested up to 15 levels deep–that is, a file that has been included may contain #include  directives, up to 15 levels.

Description

#include inserts the contents of the specified file in place of the #include directive in the source file. By convention, the file inserted is referred to as a header file. Header files should contain only preprocessor directives and external declarations. By convention header files have a .ch extension.

When deciding where to locate your header files, you have two basic choices. You can place them in the source file directory where they are local to the current system; or, you can make them globally available by placing them in the directory specified in the INCLUDE environment variable. A list of one or more directories can be specified.

Header files overcome the one major drawback of defining constants or inline functions–the #define directive only affects the file in which it is contained. This means that every program which needs access to these statements must have a list of  directives at the top. The solution to this problem is to place #define statements in a separate file and use the #include directive to tell the preprocessor to include that file before compiling.

For example, suppose the file “Inkey.ch” contains a list of #define directives assigning key values to constants. Instead of including these directives at the top of each program file (.prg) requiring access to them, you can simply place the following line at the top of each program file:

#include “Inkey.ch”

This causes the preprocessor to look for Inkey.ch and place all the directives contained within it at the top of this program.

Another advantage of using the #include directive is that all the #define statements are contained in one file. If any modifications to these statements are necessary, only the #include file need be altered; the program itself remains untouched.

Note that the scope of definitions within an included header file is the current program file unless the header file is included on the compiler command line with the /U option. In this case, the scope is all the program files compiled in the current invocation of the compiler.

Notes

Supplied header files: The compiler provides a number of header files containing manifest constants for common operations.

Std.ch–the standard header file: Std.ch is the standard header file provided with compiler. Std.ch contains the definitions of all compiler commands and the standard functions specified as pseudofunctions. It is strongly recommended that no changes be made to Std.ch. If changes are desired, it is advisable to copy Std.ch to a new name, make the changes, and compile with /U.

This header file differs somewhat from a header file you might #include in that everything defined in Std.ch, with #define, #translate, or #command, has a scope of the entire compile rather than the current source file.

Examples

This example uses #include to insert Inkey.ch, a file of common keyboard definitions, into a key exception handler called by an interface function:

#include "Inkey.ch"
FUNCTION GetEvent()
   LOCAL nKey, nResult
   nKey = INKEY(0)
   DO CASE
      CASE nKey = K_F10
         nResult := DoMenu("Browse")
      CASE nKey = K_ESC
         nResult := DoQuit()
      .
      . <statements>
      .
      CASE nKey = K_CTRL_RIGHT
          nResult := DoNextRec()
   ENDCASE

RETURN nResult