Tag Archives: item
SP_STAGFIELDS
STAGFIELDS()

  Short:
  ------
  STAGFIELDS() Tag fields

  Returns:
  --------
  aTagged => an array of element #'s of the tagged items

  Syntax:
  -------
  STAGFIELDS([aFieldnames],[cTitle],[cMark])

  Description:
  ------------
  Tags selected items in an array of fields, returning
  an array of element #'s of tagged items in the array of fields.

  [aFieldNames] - an array of field names. Default -
  all fields

  [cTitle]      - title for the popup. Default none

  [cMark]       - character used to mark as tagged.

                          Default is checkmark chr(251)

  Examples:
  ---------
   aTagged := STAGFIELDS()

   for i = 1 to len(aTagged)

     ?field(aTagged[i])   // fieldname

   next

  Source:
  -------
  S_TAGF.PRG
Coding Guidelines
Coding Guidelines
( by Greg Holmes )
| Language Syntax The general rule of thumb is: built-in features in lowercase, and custom-written functions in mixed case. When specifying the complete syntax of a language element in documentation, the input items, parameters, and so on are referred to using the following symbols:
For example:
Metasymbols provide a place holder for syntax elements, and they describe the expected data types. A metasymbol consists of one or more lowercase data type designators followed by a mixed case description. This is known as Hungarian Notation.
In this example,
|
||||||||||||||||||||||||||||||||||||||||||||||||||||||||||||
| Filenames and Aliases All filenames, in any context, are in upper case. Filenames follow DOS naming conventions (preferably limited to letters, numbers, and the underscore).
When referring to specific file types in documentation, include the period. |
| Fieldnames Fieldnames are all uppercase, and always include the alias of the table. Fieldnames may contain underscores, but should not begin with one (because the underscore is generally used to indicate an internal symbol).
|
| Memory Variables Memory variables consist of a lowercase type designator followed by a mixed case description (see Hungarian Notation). Although CA-Clipper only recognizes the first 10 characters as unique, variable names may be longer.
If you use Hungarian Notation for your memory variable names and include the table alias with fieldnames, there will be no conflict between the two. |
| Commands, Functions, and Keywords All built-in commands, functions, and keywords are lowercase. In documentation, the font should be Courier or a similar font. If fonts are not available, then bold or CAPITALIZE the word for emphasis. Never use abbreviations — this practice is not necessary with a compiler, although it was common in the early days of dBase (which was an interpreter). There should never be a space between the function name and the opening parenthesis. Also, note that the iif() function should never be spelled if().
When specifying commands that have clauses in documentation, separate the keywords with an ellipsis (
|
| Programmer-Defined Functions & Procedures These begin with an uppercase letter, followed by mixed case letters as appropriate.
Function and procedure names may contain underscores, but should not begin with one (they may conflict with internal functions which often start with an underscore). There should be only one
The return value of a function is not enclosed in parentheses, although parentheses may be used to clarify a complex expression.
|
| Preprocessor Directives Preprocessor directives are lowercase and are preceded by the # sign.
Optionally, you may use single quotes around header files that come with CA-Clipper and double quotes around your own. This convention is purely voluntary, but it helps to distinguish between the two. For example:
Manifest constants are uppercase.
Pseudo-function names should also be uppercase.
|
| Declarations Local variables are grouped according to functionality, and may be declared on one or more lines. The declarations appear as the first code at the beginning of a function or procedure.
Variables may be declared one per line and accompanied by a description.
The description can be omitted if better variable names are chosen.
Variables can be initialized when they are declared, although it is often clearer (and safer) to initialize them immediately before they are used.
|
| Logicals The .T. and .F. are typed in uppercase. |
| Operators The in-line assignment operator ( :=) is used for all assignments, and the exact comparison operator (==) is used for all comparisons.
Although the compound assignment operators (
The increment (
|
| Spacing Whenever a list of two or more items is separated by commas, the commas are followed by a space.
Spaces may be used between successive parentheses.
Spaces should surround all operators for readability.
In declarations, often spaces are not used around the assignment operator. This tends to make searching for the declaration of a variable easier.
Thus, searching for “ |
| Indentation Indenting control structures is one of the easiest techniques, yet it improves the readability the most. Indent control structures and the code within functions and procedures 3 spaces.
Case statements in a do…case structure are also indented 3 spaces.
|
| Tabs Do not use tabs in source code — insert spaces instead. Tabs cause problems when printing or when moving from one editor to another, because of the lack of a standard tab width between editors and printers. Typically, printers expand tabs to 8 spaces which easily causes nested control structures to fall off the right-hand side of the page. Commonly, a source code editing program will insert the appropriate number of spaces when the <TAB> key is hit. |
| Line Continuation When a line of code approaches the 80th column, interrupt the code at an appropriate spot with a semicolon and continue on the next line. Indent the line so that it lines up in a readable manner.
To continue a character string, end the first line with a quote and a plus sign and place the remainder on the next line. Try to choose a logical place in the string to break it, either at a punctuation mark or after a space.
|
| Quotes Use double quotes for text that needs to be translated (will appear on the screen), and single quotes for other strings.
This is a simple but extremely effective technique because translation departments often want to see the messages in context (in the source code), so the different quote types indicate which messages are to be translated and which should be left alone. |
| Comments Comments are structured just like English sentences, with a capital letter at the beginning and a period at the end.
You may encounter old-style comment indicators if you maintain older (Summer’87 and earlier) code.
For in-line comments, use the double slashes.
Note that the ‘ |
Basic Controls – 3
( Status Bar, Check Box )
We are continuing with Viva_HMG.hbp, Main.prg and Main.fmg.
While using a table and while navigating between its records, we need some extra info to show to user: Name of table, current record and record count in the table. So user always feels comfortable by knowing where is he / she; which table, which record?
The status bar control is convenient for this purpose and though this is a quite simple control, IDE has a builder for it: Status bar builder.
When you choose this builder ( after open the .fmg file by IDE of course ), a dialog box will open:
By using this dialog box we can define a status bar. We can prefer define status bar manually too:
    DEFINE STATUSBAR FONT "Tahoma" SIZE 9
        STATUSITEM "" WIDTH 300
        STATUSITEM "" WIDTH 40
        DATE         WIDTH 90
        CLOCK             WIDTH 90
    END STATUSBAR
After define status bar, we need assign values to its items. We don’t need assign values to DATE and CLOCK items, because these items will be updated by system (HMG) automatically.
First a little procedure :
PROCEDURE InitEdit()
EditReco.StatusBar.Item( 1 ) := cTableFNam
ReadData()
RETURN // InitEdit()
Change ON INIT event of EditReco form from ReadData() to InitEdit(.
And add this line at end of ReadData() procedure.
 EditReco.StatusBar.Item( 2 ) := LTRIM( STR( RECN() ) ) + "\" + ;
                                 LTRIM( STR( LASTREC() ) )
Let’s look at the result :
Whenever active record change, Item( 2 ) of Status Bar will be updated ( 5/25 ) in above picture.
In this step, user must use “Save” button every time current record edited. Whereas “Read” process is different; whenever current record changed, values of text boxes automatically updated. What about automatic save? May be, we can do this; but user may don’t want such automation. Asking a question like “Do you want save?” every change doesn’t a good way.
The better way may be: put a control to form such “Auto save” with On / Off option.
Yes, fortunately we have such control: Check Box.
We can replace a Check Box control to EditReco form with chbAutoSave name and Auto Save caption:
Now, how we will implement Auto Save process?.
By adding a little IF clause to ACTION events of navigation buttons:
Top : (IF(EditReco. chbAutoSave.Value , SaveData(), ), DBGOTOP(), ReadData() )
Next : (IF(EditReco. chbAutoSave.Value , SaveData(), ), DBSKIP(), ReadData() )
Previous : ( IF(EditReco. chbAutoSave.Value , SaveData(), ), DBSKIP( -1 ), ReadData() )
Last : (IF(EditReco. chbAutoSave.Value , SaveData(), ), DBGOBOTTOM(), ReadData() )
To be continued …
Message multiple values
MsgMulti ( aka MsM) is a message function accept multiple and any type of data.
Download here ( source only ).
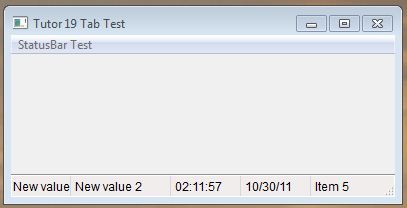
StatusBar Control
HMG Tutor 19
Showing Status (Statusbar Control)
This control creates a bar at window’s bottom, used to show information (usually status information)
#include "hmg.ch"
Function Main
DEFINE WINDOW Win_1 ;
   AT 0,0 ;
   WIDTH 400 ;
   HEIGHT 200 ;
   TITLE 'Tutor 19 StatusBar Test' ;
   MAIN

   DEFINE MAIN MENU
      POPUP '&StatusBar Test'
         ITEM 'Set Status Item 1' ACTION ;
               Win_1.StatusBar.Item(1) := "New value 1"
         ITEM 'Set Status Item 2' ACTION ;
               Win_1.StatusBar.Item(2) := "New value 2"
      END POPUP
   END MENU

   DEFINE STATUSBAR
      STATUSITEM "Item 1" ACTION MsgInfo('Click! 1')
      STATUSITEM "Item 2" WIDTH 100 ACTION MsgInfo('Click! 2')
      CLOCK
      DATE
      STATUSITEM "Item 5" WIDTH 100
   END STATUSBAR

END WINDOW

ACTIVATE WINDOW Win_1

Return
HMG Tutor 7 — More Choices
HMG Tutor 7
More Choices
There is various alternatives to get an user’s choice besides RadioGroup.
One of them is the ListBox Control
@ 10, 10 LISTBOX List_1 ITEMS {'Option 1','Option 2','Option 3'}
Using a Listbox, you can add, change or remove items at runtime.
#include "hmg.ch"
Function Main
DEFINE WINDOW Win_1 ;
   AT 0,0 ;
   WIDTH 400 ;
   HEIGHT 200 ;
   TITLE 'Tutor 07 - ListBox Test' ;
   MAIN
   DEFINE MAIN MENU
      POPUP "First Popup"
         ITEM 'Change ListBox Value' ACTION ;
               Win_1.List_1.Value := 2
         ITEM 'Retrieve ListBox Value' ACTION ;
               MsgInfo ( Str(Win_1.List_1.Value))
         SEPARATOR
         ITEM 'Add List Item' ACTION ;
               Win_1.List_1.AddItem ('New List Item')
         ITEM 'Remove List Item' ACTION ;
               Win_1.List_1.DeleteItem (2)
         ITEM 'Change List Item' ACTION ;
               Win_1.List_1.Item (1) := 'New Item Text'
         ITEM 'Get List Item Count' ACTION ;
               MsgInfo (Str(Win_1.List_1.ItemCount))
      END POPUP
   END MENU
   @ 10, 10 LISTBOX List_1 ITEMS {'Option 1','Option 2','Option 3'}
END WINDOW
ACTIVATE WINDOW Win_1
Return
Main Menu
HMG Tutor 2
Adding The Main Menu
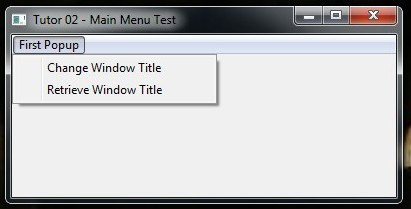
We add a main menu to the program now:
#include "hmg.ch"
Function Main
DEFINE WINDOW Win_1 ;
   AT 0,0 ;
   WIDTH 400 ;
   HEIGHT 200 ;
   TITLE 'Tutor 02 - Main Menu Test' ;
   MAIN
   DEFINE MAIN MENU
      POPUP "First Popup"
         ITEM 'Change Window Title' ACTION  Win_1.Title := 'New Title'
         ITEM 'Retrieve Window Title' ACTION  MsgInfo ( Win_1.Title )
      END POPUP
   END MENU
END WINDOW
ACTIVATE WINDOW Win_1
Return
As you can see it is pretty easy and intuitive.
All the main menu stuff will be between DEFINE MAIN MENU / END MENU statements.
Each individual menu popup will be between POPUP / END POPUP statements.
Each individual menu item will be coded via the ITEM statement.
You can use as popups as you need and you can nest it without any limit.
By the way, another handy feature, a Message function used here :
The MsgInfo() Function
This is a very useful function. It will show a little message window (with the system information icon) and a message (character type) passed as parameter.
You can optionally add a title (passed as the second parameter).
Note: By nature, Message function uses options in local language. Here “Tamam” means “Ok” in my language ( Turkish).


