SP_BLDNDX

BLDNDX()

  Short:
  ------
  BLDNDX() Interactively create a new index

  Returns:
  --------
  <cIndexName> => New index name less extension

  Syntax:
  -------
  BLDNDX([aFields,aDescriptions],[aIndexfiles],[Buildex])

  Description:
  ------------
  Allows point and shoot building of a new index.

  [aFields] - an array of legal field names. If not
  passed, all fields  in current DBF will be used.

  [aDescriptions] - an array of field descriptions. If
  not passed,field names  in current DBF will be used.

  Pass both or neither of  [aFields] and
  [aDescriptions].

  [aIndexFiles]   - an array of currently open index
  files to be reopened on exit from bldndx() (up to 10).
  Otherwise, only the newly created index file will be left open.

  [lBuildex]  - allow use of Buildex() to build complex
  expressions. Default is False.

  Examples:
  ---------
   BLDNDX()

    -- or --

   aNdxFlds  := {"LASTNAME","FIRSTNAME","CITY"}
   aNdxDesc  := {"Last Name","First Name","City"}
   aNdxOpen  := {"CUSTOMER","STATE","ZIPCODE"}
   BLDNDX(aNdxFlds,aNdxDesc,aNdxOpen)
   BLDNDX(nil,nil,aNdxOpen,.t.)   // use buildex()

  Warnings:
  ----------
  Indexes created with this function will require the
  functions DTOS() and NBR2STR() be loaded prior to use if a date
  or numeric field is part of the index. You can do this with the
  EXTERNAL statement.

  EXTERNAL DTOS, NBR2STR

  Notes:
  -------
  All fields are converted to type Character. The
  function NBR2STR() is used to create a usable character
  expression from a numeric field by first adding 1,000,000 to the
  number.

  Source:
  -------
  S_BLDNDX.PRG


C5DG-8 DBPX Driver

Clipper 5.x – Drivers Guide

Chapter 8

DBPX Driver Installation and Usage

DBPX is the Paradox 3.5 compatible RDD for Clipper. It connects to the low-level database management subsystem in the Clipper architecture. When you use the DBPX RDD, you add a number or features, including the ability to:

. Create access to and modify Paradox tables, records, and fields

. Create, select, and activate secondary indexes on Paradox tables

. Create and modify Paradox table structures, including primary index fields

. Use explicit record and file locks with concurrent execution of other Clipper applications

. Import Paradox tables directly into Clipper arrays

In This Chapter

This chapter explains how to install DBPX and how to use it in your applications. The following major topics are discussed:

. Overview of the DBPX RDD

. Installing DBPX Driver Files

. Linking the DBPX Driver

. Using the DBPX Driver

Overview of the DBPX RDD

The DBPX driver lets you create and maintain (.db), (.px), (.x??), and (.y??) files with features different from those supplied with the original DBFNTX driver and compatible with files created under Paradox 3.5. The new features are supplied in the form of several syntactical additions to database and indexing commands and functions. Specifically you can:

. Create tables that recognize the standard Clipper data types as well as Currency ($) and Short (S) numbers between -32,767 to +32,767

. Create equally efficient keyed and unkeyed tables

. Create, select, and activate secondary indexes on Paradox tables

The DBPX driver provides simple, seamless access to the Paradox database system. The Clipper application programmer who intends to access Paradox tables with the “VIA” clause need only include the RDD header file at compile time and make the appropriate libraries available at link time.

Paradox stores data in tables (known to Xbase developers as data files (.db)’s), consisting of fields and records. Unlike Xbase databases, a Paradox database refers to a group of files that are related to each other in some way, rather than to one file.

Also, Paradox employs the concept of companion files, known as objects, that are related to the table. Some examples of object files are report forms, indexes, and data entry forms. A table and its accompanying objects are referred to as a family.

It is easy to identify objects belonging to a particular family since they all have the same base filename and are distinguished by their extensions as shown in the table below.

Paradox File Descriptions
——————–  —————————————————
Extension         Object

.DB                       Table

.PX          Primary Index 
.X?? or Y??  Secondary Index
.F or F??    Data Entry Forms
.R or R??    Report Formats
.G or G??    Graph Specifications
.SET         Image Settings
.VAL         Field Validity Specifications
------------ ------------------------------------------------------------

The DBPX driver only deals with the table and index files (.db, .px, .x?? and y??) so only these files are discussed here.

Though Paradox tables are limited to 8 character filenames, each table can contain an unlimited number of records in files up to 256M in size. Paradox records in nonkeyed tables can be up to 4000 bytes each while keyed tables have a 1350 byte limitation. Each record can contain up to 255 fields of up to 255 characters each.

There are some field naming restrictions you must observe. Field names may:

. Although the Paradox file structure allows fields to be up to 25 characters long, since Clipper symbols can only be 10 characters, DBPX truncates the field name to 10 characters.

. The Paradox file structure allows embedded spaces in field names. Since this is illegal in Clipper, the DBPX driver converts spaces into underscores (_).

. Not be duplicated in the same table.

Also, most Paradox data types directly match data types in standard Xbase data files, with these differences:

. Paradox tables support both the Numeric (N) data type as well as a more specific Currency ($) data type. Both the N and $ data types can have 15 significant digits. Numeric types that exceed this length are rounded and stored as scientific notation. Also, DBPX supports the Short (S) data type to represent numbers between -32,767 and +32,767.

. The Alphanumeric field type allows all ASCII characters except embedded nulls (ASCII 0). The Alphanumeric type is identical to the Character (C) data type in Xbase. Paradox limits this field type to 255 characters.

. Paradox also supports a Date (D) field type, stored as a long integer. It can contain any value between January 1, 100 A.D. and December 31, 9999.

Installing DBPX Driver Files

The DBPX RDD is supplied as the file, DBPX.LIB:

The Clipper installation program installs this driver in the \CLIPPER5\LIB subdirectory on the drive that you specify, so you need not install the driver manually.

Linking the DBPX Database Driver

To link the DBPX driver, you must specify DBPX.LIB to the linker along with your application object (.OBJ) modules.

1. To link with .RTLink using positional syntax:

C>RTLINK <appObjectList> ,,,DBPX

2. To link with .RTLink using freeformat syntax:

C>RTLINK FI <appObjectList> LIB DBPX

Note: These link commands all assume the LIB, OBJ, and PLL environment variables are set to the standard locations. They also assume that the Clipper programs were compiled without the /R option.

Using the DBPX Database Driver

To use Paradox files in a Clipper program:

1. Place REQUEST DBPX at the top of each program file (.prg) that opens a database file using the DBPX driver.

2. Specify the VIA “DBPX” clause if you open the database file with the USE command.

-OR-

3. Specify “DBPX” for the <cDriver> argument if you open the database file with the DBUSEAREA() function.

-OR-

4. Use RDDSETDEFAULT( “DBPX” ) to set the default driver to DBPX.

Except in the case of REQUEST, the RDD name must be a literal character string or a variable. In all cases it is important that the driver name be spelled correctly using uppercase letters.

The following program fragments illustrate:

REQUEST DBPX 
. 
. 
. 
USE Customers INDEX Name, Address NEW VIA "DBPX"
-OR-
REQUEST DBPX RDDSETDEFAULT( "DBPX" )
.
. 
. 
. 
USE Customers INDEX Name, Address NEW

Index Management 

The greatest variation from the standard Xbase database design in Paradox tables is index management. As in other systems, Paradox indexes are an efficient method of dynamically sorting or locating specific data within a table without forcing a search of all data in that table. Paradox tables take two forms: unkeyed and keyed.

An unkeyed table has no fields in its structure that have been identified as specific index keys. Therefore, records are maintained in natural order. New records are added to the end of an existing table, and the unique identity for each record is a record number.

Unlike Xbase data files, unkeyed tables are not more efficient in design or faster to traverse than keyed tables. This is because Paradox tables are built as linked lists rather than fixed-length, sequential tables. Therefore, it is actually less efficient to SKIP through a unkeyed table than it is through a keyed table.

A keyed table, on the other hand, can be lightning fast as long as the data you seek is part of the key. Otherwise, just as in an unkeyed table, you are forced to do a sequential search through the table’s data fields.

Paradox tables support two types of keys or indexes.

. Primary

. Secondary

Primary Indexes

Primary indexes are directly tied to keyed tables because a primary index indicates the table is keyed. Simply, it is impossible to have a keyed table without a primary index. If you remove the primary index from a keyed table it becomes an unkeyed table.

When you identify one or more of the table’s fields as a key field (by placing an asterisk (*) at the end of the field name) during table creation/restructuring, these fields are used to create a primary index. (Note that all key fields must be together as the first fields in a table). This invisibly rebuilds the table’s structure, though in operation it only seems to change or create the key index.

Once you identify this primary key, the table is automatically maintained in the key field order and all new records are checked to make sure that no duplicate keys are added to the table. This type of index is called a unique key index. You may have only one primary key per table, but this key can be a composite of many fields in the table. You may only modify by restructuring the table.

If it is necessary to change a primary key and restructure a table, all data in the table will still be bound to the unique key restriction. This is important if you change the primary key by adding a new field to it and there is already data in the table where this new composite key would have duplicates.

DBPX handles this situation by generating a runtime error and removing every record that violates this unique key and moving it to another table named KEYVIOL.db which has the identical structure of the offending table.

The KEYVIOL.db is automatically generated whenever this situation occurs. If there is already a KEYVIOL table, it is overwritten. Because of this you should always check for the existence of a KEYVIOL.db table immediately after any type of table restructuring.

Secondary Indexes

Secondary indexes are more like common Xbase-type indexes because they can be generated or modified on the fly without having any effect on the data or table structure and aren’t restricted to unique key data.

Unlike Xbase indexes, secondary indexes can only contain a single field as their key. As mentioned earlier, primary indexes are automatically maintained so that they are always up to date. Secondary indexes are created in two different types.

. Incremental (for keyed tables)

. Independent (for unkeyed tables)

Independent indexes are created only for unkeyed tables and are not dynamically maintained in any way. Because of this they can only be considered accurate at the time of their creation. If data changes inside the table that affects the index, the index must be completely regenerated before it can be considered useful again.

Alternately, incremental indexes are created only for keyed tables and are automatically maintained similarly to primary indexes except that instead of a complete rebuild at every change, only the portion of the index affected is updated. Incremental indexes are preferable when you are handling large tables since they take considerably less time and energy to keep accurate.

Temporary Indexes

ALL, NEXT, RECORD, and REST are all supported in the scoping expressions. The syntax of these keywords is identical to that used in Clipper. Note that you can only use one scope keyword at a time. If more than one of these keywords is encountered in a scoping expression, then the last keyword in the expression is the option used.

The ALL keyword (default) specifies that all records in the table should be included in the operation, starting at the first record.

NEXT processes the specified number of records, starting with the current record. For example, NEXT 5 would process the current record and the four records following it.

The RECORD keyword identifies a specific record to process. The desired record number should follow the keyword RECORD. To process record number 3, you would include “RECORD 3” in the expression.

The REST keyword causes processing to begin with the current record, instead of starting at the beginning of the table.

Sorting

In the event that you want to reorder a table based on field data but don’t need or want to have an index attached to it, you have the option of sorting the table based on the current index. This entails a simple copy from a keyed table to an unkeyed table using the table sort function.

Passwords and Security

Although the Paradox DBMS cannot be considered a data dictionary system, it does have some special characteristics that make it more suitable to networks than the standard Xbase tables. One of these features is the level of security available.

There are two methods to make sure that your data is secure: master passwords and auxiliary passwords. As the owner of a table, you can limit access by attaching a master password to it. Auxiliary passwords can also be identified to establish access to the table and its family.

Once any type of password is identified for a table, its is encrypted. This protects it not only from unauthorized Paradox users but also from anyone trying to dissect it at the DOS file level. The encryption method used by Paradox is literally unbreakable and if you (or your users) forget a table password, there is no way to recover that information.

Auxiliary passwords allow access control at the table and field levels. Access to tables can be restricted to:

. ReadOnly: No changes to the table can be made

. Update: Changes to nonkey fields are allowed, no records can be added or deleted

. Entry: Same as update except that new records can be added

. InsertDelete: Same as Entry except that records can be inserted and deleted

. All: Full access including restructuring and table deletion

Access to the fields can be identified as:

. None: This field data cannot be displayed to the user

. ReadOnly: User can see the field value, but cannot change it

. All: Full access

With DBPX, you may perform basic database operations on Paradox tables without code changes.

Note that because Paradox tables can have primary indexes which are actually part of the table structure specification, when you open a Paradox table, its associated primary index (if applicable) is also opened and activated. The only exception to this rule is if you indicate that you want a secondary index to be activated at the time you open the table. If no primary index is available and no secondary index is specified, the table is opened in natural sequence order.

You can have up to twenty-four Paradox tables open simultaneously. These may be separate tables or the same table repeatedly or any variation in between. This might be important if you want to have more than one secondary index active for a single table, allowing you to move from one work area to another with the only change being the index order of the data in the table. Be careful with this type of multiviewed approach, however, since you will be eating up memory for each work area, despite the fact that they refer to the same table.

Sharing Data in Networks

The DBPX driver supports the native Clipper single-lock locking scheme. Therefore, in a shared environment, your application and Paradox will not see each other’s record locks. This may result in some concurrency corruption and errors.

In a shared environment, DBPX performs no record buffering; immediately writing all changes to disk.

Concurrency is an issue whenever your application is running either on a network or in some other shared environment. One example of a non- network shared environment is when your application is called from another program (like Paradox, Quatro Pro, etc.) that also has access to the Paradox tables. Even if you don’t have any plans to use your program on a network, you should design it to be smart enough not to become a problem if faced with this type of shared example.

Also be aware that many networks have different rights and privilege restrictions and you should know what they are and how to handle them.

Using (.px) and (.ntx) Files Concurrently

You can use both (.px), as well as (.x), (.y) and (.ntx) files concurrently in a Clipper program like this:

REQUEST DBPX
// (.ntx) file using default DBFNTX driver
USE File1 INDEX File1 NEW
// (.idx) files using DBPX driver
USE File2 VIA "DBPX" INDEX File2 NEW

Note, however, that you cannot use (.px) and (.ntx) files in the same work area. For example, the following does not work:

USE File1 VIA "DBFNTX" INDEX File1.ntx, File2.px

Summary

In this chapter, you were given an overview of the features and benefits of the DBPX RDD. You also learned how to link this driver and how to use it in your applications.

C5DG-7 DBFNTX Driver

Clipper 5.x – Drivers Guide

Chapter 7

DBFNTX Driver Installation and Usage

DBFNTX is the default RDD for Clipper. This new database driver replaces the DBFNTX database driver supplied with earlier versions of Clipper and adds a number of new indexing features. With DBFNTX, you can:

. Create conditional indexes by specifying a FOR condition

. Create indexes using a record scope or WHILE condition, allowing you to INDEX based on the order of another index

. Create both ascending and descending order indexes

. Specify an expression that is evaluated periodically during indexing in order to display an index progress indicator

In This Chapter 

This chapter explains how to install DBFNTX and how to use it in your applications. The following major topics are discussed:

. Overview of the DBFNTX RDD

. New Locking Scheme

. Conditional Indexing

. Installing DBFNTX Driver Files

. Linking the DBFNTX Driver

. Using the DBFNTX Driver

. Compatibility with dBASE III

Overview of the DBFNTX RDD

As an update of the default database driver, DBFNTX is linked into and used automatically by your application unless you compile using the /R option.

New Features

The replaceable driver lets you create and maintain (.ntx) files using features above and beyond those supplied with the previous DBFNTX driver. The new indexing features are supplied in the form of several syntactical additions to the INDEX and REINDEX commands. Specifically you can:

. Specify full record scoping and conditional filtering using the standard ALL, FOR, WHILE, NEXT, REST, and RECORD clauses

. Create an index while another controlling index is still active

. Monitor indexing as each record (or a specified record number interval) is processed using the EVAL and EVERY clauses

. Eliminate separate coding for descending order keys using the DESCENDING clause

Compatibility

Index files (.ntx) created with the original DBFNTX driver are compatible with DBFNTX and can be used in new applications without reindexing. Index files (.ntx) created with this version of DBFNTX will also work with previous Clipper applications provided that you use no FOR, WHILE, <scope>, or DESCENDING clauses.

Important! Indexes produced with DBFNTX using FOR or DESCENDING are incompatible with earlier version (.ntx) files. If you attempt to access them with the original DBFNTX database driver or programs compiled with versions earlier than Clipper 5.2, you will get an unrecoverable runtime error. In Clipper, this generates an “index corrupted” error message, causing the application to terminate.

New Locking Scheme

The DBFNTX database driver implements a new locking scheme to resolve several problems identified in previous versions of Clipper and to prevent potential problems that might arise when running Clipper applications in a network environment. This section discusses these changes and their implications, including compatibility issues.

Lock Time-outs

Problem: Index locking in previous versions of Clipper was handled automatically by the database driver, and had no time-out provision. This created the potential for problems in network environments if a workstation died while holding a lock. If this situation occurred all other workstations waiting for an index lock would appear to freeze while waiting to obtain their lock. This could also happen if a user placed a Clipper application in the background on a multitasking system without sufficient processing time allocated to it. Eventually, most network operation systems would clear a connection that had no activity for a specified period of time. This would free the lock and everything would resume as normal, but frustrated users may have rebooted their machines possibly causing file corruption.

Solution: In Clipper 5.2 the NTX driver will generate a recoverable runtime error if it fails to lock the index after a predetermined number of retries. The default error handler for this system simply returns (.T.) to retry the operation. This emulates the behavior of previous Clipper versions.

Error Handling

Time out handling: The handling of this error is problematic because the lock is issued from various internal index routines. Therefore the only safe recoveries are to retry or quit. Choosing to default from the error or issuing a break will more than likely leave the index in a corrupted state. If either of the options is employed, the application should immediately recreate the index. The preferred way to handle a time out such as this is to alert the user of the situation so they don’t think their machine has hung, and then have the network administrator determine what workstation is causing the problem. When the problem workstation is cleared, the users that have timed out can select retry and continue processing.

NTXERR.PRG: The file NTXERR.PRG contains the source code for the default error handler INIT procedure. This error handler can be modified to allow user-defined error handling for index lock time-outs. Care should be exercised when modifying the error handler as detailed above.

Compatibility: The lock time-out capability when used in conjunction with the default error handler is totally compatibility with previous versions of Clipper. No changes are made to the NTX file structure and no action is required by the developer to activate the time-out functionality.

New Lock Offset

Problem: Index locking, which is transparent to the developer, uses a single-byte semaphore locking system. This semaphore was placed at a virtual offset (beyond the physical end of file) in the index file. In previous versions of Clipper, this offset was located at one billion (1,000,000,000) which was adequate at the time. But many systems today are capable of producing indexes that are large enough to cause the actual data present at the lock offset to become physically locked. This leads to problems when trying to read or write to the data at that offset.

Solution: The solution is to move the offset where locking occurs to a location at a greater offset. We have chosen FFFFFFFF hex, which is the largest offset possible under the DOS operating system. The problem with this solution is that new applications using the index will be locking this new byte while old applications using the same index will lock the old position. Clearly this would cause both applications to fail because each could have a lock on the file at the same time.

To avoid this, the signature of the index (in the index header) is modified to prevent pre-Clipper 5.2 applications from being able to open the index. Clipper 5.2 applications can detect the correct offset to use by the flag in the header and will automatically use the correct one. In Figure 7-1 below, each bit represents a flag:

BIT  7 6 5 4 3 2 1 0
FLAG R R R O P I I C
R Reserved
I Index type - both bits set (NTX)
C Index created with a Condition, condition in header
T Created as a Temporary index
O New Offset for exclusive (semaphore) lock
Figure 7-1: Bit Field for the Signature Byte of a -Clipper 5.2 NTX File

Activation

If Clipper 5.2 automatically modified the signature in the header when it created indexes, programs with automatic reindexing routines would be creating indexes that appeared corrupt to pre-Clipper 5.2 applications. This has an obvious problem with backward compatibility. Therefore, in order to create indexes with the new signature, the developer must link in the module NTXLOCK2.OBJ with the full knowledge that this will create indexes that older applications will not be able to access.

Header Changes

The signature byte of a .NTX file is 6 for an unenhanced NTX index. The inclusion of the NTXLOCK2.OBJ will cause the signature to become 26 hex. (6 hex ORed with 20 hex). See Figure 7-1 for an illustration of all the possible values for the signature byte.

Error Handling

Clipper 5.2 applications will automatically recognize the signature byte of the header, and depending on the signature value, will use the correct index lock location. Applications built with previous versions of Clipper, however, do not have the capability to detect the optional new information in the signature byte. Therefore, when an order application tries to open a file that has been created with the NTXLOCK2.OBJ linked in it will produce a Corruption Detected error.

Compatibility

The new locking location, if used, is not backward compatible with applications compiled with previous versions of Clipper.

Indexes created by applications built with a previous version of Clipper can be used by Clipper 5.2 using the new location and will not be modified unless the index is recreated in application.

Since older applications have no knowledge of the new index locking scheme nor of the significance of the header signature, these applications will assume the index is corrupt and will produce an Index Corrupted error.

Conditional Indexing

Conditional indexes are a feature of the DBFNTX driver. This section discusses this feature of the DBFNTX driver in some detail, giving you specific information about the implementation of conditional indexes. Compatibility issues are also discussed.

Conditional Indexes

Conditional indexes are produced by using a FOR condition in the index creation process. These indexes are made fully maintainable by storing the FOR condition in the index header. This condition is subsequently retrieved and compiled each time the index in opened. During updates, items are added to the index only if they meet the criteria of the condition.

Since older applications do not have the ability to recognize and use the condition stored in the header, they must be prevented from opening the index since they corrupt the index. This is accomplished by modifying the signature of the index (in the index header) preventing pre-Clipper 5.2 applications from being able to open the index. Clipper 5.2 applications can detect the flag in the header and will automatically use the stored FOR condition correctly.

Temporary Indexes

Temporary indexes are produced by using any scoping clause other than the FOR condition in the index creation process. These indexes are not automatically maintainable because the condition is not stored for later use. These indexes can be made maintainable if the condition can be expressed as a FOR condition and is added using the FOR clause. But the main use of temporary indexes is for fast creation of indexes for read- only browses or reports that operate on a subset of the database.

Since older applications would not operate properly with indexes that do not contain all the keys in a given database, they must be prevented from using them. This is accomplished by modifying the index signature to prevent pre-Clipper 5.2 applications from being able to open the index.

Activation

Conditional Indexes

The developer need only specify the FOR condition when creating the index. In doing so he must be fully aware the index will no longer be accessible to pre–Clipper 5.2 applications.

Temporary Indexes

The developer need only specify a scope other than FOR when creating the index. In doing so he must be fully aware the index will no longer be accessible to pre-Clipper 5.2 applications and that the index created is not maintainable.

Header Changes

The signature byte of a .NTX file is 6 for a unenhanced NTX index. If the index is created as a conditional index it will have a signature of 7 hex (6 hex ORed with 1 hex). If the index is created as a temporary index it will have a signature of E hex. (6 hex ORed with 8 hex). See Figure 7-1 for an illustration of all the possible values for the signature byte.

Error Handling

Corruption Detected

Since older applications have no knowledge of the new index features nor how to interpret the additional flags in the header signature, these applications will assume the index is corrupt and will produce an Index Corrupted error.

EOF()

If an index is created with a FOR condition and an attempt is made to update the index with a key that does not match the condition, the update is suppressed and the index is placed at EOF(). This is consistent with the current behavior for indexes created with the unique flag when an update is attempted with a non-unique key.

Also if a navigational action is attempted (SKIP) and the current record is not found in the index, the index will place the record pointer at EOF(). This is true for both conditional and temporary indexes.

Compatibility

Backward Compatibility

If the conditional or temporary indexing features are used the index produced will not be backward compatible with applications compiled with previous versions of Clipper. Indexes that do not use the features, however, will be 100% compatible.

Forward Compatibility

Indexes created by applications built with a previous version of Clipper can be used by Clipper 5.2 and will not be modified unless the index is recreated using either the conditional or temporary index features.

Error Message Produced by Old Applications

Since older applications have no knowledge of the new index locking scheme nor of the significance of the header signature, these applications will assume the index is corrupt and will produce an Index Corrupted error.

Installing DBFNTX Driver Files

DBFNTX is supplied as the file DBFNTX.LIB.

The Clipper installation program installs this driver as the default in the \CLIPPER5\LIB subdirectory on the drive that you specify, so you need not install the driver manually.

Important! Before installing Clipper, you may want to rename the DBFNTX.LIB that currently resides in your \CLIPPER5\LIB directory to DBFNTX.001. The new version, when installed, will overwrite DBFNTX.LIB. If you do not rename or otherwise protect the old version of DBFNTX.LIB, you will lose it.

Linking the DBFNTX Database Driver

Since DBFNTX is the default database driver for Clipper, there are no special instructions for linking. Unless you specify the /R option when you compile, the new driver will be linked into each program automatically if you specify a USE command or DBUSEAREA() function without an explicit request for another database driver. The driver is also linked if you specify an INDEX or REINDEX command with any of the new features.

Using the DBFNTX Database Driver

In applications written for the new DBFNTX driver, you can use the INDEX and REINDEX commands exactly as you have used them in the past. The index files (.ntx) you create and maintain in this way are completely compatible with those created using previous versions of the driver.

Changes to existing code are necessary only if you use the new indexing features. The (.ntx) files you create using the new features will have a slightly different header file and cannot be used by programs linked with a previous version of the driver.

Using (.ntx) and (.ndx) Files Concurrently

You can use (.ntx) and (.ndx) files concurrently in a Clipper program like this:

// (.ntx) file using default DBFNTX driver

USE File1 INDEX File1 NEW

// (.ndx) files using DBFNDX driver

USE File2 VIA "DBFNDX" INDEX File2 NEW

Note, however, that you cannot use (.ntx) and (.ndx) files in the same work area. For example, the following does not work:

USE File1 VIA "DBFNDX" INDEX File1.ntx, File2.ndx

Compatibility with dBASE III PLUS

The default DBFNTX driver makes Clipper programs behave differently than traditional dBASE programs. Some of these differences are discussed below.

Supported Data Types

The DBFNTX database driver supports the following dBASE III PLUS- compatible data types for key expressions:

. Character

. Numeric

. Date

. Logical

Supported Key Expressions

When you create (.ntx) files using the DBFNTX driver, you can use all Clipper or user-defined functions compatible with dBASE III PLUS as well as other functions accepted by the extended Clipper functionality.

Error Handling

The indexing behavior of DBFNTX and DBFNDX in a Clipper application is identical unless otherwise noted. With the default DBFNTX driver, you can handle most errors using BEGIN SEQUENCE…END SEQUENCE as illustrated in the next section.

FIND vs SEEK

In Clipper, you can use the FIND command only to locate keys in indexes where the index key expression is character data type. This differs from dBASE III PLUS where FIND supports character and numeric key values.

Note: In Clipper programs, always use the SEEK command or the DBSEEK() function to search an index for a key value.

The DBFNTX driver lets you recover from data type errors raised during a FIND or SEEK. However, since Error:canDefault, Error:canRetry or Error:canSubstitute are set to false (.F.), you should use BEGIN SEQUENCE…END to handle such SEEK or FIND data type errors. Within the error block for the current operation, issue a BREAK() using the error object that the DBFNTX database driver generates, like this:

bOld := ERRORBLOCK({|oError| BREAK(oError)})
 .
 .
 .
 BEGIN SEQUENCE
     SEEK xVar
 RECOVER USING oError
     // Recovery code END
 .
 .
 .
 ERRORBLOCK(bOld)

There is an extensive discussion of the effective use of the Clipper error system in the Error Handling Strategies chapter of the Programming and Utilities guide.

Sharing Data on a Network

The DBFNTX driver provides file and record locking schemes that are different from dBASE III PLUS schemes. This means that if the same database and index files are open in Clipper and in dBASE III PLUS, Clipper program locks are not visible to dBASE III PLUS and vice versa.

Warning! Database integrity is not guaranteed and index corruption will occur if Clipper and dBASE III PLUS programs attempt to write to a database or index file at the same time. Therefore, concurrent use of the same database (.dbf) and index (.ndx) files by dBASE III PLUS and Clipper programs is strongly discouraged and not supported by Computer Associates.

Summary

In this chapter, you were given an overview of the new features of the default DBFNTX RDD. You learned how to this driver is automatically linked and how to use it in your applications, and were given an overview of the compatiblity issues.

C5DG-4 DBFCDX Driver

Clipper 5.x – Drivers Guide

Chapter 4

DBFCDX Driver Installation and Usage

DBFCDX is the FoxPro 2 compatible RDD for Clipper. As such, it connects to the low-level database management subsystem in the Clipper architecture. When you use the DBFCDX RDD, you add a number of new features including:

. FoxPro 2 file format compatibility

. Compact indexes

. Compound indexes

. Conditional indexes

. Memo files smaller than DBFNTX format

In This Chapter

This chapter explains how to install DBFCDX and how to use it in your applications. The following major topics are discussed:

. Overview of the DBFCDX RDD

. Installing DBFCDX Driver Files

. Linking the DBFCDX Driver

. Using the DBFCDX Driver

Overview of the DBFCDX RDD

The DBFCDX driver lets you create and maintain (.cdx) and (.idx) files with features different from those supplied with the original DBFNTX driver and is compatible with files created under FoxPro 2. The new features are supplied in the form of several syntactical additions to the INDEX and REINDEX commands. Specifically, you can:

. Create indexes smaller than those created with the DBFNTX
driver. The key data is stored in a compressed format that
substantially reduces the size of the index file.

. Create a compound index file that contains multiple indexes
(TAGs), making it possible to open several indexes under one file
handle. A single (.cdx) file may contain up to 99 index keys.

. Create conditional indexes (FOR / WHILE / REST / NEXT).

. Create files with FoxPro 2 file format compatibility.

Compact Indexes

Like FoxPro 2, The DBFCDX driver creates compact indexes. This means that the key data is stored in a compressed format, resulting in a substantial size reduction in the index file. Compact indexes store only the actual data for the index keys. Trailing blanks and duplicate bytes between keys are stored in one or two bytes. This allows considerable space savings in indexes with much empty space and similar keys. Since the amount of compression is dependent on many variables, including the number of unique keys in an index, the exact amount of compression is impossible to predetermine.

Compound Indexes

A compound index is an index file that contains multiple indexes (called tags). Compound indexes (.cdx)’s make several indexes available to your application while only using one file handle. Therefore, you can overcome the Clipper index file limit of 15. A compound index can have as many as 99 tags, but the practical limit is around 50. Once you open a compound index, all the tags in the file are automatically updated as the records are changed.

Once you open a compound index, all the tags contained in the file are automatically updated as the records are changed. A tag in a compound index is essentially identical to an individual index (.idx) and supports all the same features. The first tag (in order of creation) in the compound index is, by default, the controlling index.

Conditional Indexes

The DBFCDX driver can create indexes with a built-in FOR clause. These are conditional indexes in which the condition can be any expression, including a user-defined function. As the database is updated, only records that match the index condition are added to the index, and records that satisfied the condition before, but don’t any longer, are automatically removed.

Expanded control over conditional indexing is supported with the revised INDEX and REINDEX command options as in the new DBFNTX driver.

Installing DBFCDX Driver Files

The DBFCDX driver is supplied as the file, DBFCDX.LIB.

The Clipper installation program installs this driver in the \CLIPPER5\LIB subdirectory on the drive that you specify, so you need not install the driver manually.

Linking the DBFCDX Database Driver

To link the DBFCDX database driver into an application program, you must specify DBFCDX.LIB to the linker in addition to your application object files (.OBJ).

1. To link with .RTLink using positional syntax:

C>RTLINK <appObjectList> ,,,DBFCDX

2. To link with .RTLink using freeformat syntax:

C>RTLINK FI <appObjectList> LIB DBFCDX

Note: These link commands all assume the LIB, OBJ, and PLL environment variables are set to the standard locations. They also assume that the Clipper programs were compiled without the /R option.

Using the DBFCDX Database Driver

To use FoxPro 2 files in a Clipper program:

1. Place REQUEST DBFCDX at the beginning of your application or at the top of the first program file       (.prg) that opens a database file using the DBFCDX driver.

2. Specify the VIA “DBFCDX” clause if you open the database file with the USE command.

    -OR-

3. Specify “DBFCDX” for the <cDriver> argument if you open the database file with the DBUSEAREA()       function.

   -OR-

4. Use ( “DBFCDX” ) to set the default driver to DBFCDX.

    Except in the case of REQUEST, the RDD name must be a literal character string or a variable. In all       cases it is important that the driver name be spelled correctly.

The following program fragments illustrate:

  REQUEST DBFCDX
  .
  .
  .
  USE Customers INDEX Name, Address NEW VIA "DBFCDX"

     -OR-

  REQUEST DBFCDX
  RDDSETDEFAULT( "DBFCDX" ) .
  . 
  .
  USE Customers INDEX Name, Address NEW

Using (.idx) and (.ntx) Files Concurrently

You can use both (.idx) and (.ntx) files concurrently in a Clipper program like this:

// (.ntx) file using default DBFNTX driver
 USE File1 INDEX File1 NEW
// (.idx) files using DBFCDX driver
 USE File2 VIA "DBFCDX" INDEX File2 NEW

Note, however, that you cannot use (.idx) and (.ntx) files in the same work area. For example, the following does not work:

USE File1 VIA "DBFNTX" INDEX File1.ntx, File2.idx

Using (.cdx) and (.idx) Files Concurrently

You may use (.cdx) with (.idx) files concurrently (even in the same work area); however, in most cases it is easier to use a single (.cdx) index for each database file or separate (.idx) files. When using both types of index at the same time, attempting to select an Order based on its Order Number can be confusing and will become difficult to maintain.

File Maintenance under DBFCDX

When an existing tag in a compound index (.cdx) is rebuilt using INDEX ON…TAG… the space used by the original tag is not automatically reclaimed. Instead, the new tag is added to the end of the file, increasing file size.

You can use the REINDEX command to “pack” the index file. REINDEX rebuilds each tag, eliminating any unused space in the file.

If you rebuild your indexes on a regular basis, you should either delete your (.cdx) files before rebuilding the tags or use the REINDEX command to rebuild them instead.

DBFCDX and Memo Files

The DBFCDX driver uses FoxPro compatible memo (.fpt) files to store data for memo fields. These memo files have a default block size of 64 bytes rather than the 512 byte default for (.dbt) files.

DBFCDX memo files can store any type of data. While (.dbt) files use an end of file marker (ASCII 26) at the end of a memo entry, (.fpt) files store the length of the entry. This not only eliminates the problems normally encountered with storing binary data in a memo field but also speeds up memo field access since the data need not be scanned to determine the length.

Tips For Using DBFCDX

1. Make sure index extensions aren’t hard-coded in your application. The default extension for DBFCDX indexes is (.idx), not (.ntx). You can still use (.ntx) as the extension as long as you specify the extension when you create your indexes. The best way to determine index extensions in an application is to call ORDBAGEXT().

For example, if you currently use the following code to determine the existence of an index file:

IF .NOT. FILE("index.ntx")
    INDEX ON field TO index
ENDIF

Change the code to include the INDEXEXT() function, as follows:

IF .NOT. FILE("index"+ORDBAGEXT())
   INDEX ON field TO index
ENDIF

2. If your application uses memo fields, you should convert your (.dbt) files to (.fpt) files.

There are some good reasons for using (.fpt) files. Most important is the smaller block size (64 bytes). Clipper’s (.dbt) files use a fixed block size of 512 bytes which means that every time you store even 1 byte in a memo field Clipper uses 512 bytes to store it. If the data in a memo field grows to 513 bytes, then two blocks are required.

When creating (.fpt) files, the block size is set at 64 bytes to optimize it for your needs. A simple conversion from (.dbt) files to (.fpt) files will generally shrink your memo files by approximately 30%.

3. Add DBFCDX.LIB as a library to your link command or link script.

Summary

In this chapter, you were given an overview of the features and benefits of the DBFCDX RDD. You also learned how to link this driver and how to use it in your applications.

C5DG-3 RDD Reference

Clipper 5.x – Drivers Guide

Chapter 3

RDD Reference


APPEND FROM     Import records from a (.dbf) or ASCII file                  
COPY TO         Export records to a new (.dbf) or ASCII file                
DBAPPEND()      Append a new record to the database in the current work area
DBGOTO()        Position record pointer to a specific identity              
DBRLOCK()       Lock the record at the current or specified identity        
DBRLOCKLIST()   Return an array of the current Lock List                    
DBRUNLOCK()     Release all or specified record locks                       
DBSETINDEX()*   Empty Orders from an Order Bag into the Order List          
DELETE TAG      Delete a Tag                                                
GO              Move the pointer to the specified identity                  
INDEX           Create an index file                                        
ORDBAGEXT()     Return the default Order Bag RDD extension                  
ORDBAGNAME()    Return the Order Bag name of a specific Order               
ORDCREATE()     Create an Order in an Order Bag                             
ORDDESTROY()    Remove a specified Order from an Order Bag                  
ORDFOR()        Return the FOR expression of an Order                       
ORDKEY()        Return the key expression of an Order                       
ORDLISTADD()    Add Orders to the Order List                                
ORDLISTCLEAR()  Clear the current Order List                                
ORDLISTREBUI()  Rebuild all Orders in Order List of the current work area   
ORDNAME()       Return the name of an Order in the Order List               
ORDNUMBER()     Return the position of an Order in the current Order List   
ORDSETFOCUS()   Set focus to an Order in an Order List                      
RDDLIST()       Return an array of available Replaceable Database Drivers   
RDDNAME()       Return name of RDD active in current or specified work area 
RDDSETDEFAULT() Set or return the default RDD for the application           
RECNO()         Return the identity at the position of the record pointer   
SEEK            Search an Order for a specified key value                   
SET INDEX       Open one or more Order Bags in the current work area        
SET ORDER       Select the controlling Order

C5DG-2 RDD Architecture

Clipper 5.x – Drivers Guide

Chapter 2

Replaceable Database Driver Architecture

Clipper supports a driver architecture that allows Clipper applications to use Replaceable Database Drivers (RDDs). The RDD system makes Clipper applications data-format independent. Such applications can, therefore, access the data formats of other database systems, including the dBASE IV (.mdx), FoxPro (.cdx), and Paradox (.db) formats on a variety of equipment. This driver architecture can even support database drivers that are not file-based, although all of the drivers supplied with Clipper 5.x are file-based.

The concept of replaceable drivers is not new to this version of Clipper. In previous versions, the use of the default database driver (DBFNTX.LIB) was hidden by the fact that it was automatically linked into your application. In fact, this is still the case. The DBFNTX driver has been replaceable since it was first introduced in version 5.0. Before this version, the DBFNTX driver was the only RDD supplied as part of the system.

In This Chapter

With the introduction of the new RDDs, Clipper provides many new and enhanced commands and functions that access and manipulate databases. These language elements can enable your applications to access data regardless of the RDD under which it is ordered. There are also commands and functions that give you specific information about the RDDs in use.

The Language Implementation section of this chapter includes tables that summarize these new and enhanced language elements. This chapter also covers basic terminology, implementation principals, and general concepts of the Order Management System.

The following major topics are discussed:

. RDD Basics

. Basic Terminology

. The Language Implementation

. Order Management System

RDD Basics

The cornerstone of the replaceable database driver system is the Clipper work area. All Clipper database commands and functions operate in a work area through a database driver that actually performs the access to the stored database information. The layering of the system looks like this:

                      +———————————+

                      | Database Commands and Functions |
                      ----------------------------------|
                      |          RDD Interface          |
                      |---------------------------------|
                      |         Database driver         |
                      |---------------------------------|
                      |           Stored Data           |
                      +---------------------------------+

 In this system, each work area is associated with a single database driver. Each database driver, in turn, is supplied as a separate library file (.LIB) you link into your application programs. Within an application, you specify the name of the database driver when you open or access a database file or table with the USE command or DBUSEAREA() function. If you specify no database driver at the time a file is opened, the default driver is used. You may select which driver will be used as the default driver.

Once you open a database in a work area, the RDD used for that work area is automatically used for all operations on that database (except commands and functions that create a new table). Any command or function that creates a new table (i.e., SORT, CREATE FROM, DBCREATE(), etc.) uses the default RDD. Most of the new commands and functions let you specify a driver other than the default driver.

The normal default database driver, DBFNTX (which supports the traditional (.dbf), (.ntx), and (.dbt) files) is installed into your \CLIPPER5\LIB directory. This driver is linked into each program automatically to provide backwards compatibility.

To use any of the other supplied drivers, either as an additional driver or an alternate driver, you must use the REQUEST command to assure that the driver will be linked in. You must also include the appropriate library on the link line.

All Clipper applications will automatically include code generated by RDDSYS.PRG from the \CLIPPER5\SOURCE\SYS subdirectory. If you wish to automatically load another RDD, you must modify and compile RDDSYS.PRG and link the resulting object file into your application. The content of the default RDDSYS.PRG is shown below. Only the portion in bold should be modified

 
     //  Current RDDSYS.PRG
     #include "rddsys.ch"

     ANNOUNCE RDDSYS                     // This line must not change
     INIT PROCEDURE RddInit
        REQUEST DBFNTX                   // Force link for DBFNTX RDD
        RDDSETDEFAULT( "DBFNTX" )        // Set up DBFNTX as default
                                         // driver

        RETURN

     // eof: rddsys.prg

To change the default to a new automatically-loading driver, modify the bold lines in RDDSYS.PRG to include the name of the new driver. For example:

     //  Revised RDDSYS.PRG
     #include "rddsys.ch"

     ANNOUNCE RDDSYS                     // This line must not change
     INIT PROCEDURE RddInit
        REQUEST DBFCDX                   // Force link for DBFCDX RDD
        RDDSETDEFAULT( "DBFCDX" )        // Set up DBFCDX as default
                                         // driver

        RETURN

     // eof: rddsys.prg

If you change this file, all Clipper applications in which it is linked will automatically include the new RDD.

To use any RDD other than the default, you must explicitly identify it through use of the VIA clause of the USE command.

You need not disable the automatic DBFNTX loading to use other RDDs in your applications, but if your application will not use any DBFNTX functionality, you can save its code overhead by disabling it.

To completely disable the automatic loading of a default RDD, remove the two lines shown above in bold. For example:

     //  New Revised RDDSYS.PRG
     //  disables auto-loading
     #include "rddsys.ch"

     ANNOUNCE RDDSYS                     // This line must not change
     INIT PROCEDURE RddInit

        RETURN
     // eof: rddsys.prg

Basic Terminology

The RDD architecture introduces several new terms and concepts that are key to the design and usage of RDDs. You should familiarize yourself with these concepts and terms as you begin to use the RDD functionality. The meaning of some earlier terminology is also further defined. The following RDD functional glossary defines the terminology for all RDDs.

. Key Expression : A valid Clipper expression that creates a key value from a single record.

. Key Value : A value that is based on value(s) contained within database fields, associated with a particular record in a database.

. Identity : A unique value guaranteed by the structure of the data file to reference a specific record in a database even if the record is empty. In the Xbase file (.dbf), the identity is the record number; but it could be the value of a unique primary key or even the offset of an array in memory.

. Keyed-Pair : A pair consisting of a key value and an identity.

. Identity Order : Describes a database arranged by identity. In Xbase, this refers to the physical arrangement of the records in the database in the order in which they were entered (natural order).

. Tag : A set of keyed-pairs that provides ordered access to the table based on a key value. Usually, an Order in a multiple-Order index (Order). An Order.

. Order : A named mechanism (index) that provides logical access to a database according to the keyed-pairs. This term encompasses both single indexes and the Tags in multiple-Tag indexes.

Orders are not, themselves, data files. They provide access to data that gives the appearance of an ordering of the data in a specific way. This ordering is defined by the relationships between keyed- pairs. An Order does not change the physical (the natural or entry) order of data in a database.

. Controlling Order : The active Order (index) for a particular work area. Only one Order may control a work area at any time, and it controls the order in which the database is accessed during paging and searching.

. Order List : A list of all the Orders available to the database in the specified work area.

. Order Bag : A container that holds zero or more Orders. Normally a disk or memory file. A traditional index like (.ntx) is an Order Bag that holds only one Order. A multiple-Tag index (.mdx or .cdx) is an Order Bag that holds zero or more Orders. Though Order Bags may be a memory or disk file, Clipper 5.x only supports Order Bags as disk files.

. Record : A record in the traditional database paradigm is a row of one or more related columns (fields) of data. In the expanded architecture of Clipper, a record could be data that does not exactly fit this definition.

A record is, in this expanded context, data associated with a single identity. In an Xbase data structure, this corresponds to a row (fields associated with a record number); in other data structures, this may not be the case.

In this document we use “record” in the traditional sense, but you should be aware that Clipper permits expansion of the meaning of record.

. single-Order Bag : An Order Bag that can contain only one Order. The (.ntx) and (.ndx) files are examples of single-Order Bags.

. multiple-Order Bag : An Order Bag that can contain any number of Orders; a multiple-Tag index. The (.cdx) and (.mdx) files are examples of multiple-Order Bags.

. maintainable scoped Orders : Scoped (filtered) Orders created using the FOR clause. The FOR condition is stored in the index header. Orders of this type are correctly updated using the expression to reflect record updates, deletions and additions.

. non-maintainable/temporary Orders : Orders created using the WHILE or NEXT clauses. These Orders are useful because they can be created quickly. However, the conditions in these clauses are not stored in the index header. Therefore, Orders of this type are not correctly updated to reflect record updates, deletions and additions. They are only for temporary use.

. Lock List : A list of the records that are currently locked in the work area.

The Language Implementation

To support the RDD architecture and let you design applications that are independent of the data format you are using, many existing Clipper commands and functions have been enhanced, and several new language elements have been added. The following tables summarize these changes and additions. See the Reference chapter of this guide for more detailed information on a particular item.

     Enhanced Commands and Functions
     ------------------------------------------------------------------------
     Command/Function  Changes
     ------------------------------------------------------------------------
     APPEND FROM       VIA clause
     COPY TO           VIA clause
     DBAPPEND()        Terminology
     GO                Terminology
     DBAPPEND()        Terminology
     INDEX             ALL, EVAL, EVERY, NEXT, RECORD, REST, TAG, and
                       UNIQUE clauses
     SEEK              SOFTSEEK option
     SET INDEX         ADDITIVE clause
     SET ORDER         IN, TAG clauses
     DBSETINDEX()      Terminology
     RECNO()           Terminology
     ------------------------------------------------------------------------

     New Commands and Functions
     ------------------------------------------------------------------------
     Command/Function    Description
     ------------------------------------------------------------------------
     DELETE TAG          Delete a Tag (Order)
     DBGOTO()            Position record pointer to a specific identity
     DBRLOCK()           Lock the record at the current or specified identity
     DBRLOCKLIST()       Return an array of the currently locked records
     DBRUNLOCK           Release all or specified record locks
     ORDBAGEXT()         Return the Order Bag file extension
     ORDBAGNAME()        Return the Order Bag name of a specific Order
     ORDCREATE()         Create an Order in an Order Bag
     ORDDESTROY()        Remove a specified Order from an Order Bag
     ORDFOR()            Return the FOR expression of an Order
     ORDKEY()            Return the Key expression of an Order
     ORDLISTADD()        Add Order Bag contents or single Order to the Order
                         List
     ORDLISTCLEAR()      Clear the current Order List
     ORDLISTREBUILD()    Rebuild all Orders in the Order List of the current
                         work area
     ORDNAME()           Return the name of an Order in the work area
     ORDNUMBER()         Return the position of an Order in the current Order
                         List
     ORDSETFOCUS()       Set focus to an Order in an Order List
     RDDLIST()           Return an array of the available Replaceable
                         Database Drivers
     RDDNAME()           Return the name of the RDD active in the current or
                         specified work area
     RDDSETDEFAULT()     Set or return the default RDD for the application
     ------------------------------------------------------------------------

User Interface Levels

We want to make it easy for you to quickly take advantage of the added functionality provided in Clipper 5.x. In order to effectively use the RDDs, you should read the following discussions. They are provided as a means of identifying the degree of programming knowledge or Clipper experience that will let you effectively use the RDD features.

For this purpose the RDD feature set is arbitrarily divided into levels A and B. Tables listing the commands or functions that comprise these access levels are also supplied. In addition, an RDD Features Summary is provided in table form which outlines the features available in each driver. The commands and functions in both of these levels of access are described in the Reference chapter of this guide.

Level A – Command-Level Interface

Level A. a simple command-level interface very similar to those found in other languages (e.g., dBASE IV, FoxPro). This is the primary access for new Clipper users who may or may not be familiar with other languages.

The following table lists the commands and functions accessible by the Clipper programmer with background in languages such as dBASE or FoxPro. The commands and functions in this table provide access to the additional features without requiring an advanced knowledge of Clipper or other programming concepts.

     Basic Commands and Functions
     ------------------------------------------------------------------------
     Command/Function  Changes
     ------------------------------------------------------------------------
     DELETE TAG        Delete a Tag
     GOTO              Move the pointer to the specified identity
     INDEX             Create an index file
     SEEK              Search an Order for a specified key value
     SET INDEX         Open one or more Order Bags in the current work area
     SET ORDER         Select the controlling Order
     DBAPPEND()        Append a new record to the current Lock List
     DBRLOCK()         Lock the record at the current or specified identity
     DBRLOCKLIST()     Return an array of the current Lock List
     DBRUNLOCK         Release all or specified record locks
     ------------------------------------------------------------------------

Level B – Function-Level Interface

Level B. Clipper also adds a function level interface that not only allows access to the enhanced functionality of the drivers, but permits the building of higher-level functions using these composing behaviors. This level is meant for more experienced Clipper users who need to take advantage of the full power of the driver and Order Management System.

The following table lists the DML and Order Management functions recommended to the intermediate to advanced Clipper programmer. These functions provide the greatest flexibility in accessing the extended features of these drivers

     Advanced Functions (including Order Management)
     ------------------------------------------------------------------------
     Command/Function    Description
     ------------------------------------------------------------------------
     DBAPPEND()          Append a new record to the current Lock List
     DBRLOCK()           Lock the record at the current or specified identity
     DBRLOCKLIST()       Return an array of the current Lock List
     DBRUNLOCK()         Release all or specified record locks
     ORDBAGEXT()         Return the default Order Bag RDD extension
     ORDBAGNAME()        Return the Order Bag name of a specific Order
     ORDCREATE()         Create an Order in an Order Bag
     ORDDESTROY()        Remove a specified Order from an Order Bag
     ORDFOR()            Return the FOR expression of an Order
     ORDKEY()            Return the Key expression of an Order
     ORDLISTADD()        Add Order Bag contents or single Order to the Order
                         List
     ORDLISTCLEAR()      Clear the current Order List
     ORDLISTREBUILD()    Rebuild all Orders in the Order List of the current
                         work area
     ORDNAME()           Return the name of an Order in the work area
     ORDNUMBER()         Return the position of an Order in the current Order
                         List
     ORDSETFOCUS()       Set focus to an Order in an Order List
     RDDLIST()           Return an array of the available Replaceable
                         Database Drivers
     RDDNAME()           Return the name of the RDD active in the current or
                         specified work area
     RDDSETDEFAULT()     Set or return the default RDD for the application
     ------------------------------------------------------------------------

RDD Features

The following decision table summarizes the availability of key features across RDDs. It lists the features available in each RDD so you can use it as an aid in correct RDD implementation and data access.

     RDD Features Summary
     ------------------------------------------------------------------------
     Item                                NTX   NDX   MDX   CDX  DBPX
     ------------------------------------------------------------------------
     Implicit record unlocking in        Yes   Yes   Yes   Yes  Yes
     single lock mode
     Multiple Record Locks               Yes   Yes   Yes   Yes  No
     Number of Concurrent Record Locks   *1    *1    *1    *1   1
     Order Management (Tag support)      Yes   Yes   Yes   Yes  No
     Orders (Tags) per Order Bag (File)  1     1     47    50   N/A
     Number of Order Bags (Files)        15    15    15    15   N/A
     per work area
     Conditional Indexes (FOR clause)    Yes   No    Yes   Yes  No
     Temporary (Partial) Indexes         Yes   No    No    Yes  No
     (WHILE, ... )
     Descending via DESCENDING clause    Yes   No    Yes   Yes  No
     Unique via the UNIQUE clause        Yes   Yes   Yes   Yes  No
     EVAL and EVERY clause support       Yes   No    No    Yes  No
     Production/Structural Indexes       No    No    Yes   Yes  No
     Maximum Key Expression length       256   256   220   255  N/A
     (bytes)
     Maximum FOR Condition length        256   N/A   261   255  N/A
     (bytes)
     ------------------------------------------------------------------------

     *1 determined by available memory.

Clipper 5.x Order Management

Clipper includes a new Order Management System which provides a more effective and flexible way of indexing data. The main objective of the new Order Management implementation is to raise the Xbase indexing paradigm from a low level of abstraction (Xbase database specific) to a higher, more robust, level. This higher level of abstraction allows the user to build new commands and functions.

Low level abstraction refers to manipulation of discrete elements in the database architecture (i.e., field names and sizes, methods of handling controlling indexes, etc.).

High level abstraction refers to manipulation of general elements in a data source. It lets us, for example, set a controlling Order without explicitly addressing the character of the data file structure. This higher level of abstraction was achieved by reviewing all the processes that indexes have in common.

The Order Management function set was generically named (i.e. non-dbf specific) to provide a semantic that could encompass future RDD implementations that may not be file-bound. For example, an RDD could easily be created that orders (indexes) on a memory array, or other data structure, instead of a database. Therefore, all Order Management functions simply begin with ORD (for Order). You will find the function names to be self-explanatory (e.g., ORDCREATE() creates an Order, and ORDDESTROY() destroys an Order).

Concept

An Order is a set of keyed-pairs that provides a logical ordering of the records in an associated database file. Each key in an Order (index) is associated with a particular identity (record number) in the data set (database file). The records can be processed sequentially in key order, and any record can be located by performing a SEEK operation with the associated key value. An Order never physically changes the data that it’s applied against, but creates a different view of that data.

There are at least four basic types of processes that you can perform with an Order:

1. Ordering: Changes the sequence in which you view the data records.

2. Scoping: Constrains the visibility of data to specified upper and lower bounds. Determines the range of data items included, through a scoping rule, like the WHILE clause.

3. Filtration: Visibility of data is subject to conditional evaluation. Filtration determines which items of data are included, through a filter rule, like the FOR clause.

4. Translation: Values in underlying data source are translated (or converted) in some form based on a selection criteria. For example:

INDEX ON IIF(CUSTID > 1000, "NEW", "OLD")

The difference between scope and condition as it applies to FOR and WHILE is that the WHILE clause provides scope, but not filtering, but a FOR clause can provide both.

There are three primary elements in Order Management:

. Order: An Order is a set that has two elements in it: an Order Name, which is a logical name that can be referenced, and an Order Expression which supplies the view of the data. The Order Name provides logical access to the expression and the Order Expression provides a way of viewing the underlying data source. Data ordering can also be modified to ascending or descending sequence.

– Order Name: An Order Name is a symbolic name, that you use to manipulate an Order, like a file’s alias. The difference between an Order Name and the Order Number with which you would normally access indexes (Orders), is that the Order Name is stored in the index file. It is available each time you run the program, and is maintained by the system. The Order Number is generated each time the Order is added to an Order List and may change from one program execution to another. This makes Order Name the preferred means of referencing Orders.

– Order Expression: Is any valid Clipper expression. This is an index expression such as:

CUSTLIST->CUSTID

This expression produces the ordered view of the data. The values derived from this expression are sorted, and it is the relationship of these values to one another that provides the actual ordering.

. Order Number: An Order Number is provided by the Order List. An Order Number is only valid as long as the work area to which it belongs is open.

– Order Numbers provide one of the services performed by Order Names, allowing you to access a specific Order. In general, you should avoid accessing Orders by number.

– The ORDNUMBER() function returns the ordinal position of the specified <orderName> within the specified <orderList>.

. Order Bag: Unsorted collection of Orders. Each Order contains two elements (Order Name and Order Expression). Each Order Bag may have zero to n Orders. The maximum is determined by the RDD driver being used. Order Bags are similar to multiple-index files in that there’s no guarantee of any specific order within the container or Bag. Within an Order Bag you can access specific Orders by referencing a particular Order Name. Order Bags have persistence between activations of the program.

. Order List: An Order List orders the collection of Orders that are associated with and active in the current work area. It provides an access to the Orders active within a given work area. Each work area has an Order List, and there is only one Order List per work area. An Order List is created when a new work area is opened, and exists only as long as that work area is active. Once you close a work area, the Order List ceases to exist.

When you SET INDEX TO, the contents of the Order Bag are emptied into the Order List. At this point, the Orders in the Order List are active in the work area, where they will be updated as the data associated with the work area is modified. You may access an Order in the list by its Order Number or by its Order Name. You should access an Order by its name rather than a hard-coded ordinal position. You can make any Order in the Order List the controlling Order by giving it focus, as explained below.

. Order List Focus: Order List Focus is, essentially, a pointer to the Order that is used to change the view of the data. It is synonymous with controlling Order or controlling index, and defines the active index order. The SET ORDER TO command does not modify the Order List in any way. It does not clear the active indexes. It only changes the Order List Focus (the controlling order in the Order List).

Notes

The following list contains specific information regarding Order Bag usage and limitations with DBFNDX and DBFNTX index files:

. Single-Order Bags: With DBFNDX and DBFNTX you can explicitly assign the Order Name within the Order creation syntax. You can then use the Order Name in any command or function that accepts an Order Name (Tag) as a parameter.

. Single-Order Bag with INDEX ON: Single-Order Bags may retain the Order Name between activations. During creation, DBFNTX stores an optionally supplied Order Name in the file’s header for subsequent use. Therefore, the Order Name is not necessarily the same as that of the file. By contrast, DBFNDX cannot store an Order Name since this would prevent dBASE from accessing the file. By default DBFNDX Orders inherit the name of their index file.

Summary

This chapter has introduced you to the RDD concept, giving you specific information on the architecture that implements RDDs in Clipper. The basic terminology of RDDs has also been defined.

Finally, you have seen an overview of the language enhancements designed to make using RDDs straightforward and to let you build applications that do not depend on the RDD in use. The next chapter elaborates on these language enhancements, discussing syntax and usage in detail.

C5_INDEX

 INDEX
 Create an index file
------------------------------------------------------------------------------
 Syntax

     INDEX ON <expKey> [TAG <cOrderName>] [TO <cOrderBagName>]
        [FOR <lCondition>] [ALL]
        [WHILE <lCondition>] [NEXT <nNumber>]
        [RECORD <nRecord>] [REST]
        [EVAL <bBlock>] [EVERY <nInterval>]
        [UNIQUE] [ASCENDING|DESCENDING]
        [USECURRENT] [ADDITIVE]
        [CUSTOM] [NOOPTIMIZE]

     Note:  Although both the TAG and the TO clauses are optional, you
     must specify at least one of them.

 Arguments

     <expKey> is an expression that returns the key value to place in the
     index for each record in the current work area.  <expKey> can be
     character, date, logical, or numeric type.  The maximum length of the
     index key expression is determined by the driver.

     TAG <cOrderName> is the name of the order to be created.
     <cOrderName> can be any Clipper expression that evaluates to a string
     constant.

     TO <cOrderBagName> is the name of a disk file containing one or more
     orders.  The active RDD determines the order capacity of an order bag.
     The default DBFNTX driver only supports single-order bags, while other
     RDDs may support multiple-order bags (e.g., the DBFCDX and DBFMDX
     drivers).  You may specify <cOrderBagName> as the file name with or
     without a path name or extension.  If an extension is not provided as
     part of <cOrderBagName>, Clipper will use the default extension of
     the current RDD.

     Both the TAG and the TO clauses are optional, but you must use at least
     one of them.

     FOR <lCondition> specifies the conditional set of records on which
     to create the order.  Only those records that meet the condition are
     included in the resulting order.  <lCondition> is an expression that may
     be no longer than 250 characters under the DBFNTX and DBFNDX drivers.
     The maximum value for these expressions is determined by the RDD.  The
     FOR condition is stored as part of the order bag and used when updating
     or recreating the index using the REINDEX command.  Duplicate key values
     are not added to the order bag.

     Drivers that do not support the FOR condition will produce an
     "unsupported" error.

     The FOR clause provides the only scoping that is maintained for all
     database changes.  All other scope conditions create orders that do not
     reflect database updates.

     ALL specifies all orders in the current or specified work area.  ALL
     is the default scope of INDEX .

     WHILE <lCondition> specifies another condition that must be met by
     each record as it is processed.  As soon as a record is encountered that
     causes the condition to fail, the INDEX command terminates.  If a WHILE
     clause is specified, the data is processed in the controlling order.
     The WHILE condition is transient (i.e., it is not stored in the file and
     not used for index updates and REINDEXing purposes).  The WHILE clause
     creates temporary orders, but these orders are not updated.

     Drivers that do not support the WHILE condition will produce an
     "unsupported" error.

     Using the WHILE clause is more efficient and faster than using the FOR
     clause.  The WHILE clause only processes data for which <lCondition> is
     true (.T.) from the current position.  The FOR clause, however,
     processes all data in the data source.

     NEXT <nNumber> specifies the portion of the database to process.  If
     you specify NEXT, the database is processed in the controlling order for
     the <nNumber> number of identities.  The scope is transient (i.e., it is
     not stored in the order and not used for REINDEXing purposes).

     RECORD <nRecord> specifies the processing of the specified record.

     REST specifies the processing of all records from the current
     position of the record pointer to the end of file (EOF).

     EVAL <bBlock> evaluates a code block every <nInterval>, where
     <nInterval> is a value specified by the EVERY clause.  The default value
     is 1.  This is useful in producing a status bar or odometer that
     monitors the indexing progress.  The return value of <bBlock> must be a
     logical data type.  If <bBlock> returns false (.F.), indexing halts.

     EVERY <nInterval> is a clause containing a numeric expression that
     modifies the number of times <bBlock> is EVALuated.  The EVERY option of
     the EVAL clause offers a performance enhancement by evaluating the
     condition for every nth record instead of evaluating every record
     ordered.  The EVERY keyword is ignored if you specify no EVAL condition.

     UNIQUE specifies that the key value of each record inserted into the
     order be unique.  Duplicate key values are not added to the order.

     ASCENDING specifies that the keyed pairs be sorted in increasing
     order of value.  If neither ASCENDING nor DESCENDING is specified,
     ASCENDING is assumed.  Although not stored as an explicit part of the
     file, ASCENDING is an implicit file attribute that is understood by the
     REINDEX command.

     Drivers that do not support the ASCENDING condition will produce an
     "unsupported" error.  The following keywords are new to Clipper 5.3.

     DESCENDING specifies that the keyed pairs be sorted in decreasing
     order of value.  Using this keyword is the same as specifying the
     DESCEND() function within <expKey>, but without the performance penalty
     during order updates.  If you create a DESCENDING index, you will not
     need to use the DESCEND() function during a SEEK.  DESCENDING is an
     attribute of the file, where it is stored and used for REINDEXing
     purposes.

     Drivers that do not support the DESCENDING condition will produce an
     "unsupported" error.

     USECURRENT specifies that only records in the controlling order--and
     within the current range as specified by ORDSETSCOPE()--will be included
     in this order.  This is useful when you have already created a
     conditional order and want to reorder the records which meet that
     condition, and/or to further restrict the records meeting a condition.
     If not specified, all records in the database file are included in the
     order.

     ADDITIVE specifies that any open orders should remain open.  If not
     specified, all open orders are closed before creating the new one.
     Note, however, that the production index file is never closed.

     CUSTOM specifies that a custom built order will be created for RDDs
     that support them.  A custom built order is initially empty, giving you
     complete control over order maintenance.  The system does not
     automatically add and delete keys from a custom built order.  Instead,
     you explicitly add and delete keys using ORDKEYADD() and ORDKEYDEL().
     This capability is excellent for generating pick lists of specific
     records and other custom applications.

     NOOPTIMIZE specifies that the FOR condition will not be optimized.
     If NOOPTIMIZE is not specified, the FOR condition will be optimized if
     the RDD supports optimization.

 Description

     The INDEX command adds a set of keyed pairs, ordered by <expKey> to a
     file specified by <cOrderBagName> using the database open in the current
     work area.

     In RDDs that support production or structural indexes (e.g., DBFCDX,
     DBFMDX), if you specify a tag but do not specify an order bag, the tag
     is created and added to the order bag.  If no production or structural
     index exists, it will be created and the tag will be added to it.

     When using RDDs that support multiple order bags, you must explicitly
     SET ORDER (or ORDSETFOCUS()) to the desired controlling order.  If you
     do not specify a controlling order, the data file will be viewed in
     natural order.

     If <cOrderBagName> does not exist, it is created in accordance with the
     RDD in the current or specified work area.

     If <cOrderBagName> exists and the RDD specifies that order bags can only
     contain a single order, <cOrderBagName> is erased and the new order is
     added to the order bag and to the order list in the current or specified
     work area.

     If <cOrderBagName> exists and the RDD specifies that order bags can
     contain multiple tags, <cOrderName> is created if it does not already
     exist; otherwise, <cOrderName> is replaced in <cOrderBagName> and the
     order is added to the order list in the current or specified work area.

     ASCENDING or DESCENDING specifies the sequence of keyed pairs in the order.
     If neither clause is specified, the default is ASCENDING.

     If you specify the UNIQUE clause, the resulting order will contain only
     unique records.  Some RDDs may do this by only including record
     references to a key value once.  Others may produce a runtime
     recoverable error as a non-unique key insertion is attempted.

     The EVAL clause lets you specify a code block to be evaluated as each
     record is placed in the order.  The EVERY clause lets you modify how
     often <bBlock> is called.  Instead of evaluation as each record is
     placed in the order, evaluation only occurs as every <nInterval> records
     are placed in the order.

     The INDEX command accepts certain clauses that let the user create
     conditional and partial orders.  Some orders are intended to be
     maintained across the application, others are considered "temporary"
     orders.

     The FOR clause provides the only order scoping that is permanent and can
     be maintained across the life of the application.  The string passed as
     the FOR condition is stored within the order for later use in
     maintaining the order.  Though only accessing part of a database, orders
     created using this clause exist as long as the database is active.  The
     FOR clause lets you create maintainable scoped orders.

     The WHILE, NEXT, REST and RECORD clauses process data from the current
     position of the database cursor in the default or specified work area.
     If you specify these clauses, the order list remains open and the active
     order is used to organize the database while it is being created.  These
     clauses let you create temporary (non-maintainable) orders.  Orders
     created using these clauses contain records in which <lCondition> is
     true (.T.) at the location of the record pointer.

 Notes

     RDD support:  Not all RDDs support all aspects of the INDEX command.
     See the "Replaceable Database Driver Architecture" chapter in the
     Drivers Guide for details on a particular RDD.

 Examples

     .  The following example creates a simple order (index) based on
        one field (Acct):

        USE Customer NEW
        INDEX ON Customer->Acct TO CuAcct

     .  This example creates a conditional order (index) based on a
        FOR clause.  This index will contain only records whose field
        TransDate contains a date greater than or equal to January 1, 1995:

        USE Invoice NEW
        INDEX ON Invoice->TransDate      ;
           TO InDate      ;
           FOR ( Invoice->TransDate >= CTOD( "01/01/95" ) )

     .  This example creates an order in a multiple-order bag (i.e., a
        tag in
        an index that can support multiple tags in an index file):

        USE Customer NEW
        INDEX ON Customer->Acct TAG CuAcct TO Customer

     .  The following example creates an order that calls a routine,
        MyMeter, during its creation:

        #define MTR_INCREMENT   10

        USE Customer NEW
        INDEX ON Customer->Acct TO CuAcct EVAL ;
              {|| MYMETER() } EVERY MTR_INCREMENT

        FUNCTION MYMETER()

           STATIC nRecsDone := 0

           nRecsDone := += MTR_INCREMENT
           ? ( nRecsDone/LASTREC() ) * 100

           RETURN (.T.)

 Files   Library is CLIPPER.LIB.

See Also: CLOSE DBCREATEIND() DBORDERINFO() DBREINDEX()


C5 Commands

 ?|??            Display one or more values to the console
 @...BOX         Draw a box on the screen
 @...CLEAR       Clear a rectangular region of the screen
 @...GET         Create a new Get object and display it
 @...PROMPT      Paint a menu item and define a message
 @...SAY         Display data at a specified screen or printer row and column
 @...TO          Draw a single- or double-line box
 ACCEPT*         Place keyboard input into a memory variable
 APPEND BLANK    Add a new record to the current database file
 APPEND FROM     Import records from a database (.dbf) file or ASCII text file
 AVERAGE         Average numeric expressions in the current work area
 CALL*           Execute a C or Assembler procedure
 CANCEL*         Terminate program processing
 CLEAR ALL*      Close files and release public and private variables
 CLEAR GETS      Release Get objects from the current GetList array
 CLEAR MEMORY    Release all public and private variables
 CLEAR SCREEN    Clear the screen and return the cursor home
 CLEAR TYPEAHEAD Empty the keyboard buffer
 CLOSE           Close a specific set of files
 COMMIT          Perform a solid-disk write for all active work areas
 CONTINUE        Resume a pending LOCATE
 COPY FILE       Copy a file to a new file or to a device
 COPY STRUCTURE  Copy the current .dbf structure to a new database (.dbf) file
 COPY STRU EXTE  Copy field definitions to a .dbf file
 COPY TO         Export records to a database (.dbf) file or ASCII text file
 COUNT           Tally records to a variable
 CREATE          Create an empty structure extended (.dbf) file
 CREATE FROM     Create a new .dbf file from a structure extended file
 DELETE          Mark records for deletion
 DELETE FILE     Remove a file from disk
 DELETE TAG      Delete a tag
 DIR*            Display a listing of files from a specified path
 DISPLAY         Display records to the console
 EJECT           Advance the printhead to top of form
 ERASE           Remove a file from disk
 FIND*           Search an index for a specified key value
 GO              Move the pointer to the specified identity
 INDEX           Create an index file
 INPUT*          Enter the result of an expression into a variable
 JOIN            Create a new database file by merging from two work areas
 KEYBOARD        Stuff a string into the keyboard buffer
 LABEL FORM      Display labels to the console
 LIST            List records to the console
 LOCATE          Search sequentially for a record matching a condition
 MENU TO         Execute a lightbar menu for defined PROMPTs
 NOTE*           Place a single-line comment in a program file
 PACK            Remove deleted records from a database file
 QUIT            Terminate program processing
 READ            Activate full-screen editing mode using Get objects
 RECALL          Restore records marked for deletion
 REINDEX         Rebuild open indexes in the current work area
 RELEASE         Delete public and private memory variables
 RENAME          Change the name of a file
 REPLACE         Assign new values to field variables
 REPORT FORM     Display a report to the console
 RESTORE         Retrieve memory variables from a memory (.mem) file
 RESTORE SCREEN* Display a saved screen
 RUN             Execute a DOS command or program
 SAVE            Save variables to a memory (.mem) file
 SAVE SCREEN*    Save the current screen to a buffer or variable
 SEEK            Search an order for a specified key value
 SELECT          Change the current work area
 SET ALTERNATE   Echo console output to a text file
 SET BELL        Toggle sounding of the bell during full-screen operations
 SET CENTURY     Modify the date format to include or omit century digits
 SET COLOR*      Define screen colors
 SET CONFIRM     Toggle required exit key to terminate GETs
 SET CONSOLE     Toggle console display to the screen
 SET CURSOR      Toggle the screen cursor on or off
 SET DATE        Set the date format for input and display
 SET DECIMALS    Set the number of decimal places to be displayed
 SET DEFAULT     Set the CA-Clipper default drive and directory
 SET DELETED     Toggle filtering of deleted records
 SET DELIMITERS  Toggle or define GET delimiters
 SET DESCENDING  Change the descending flag of the controlling order
 SET DEVICE      Direct @...SAYs to the screen or printer
 SET EPOCH       Control the interpretation of dates with no century digits
 SET ESCAPE      Toggle Esc as a READ exit key
 SET EXACT*      Toggle exact matches for character strings
 SET EXCLUSIVE*  Establish shared or exclusive USE of database files
 SET FILTER      Hide records not meeting a condition
 SET FIXED       Toggle fixing of the number of decimal digits displayed
 SET FORMAT*     Activate a format when READ is executed
 SET FUNCTION    Assign a character string to a function key
 SET INDEX       Open one or more order bags in the current work area
 SET INTENSITY   Toggle enhanced display of GETs and PROMPTs
 SET KEY         Assign a procedure invocation to a key
 SET MARGIN      Set the page offset for all printed output
 SET MEMOBLOCK   Change the block size for memo files
 SET MESSAGE     Set the @...PROMPT message line row
 SET OPTIMIZE    Change the setting that optimizes using open orders
 SET ORDER       Select the controlling order
 SET PATH        Specify the CA-Clipper search path for opening files
 SET PRINTER     Toggle echo of output to printer or set the print destination
 SET PROCEDURE*  Compile procedures and functions into the current object file
 SET RELATION    Relate two work areas by a key value or record number
 SET SCOPE       Change the boundaries for scoping keys in controlling order
 SET SCOPEBOTTOM Change bottom boundary for scoping keys in controlling order
 SET SCOPETOP    Change top boundary for scoping keys in controlling order
 SET SCOREBOARD  Toggle the message display from READ or MEMOEDIT()
 SET SOFTSEEK    Toggle relative seeking
 SET TYPEAHEAD   Set the size of the keyboard buffer
 SET UNIQUE*     Toggle inclusion of non-unique keys into an index
 SET WRAP*       Toggle wrapping of the highlight in menus
 SKIP            Move the record pointer to a new position
 SORT            Copy to a database (.dbf) file in sorted order
 STORE*          Assign a value to one or more variables
 SUM             Sum numeric expressions and assign results to variables
 TEXT*           Display a literal block of text
 TOTAL           Summarize records by key value to a database (.dbf) file
 TYPE            Display the contents of a text file
 UNLOCK          Release file/record locks set by the current user
 UPDATE          Update current database file from another database file
 USE             Open an existing database (.dbf) and its associated files
 WAIT*           Suspend program processing until a key is pressed
 ZAP             Remove all records from the current database file


Array Basics

    An array is a distinct data type which may contains multiple data items under same name.  Data items stored in an array referred as an “element” and can be any data type. An individual element of array referenced by array name and position number of element as an integer in array, called “index” or “subscript”.

 Defining / Building:

    An array is a variable and like all variables has “scope”; arrays can be defined PRIVATE, PUBLIC and LOCAL as well as STATIC.

   Building an array is quite simple: for example to define an array named “aColors” with 5 elements we can use a statement like this:

LOCAL aColors[ 5 ]

or

LOCAL aColors := ARRAY( 5 )

or

LOCAL  aColors := {  , , , , }

Results of these three methods are exactly same; we can inspect easily:

? ValType( aColors )      // A

? LEN( aColors )          // 5
? HB_ValToExp( aColors )  // {NIL, NIL, NIL, NIL, NIL}

NIL is a special data type with meaning “not defined”.

We can define an array with initial value(s)

aColors := {  “green”, ”yellow” ,  “red”,  “black”, “white” }

or assign values after defined:

aColors[ 1 ] := ”green”
aColors[ 2 ] := ”yellow”
aColors[ 3 ] := ”red”
aColors[ 4 ] := ”black”
aColors[ 5 ] := ”white”
? HB_ValToExp( aColors ) // {"green", "yellow", "red", "black", "white"}

Retrieve:

As seen in our first array statement

LOCAL aColors[ 5 ]

used a special sign square brackets as “Array element indicator” ( used also as string delimiter ).

As cited at the beginning, an individual element of array is referenced by array name and position number of element as an integer (enclosed by square brackets) in array, called “index” or “subscript”, and this notation called “subscripting”.

Note that subscribing begins with one.

To specify more than one subscript ( i.e. when using multi-dimensional arrays), you can either enclose each subscript in a separate set of square brackets, or separate the subscripts with commas and enclose the list in square brackets. For example, if aArray is a two dimensional array, the following statements both addresses the second column element of tenth row:

aArray[ 10 ][ 2]
aArray[ 10, 2]

Of course it’s illegal to address an element that is outside of the boundaries of the array (lesser than one or greater than array size / length; one is also illegal for an empty array). Attempting to do so will result in a runtime error.

When making reference to an array element using a subscript, you are actually applying the subscript operator ([]) to an array expression, not only an array identifier (array variable name). An array expression is any valid expression that evaluate to an array. This includes function calls, variable references, subscripting operations, or any other expression that evaluate to an array. For example, the following are all valid:

 { “a”, “b”, “c” }[ 2 ]

x[ 2 ]
ARRAY(3)[ 2 ]
&(<macro expression>)[ 2 ]
(<complex expression>)[ 2 ]

Syntax :

 <aArrayName> [ <nSubscript> ]

<nSubscript> is integer value and indicate sequence number of element into this array.

With this way we can also traverse an array:

FOR nColor := 1 TO LEN( aColors )
     ? aColors[ nColor ]
NEXT nColor

In fact, with the other FOR loop, traversing an array doesn’t require subscripting:

cColor := “” // FOR EACH loop require a predefined loop element

FOR EACH cColor IN aColors
  ? cColor
NEXT nColor

Elements of an array may be different data type; thus arrays called as “ragged” arrays in Clipper language.

aRagged := { 1, "One", DATE(),  .T. } 
FOR nIndex := 1 TO LEN( aRagged )
   x1Elem := aRagged[ nIndex  ]
   ? VALTYPE( x1Elem ), x1Elem
NEXT nIndex

A build-in array function AEVAL() can be use instead of a loop :

AEVAL( aRagged, { | x1 | QOUT(x1 ) } )


Adding one element to end of an array:

The architect of array is quite versatile. Array may change ( in size and element values ) dynamically at run time.

 AADD() function can be used for add a new element to the end of an array

AADD(<aTarget>, <expValue>) --> Value

<aTarget> is the array to which a new element is to be added.

<expValue> is the value assigned to the new element.

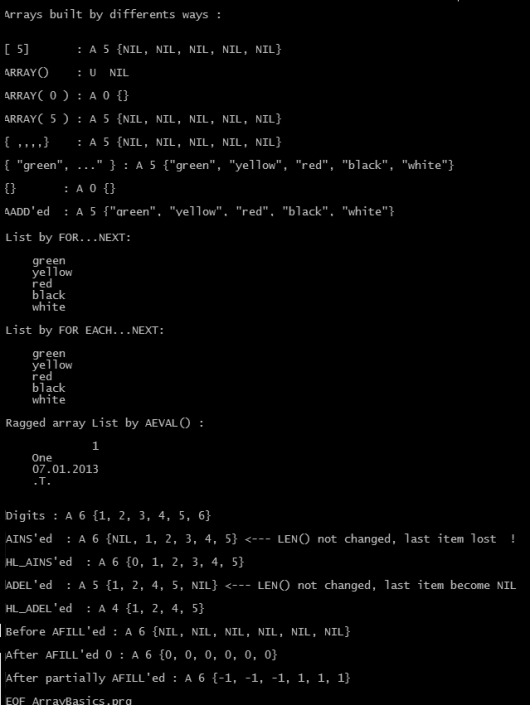
AADD() is an array function that increases the actual length of the target array by one.  The newly created array element is assigned the value specified by <expValue>.

AADD() is used to dynamically grow an array.  It is useful for building dynamic lists or queues.

For example an array may build empty and later add element(s) to it :

aColors := {}
AADD( aColors, ”green” )
AADD( aColors, ”yellow” )
AADD( aColors, ”red” )
AADD( aColors, ”black” )
AADD( aColors, ”white” )
? HB_ValToExp( aColors ) // {"green", "yellow", "red", "black", "white"}
Inserting one element to an array:

AINS() function can be use for insert a NIL element into an array

AINS (<aTarget>, <nPosition>) --> aTarget

<aTarget> is the array into which a new element will be inserted.

<nPosition> is the position at which the new element will be  inserted.

AINS() is an array function that inserts a new element into a specified array.  The newly inserted element is NIL data type until a new value is assigned to it.  After the insertion, the last element in the array is discarded, and all elements after the new element are shifted down one position.

For a lossless AINS() ( HL_AINS() ) look at attached .prg.

Deleting one element from an array:

ADEL(<aTarget>, <nPosition>) --> aTarget

ADEL() is an array function that deletes an element from an array.  The content of the specified array element is lost, and all elements from that position to the end of the array are shifted up one element.  The last element in the array becomes NIL. So, ADEL() function doesn’t change size of array.

For an another ADEL()  ( HL_ADEL() ) look at attached .prg.

Resizing:

 ASIZE() function can be use for grow or shrink, that is changing size of an array.

ASIZE( <aTarget>, <nLength>) --> aTarget

<aTarget> is the array to grow or shrink.

<nLength> is the new size of the array.


     ASIZE() is an array function that changes the actual length of the   <aTarget> array.  The array is shortened or lengthened to match the specified length.  If the array is shortened, elements at the end of the array are lost.  If the array is lengthened, new elements are added to the end of the array and assigned NIL.

     ASIZE() is similar to AADD() which adds a single new element to the end   of an array and optionally assigns a new value at the same time.  Note that ASIZE() is different from AINS() and ADEL(), which do not actually      change the array’s length.

Assigning a fixed value to all elements of an array:

Changing values of all element of an array can not be accomplish by a simple assign statement. For example:

aTest := ARRAY( 3 )
aTest := 1

change type of aTest from array to numeric with a value 1.

Instead, AFILL() function gives a short way to fill an array with a fixed value.

AFILL() :  Fill an array with a specified value

Syntax :

AFILL(<aTarget>, <expValue>,
    [<nStart>], [<nCount>]) --> aTarget
    <aTarget> is the array to be filled.

<expValue> is the value to be placed in each array element.  It can be an expression of any valid data type.

<nStart> is the position of the first element to be filled.  If this argument is omitted, the default value is one.

<nCount> is the number of elements to be filled starting with  element <nStart>.  If this argument is omitted, elements are filled from the starting element position to the end of the array.

Code evaluation on an array:

AEVAL()

Execute a code block for each element in an array

Syntax:

AEVAL(<aArray>, <bBlock>,
    [<nStart>], [<nCount>]) --> aArray

Arguments:

<aArray> is the array to traverse.

<bBlock> is a code block to execute for each element encountered.

<nStart> is the starting element.  If not specified, the default is  element one.

<nCount> is the number of elements to process from <nStart>.  If not specified, the default is all elements to the end of the array.

Returns:

     AEVAL() returns a reference to <aArray>.

Description:

AEVAL() is an array function that evaluates a code block once for each element of an array, passing the element value and the element index as  block parameters.  The return value of the block is ignored.  All      elements in <aArray> are processed unless either the <nStart> or the  <nCount> argument is specified.

AEVAL() makes no assumptions about the contents of the array elements it is passing to the block.  It is assumed that the supplied block knows  what type of data will be in each element.

AEVAL() is similar to DBEVAL() which applies a block to each record of a  database file.  Like DBEVAL(), AEVAL() can be used as a primitive for  the construction of iteration commands for both simple and complex array  structures.

Refer to the Code Blocks section in the “Basic Concepts” chapter of the   Programming and Utilities Guide for more information on the theory and syntax of code blocks.

Examples :

This example uses AEVAL() to display an array of file names  and file sizes returned from the DIRECTORY() function:

#include “Directry.ch”

//

LOCAL aFiles := DIRECTORY(“*.dbf”), nTotal := 0

AEVAL(aFiles, { | aDbfFile |;
     QOUT( PADR(aDbfFile[F_NAME], 10), aDbfFile[F_SIZE]),;
     nTotal += aDbfFile[F_SIZE])} )
//
?
? "Total Bytes:", nTotal

This example uses AEVAL() to build a list consisting of  selected items from a multi-dimensional array:

#include "Directry.ch"
//
LOCAL aFiles := DIRECTORY("*.dbf"), aNames := {}
AEVAL(aFiles, { | file | AADD(aNames, file[F_NAME]) } )

This example changes the contents of the array element depending on a condition.  Notice the use of the codeblock  parameters:


LOCAL aArray[6]
AFILL(aArray,"old")
AEVAL(aArray,;
{|cValue,nIndex| IF( cValue == "old",;
aArray[nIndex] := "new",)})

Searching a value into an array :

ASCAN() : Scan an array for a value or until a block returns true (.T.)

Syntax:

ASCAN(<aTarget>, <expSearch>,
       [<nStart>], [<nCount>]) --> nStoppedAt

 Arguments:

<aTarget> is the array to be scanned.

<expSearch> is either a simple value to scan for, or a code block.   If <expSearch> is a simple value it can be character, date, logical, or  numeric type.

<nStart> is the starting element of the scan.  If this argument is not specified, the default starting position is one.

<nCount> is the number of elements to scan from the starting  position.  If this argument is not specified, all elements from the  starting element to the end of the array are scanned.

 Returns:

ASCAN() returns a numeric value representing the array position of the last element scanned.  If <expSearch> is a simple value, ASCAN() returns the position of the first matching element, or zero if a match is not  found.  If <expSearch> is a code block, ASCAN() returns the position of the element where the block returned true (.T.).

 Description:

ASCAN() is an array function that scans an array for a specified value and operates like SEEK when searching for a simple value.  The  <expSearch> value is compared to the target array element beginning with  the leftmost character in the target element and proceeding until there are no more characters left in <expSearch>.  If there is no match,  ASCAN() proceeds to the next element in the array.

Since ASCAN() uses the equal operator (=) for comparisons, it is  sensitive to the status of EXACT.  If EXACT is ON, the target array  element must be exactly equal to the result of <expSearch> to match.

If the <expSearch> argument is a code block, ASCAN() scans the <aTarget>   array executing the block for each element accessed.  As each element is encountered, ASCAN() passes the element’s value as an argument to the code block, and then performs an EVAL() on the block.  The scanning operation stops when the code block returns true (.T.), or ASCAN()  reaches the last element in the array.

  Examples:

This example demonstrates scanning a three-element array using simple values and a code block as search criteria.  The code block criteria show how to perform a case-insensitive search:

aArray := { "Tom", "Mary", "Sue" }
? ASCAN(aArray, "Mary")               // Result: 2
? ASCAN(aArray, "mary")               // Result: 0
//
? ASCAN(aArray, { |x| UPPER(x) == "MARY" }) // Result: 2

This example demonstrates scanning for multiple instances of a search argument after a match is found:

LOCAL aArray := { "Tom", "Mary", "Sue","Mary" },; 
      nStart := 1
//
// Get last array element position
nAtEnd := LEN(aArray)
DO WHILE (nPos := ASCAN(aArray, "Mary", nStart)) > 0
   ? nPos, aArray[nPos]
   //
   // Get new starting position and test
   // boundary condition
   IF (nStart := ++nPos) > nAtEnd
      EXIT
   ENDIF
ENDDO

This example scans a two-dimensional array using a code block.  Note that the parameter aVal in the code block is an array:

LOCAL aArr:={}
CLS
AADD(aArr,{"one","two"})
AADD(aArr,{"three","four"})
AADD(aArr,{"five","six"})
? ASCAN(aArr, {|aVal| aVal[2] == "four"})         // Returns 2

Sorting an array:

ASORT() :  Sort an array

Syntax:

ASORT(<aTarget>, [<nStart>],
[<nCount>], [<bOrder>]) --> aTarget

 Arguments:

<aTarget> is the array to be sorted.

<nStart> is the first element of the sort.  If not specified, the default starting position is one.

<nCount> is the number of elements to be sorted.  If not specified, all elements in the array beginning with the starting element are sorted.

<bOrder> is an optional code block used to determine sorting order.  If not specified, the default order is ascending.

 Returns:

ASORT() returns a reference to the <aTarget> array.

 Description:

 ASORT() is an array function that sorts all or part of an array  containing elements of a single data type.  Data types that can be  sorted include character, date, logical, and numeric.

If the <bOrder> argument is not specified, the default order is ascending.  Elements with low values are sorted toward the top of the  array (first element), while elements with high values are sorted toward the bottom of the array (last element).

If the <bOrder> block argument is specified, it is used to determine the sorting order.  Each time the block is evaluated; two elements from the target array are passed as block parameters.  The block must return true     (.T.) if the elements are in sorted order.  This facility can be used to create a descending or dictionary order sort.  See the examples below.

When sorted, character strings are ordered in ASCII sequence; logical values are sorted with false (.F.) as the low value; date values are sorted chronologically; and numeric values are sorted by magnitude.

 Notes:

ASORT() is only guaranteed to produce sorted output (as defined by the block), not to preserve any existing natural order in the process.

Because multidimensional arrays are implemented by nesting sub-arrays within other arrays, ASORT() will not directly sort  a multidimensional array.  To sort a nested array, you must supply a code block which properly handles the sub-arrays.

 Examples:

This example creates an array of five unsorted elements, sorts the array in ascending order, then sorts the array in descending  order using a code block:

aArray := { 3, 5, 1, 2, 4 }
ASORT(aArray)
// Result: { 1, 2, 3, 4, 5 }
ASORT(aArray,,, { |x, y| x > y })
// Result: { 5, 4, 3, 2, 1 }

This example sorts an array of character strings in ascending order, independent of case.  It does this by using a code block that  converts the elements to uppercase before they are compared:

aArray := { "Fred", Kate", "ALVIN", "friend" }
ASORT(aArray,,, { |x, y| UPPER(x) < UPPER(y) })

This example sorts a nested array using the second element of each sub-array:

aKids := { {"Mary", 14}, {"Joe", 23}, {"Art", 16} }
aSortKids := ASORT(aKids,,, { |x, y| x[2] < y[2] })

Result:

{ {“Mary”, 14}, {“Art”, 16}, {“Joe”, 23} }

Last element in an array:

ATAIL() : Return the highest numbered element of an array

Syntax:

      ATAIL(<aArray>) --> Element

Arguments:

<aArray> is the array.

 Returns:

ATAIL() returns either a value or a reference to an array or object.  The array is not changed.

 Description:

ATAIL() is an array function that returns the highest numbered element  of an array.  It can be used in applications as shorthand for <aArray>[LEN(<aArray>)] when you need to obtain the last element of an      array.

Examples:

The following example creates a literal array and returns that last element of the array:

     aArray := {"a", "b", "c", "d"}
     ? ATAIL(aArray)                     // Result: d

Getting directory info:

ADIR() is a array function to obtain directory information. But it’s  a compatibility function and therefore not recommended. It is superseded by the DIRECTORY() function which returns all file information in a multidimensional array.

A sample .prg : ArrayBasics.prg 


ArrBass

Strings as array

/*
StrAsArr.prg
Harbour offers a very handy string manipulation method: 
strings can be processed by indexing as array.
This sample inverts a string while converting it to uppercase.
lib is xHB, so you need add xHB lib calling in the your 
compile command:
hbmk2 -lxHB StrAsArr -run
*/
#include "xhb.ch"
PROCEDURE Main()

 CLS
cString := "This is a string"
? cString
?
FOR n1Char := LEN( cString ) TO 1 STEP -1
   cString[ n1Char ] := UPPER( cString[ n1Char ] )
   ?? cString[ n1Char ]
NEXT 

 /* Result: 

 This is a string
 GNIRTS A SI SIHT 

 */

 @ MAXROW(), 0
 WAIT "EOF StrAsArr.prg"

RETURN // StrAsArr.Main()

StrAsArr