REQUEST

REQUEST

Declare a module request list

Syntax

      REQUEST <name1> [,<nameN>]

Arguments

<idModule list> is the list of modules that will be linked into the current executable (.EXE) file.

Description

REQUEST is a declaration statement that defines a list of module identifiers to the linker. Like all other declaration statements, a REQUEST statement must be specified before any executable statements in either the program file, or a procedure or user-defined function definition.

During the compilation of Clipper source code, all explicit references to procedures and user-defined functions are made to the linker. In some instances, within a source file, there may be no references made to procedure or user-defined function names until runtime. REQUEST resolves this situation by forcing the named procedures or user-defined functions to be linked even if they are not explicitly referenced in the source file. This is important in several instances:

. Procedures, user-defined functions, or formats referenced with macro expressions or variables

. Procedures and user-defined functions used in REPORT and LABEL FORMs and not referenced in the source code

. User-defined functions used in index keys and not referenced in the source code

. ACHOICE(), DBEDIT(), or MEMOEDIT() user functions

. Initialization procedures declared with the INIT PROCEDURE statement

. Exit procedures declared with the EXIT PROCEDURE statement

To group common REQUESTs together, place them in a header file and then include (#include) the header file into each program file (.prg) that might indirectly use them.

Examples

      .  This example shows a typical header file consisting of common
         REQUESTs for REPORT FORMs:
      // Request.ch

      REQUEST HARDCR
      REQUEST TONE
      REQUEST MEMOTRAN
      REQUEST STRTRAN

      OR :

      REQUEST HARDCR, TONE, MEMOTRAN, STRTRAN

Seealso

ACHOICE(), ANNOUNCE, DBEDIT(), EXIT, PROCEDURE; EXTERNAL*

Features Differences

This document attempts to describe the features separating Harbour from
CA-Cl*pper.

/* TODO: @FunPointer(), and all other Harbour extensions. */

Harbour Macro Compiler
----------------------
The Harbour Macro Compiler offers 2 additional layers of functionality
controlled by means of hb_SetMacro()* function, not available in CA-Cl*pper.

hb_SetMacro( HB_SM_HARBOUR, .T. ) will enable macro compilation and
evaluation of complex expressions not supported by CA-Cl*pper like:

 - exp++, exp--, var += exp, (exp), etc..
 - Nested codeblocks.
 - Expressions longer then 254 characters.

hb_SetMacro( HB_SM_XBASE, .T. ) will enable macro compilation and
evaluation of comma separated lists in all contexts where lists are
acceptable by CA-Cl*pper*, including:

  - { &cMacro } // Literal array elements list.
  - SomeArray[ &cMacro ] // Array index list.
  - SomeFun( &cMacro ) // Arguments list.
  - ( &cMacro ) // parenthesized list expression.

*CA-Cl*pper only supports list macros within codeblocks context.

Both these extra layers are activated by default.

* See also -k Compiler switch.

LIST Command
------------

LIST &cMacro

LIST in CA-Cl*pper [superficially] supports macros of lists expressions.
No error will be produced, and all expressions in the list will be
evaluated, but *only* the *last* expression will be displayed. This is
not documented in either the LIST Command or the Macro Operator
descriptions, but is the de-facto behavior in all CA-Cl*pper 5.x versions.

Harbour instead will not only evaluate all of the expressions in
such list macro, but will also display all such values. This default
behavior may be disabled with hb_SetMacro( HB_SM_XBASE, .F. )*

* See also -k Compiler switch.

INIT/EXIT and startup procedures
--------------------------------

In CA-Cl*pper the startup procedure is always the first procedure/function
of the main module, even if such symbol is an INIT or EXIT symbol. In
such case the program will never execute the "main" symbol. In Harbour
the first *non* INIT/EXIT symbol, will be executed as the main symbol
after all INIT procedures have been executed.

FOR EACH statement
------------------
Harbour has support enumeration loop with the following syntax:

   FOR EACH var1 [,var255] IN expr1 [,expr255] [DESCEND]
      [EXIT]
      [LOOP]
      ...
   NEXT

Note:
   - expr can be a string or an array
   - enumerator variable 'var<n>' stores a reference to the element of
     an array or a string specified by 'expr<n>' thus assigments to the
     enumerator changes the value of given array element
   - after the loop the controlling variable(s) store the value which
     they had before entering the loop
   - the enumeraqtor variable supports the following properties
     :__enumindex - the loop counter for variable
     :__enumbase  - the value that is being traversed
     :__enumvalue - the value of variable

for example:
   a := 'A'
   b := 'B'
   FOR EACH a, b IN { 1, 2, 3, 4 }, "abcd"
      ? a, b   //prints: 1 a
               //        2 b
               //        3 c
               //        4 d
   NEXT
   ? a, b   //prints: A B

   // you can use EXIT statement inside the loop
   FOR EACH a IN { 1, 2, 3, 4 }
      IF a:__enumindex == 3
         ? a
         EXIT
      ENDIF
   NEXT

   arr := { 1, 2, 3 }
   str := "abc"
   FOR EACH a, b IN arr, str
      a *= 2
      str := Upper( str )
   NEXT
   // now 'arr' stores { 2, 4, 6 }
   // howerer 'str' still stores "abc"

Notice the difference:
   FOR EACH a IN someValue
      ? a:__enumindex   //prints current value of the index
      ? (a):__enumindex //sends '__enumindex' message to the current value
   NEXT

WITH OBJECT
-----------
Harbour supports the following statement:

   WITH OBJECT expression
      ...
   ENDWITH

   Inside this WITH OBJECT/END enclosure you can use the simplified
   form of sending messages to the object. You can use the syntax
   :message( [params] )
   :property
   to send messages to the object specified by 'expression'

for example:
   WITH OBJECT myobj:a[ 1 ]:myitem
      :message( 1 )
      :value := 9
   ENDWITH

   The above code is equivalent to:
   myobj:a[ 1 ]:myitem:message( 1 )
   myobj:a[ 1 ]:myitem:value := 9

   Inside WITH OBJECT/END you can access (or even assign a new object)
   using a special reserved property :__withobject

       The runtime error will be generated at the time of message
       sending (or property access/assign) if <objexpression>
       is not a value of type object.

for example:
   CREATE CLASS foo
      VAR name INIT 'FOO'
   ENDCLASS

   CREATE CLASS bar
      VAR name INIT 'BAR'
   ENDCLASS

   WITH OBJECT foo():new()
      ? :name                 //prints 'FOO'
      ? :__withobject:name    //also prints 'FOO'
      ? :__withobject := bar():new()
      ? :name                 //prints 'BAR'
   ENDWITH

Source : https://github.com/harbour/core/blob/master/doc/clipper.txt

Basic Controls – 2


( Text Box  )

We are continuing with Viva_HMG.hbp, Main.prg and Main.fmg. We have assign real actions other than MsgBox() to our two buttons now : Open File and Edit Record. Open File not required GUI controls ( at least for now ), so we can begin with it: For Open File we need a file ( a table ) first: it’s here; a table with four field: Clients.dbf :

No:  Field Name Type Width Dec
---  ---------  ---- ----- ---
  1  CLI_ID       N      5   0
  2  CLI_SNAM     C     12   0
  3  CLI_NAME     C     12   0
  4  CLI_TLF      C     11   0

And then add a little routine to Main.prg for open (USE) it:

PROCEDURE OpenTable()
   IF FILE( "CLIENTS.DBF" )
      USE CLIENTS
   ELSE
      MsgStop( "Clients.dbf file not found !")
   ENDIF
RETURN // OpenTable()

And assign this procedure to ACTION of  Open File  button.

Now, we can begin Edit Record task. For this task we need a separate form, a sub form.  Then let’s begin. “New form” from tool-bar and assign a name : EditReco. Assign a title : “Edit Record”, a type : MODAL. Our table has four fields, so we need four LABEL first:

Names :  lblCLI_ID,  lblCLI_SNAM,  lblCLI_NAME, lblCLI_TLF;

Values ( Captions ) : ID,  Surname, Name, Tlf

Rows : 60, 100, 140, 180 Col : 60

Cols :  60, 60, 60, 60

Widths : 70, 70,  70, 70

Alignement : RIGHT, RIGHT, RIGHT, RIGHT

We can see our job at work:
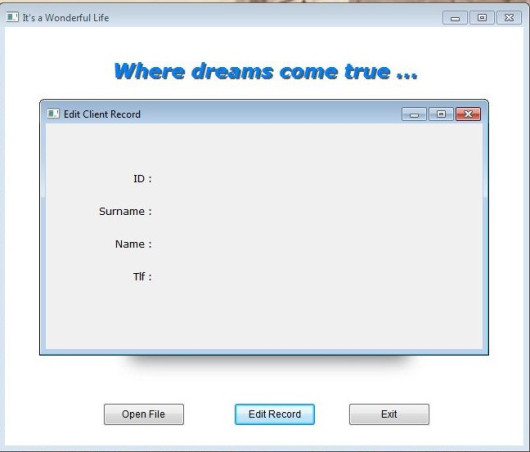
Now we need a place  for display the current data and accept user input. The control for this purpose is text box. So we need to define four text boxes for each field in the table.

The button of text box in the IDE tool bar is :

Names :  txbCLI_ID,  txbCLI_SNAM,  txbCLI_NAME, txbCLI_TLF;

Rows : 55, 95, 135, 175

Col : 140

DataTypes : First : NUMERIC, others : CHARACTER

We can see our job at work:
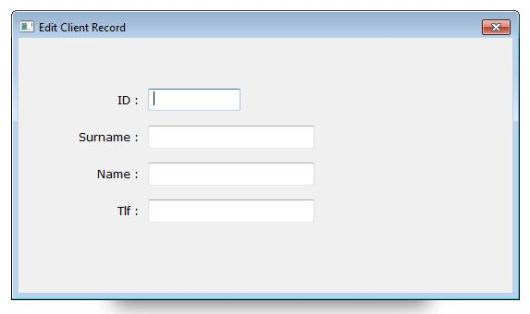
Well …

But where are table data ?

To see table data we need assign field values to text boxes as values.

Again, a little procedure:

PROCEDURE ReadData()
   EditReco.txbCLI_ID.Value   := CLIENTS->CLI_ID
   EditReco.txbCLI_SNAM.Value := CLIENTS->CLI_SNAM
   EditReco.txbCLI_NAME.Value := CLIENTS->CLI_NAME
   EditReco.txbCLI_TLF.Value  := CLIENTS->CLI_TLF
RETURN // ReadData()

and a call command for this procedure to ON INIT event of  EditReco form.

The result :
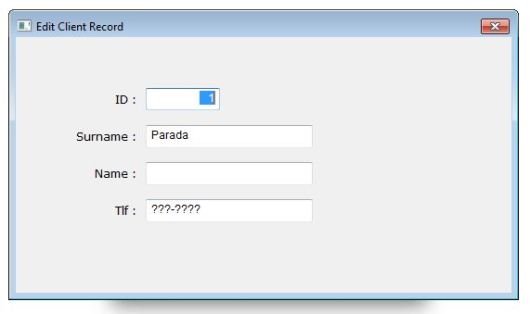
Everything is OK ?

No !

This is only first record of table; how we will see others ?

Yes, we need now yet another feature: navigation; that is travelling between records of table.

But before navigation, we have a problem: Open Table must be processed before Edit Record.

Otherwise a run time error will occurs: Alias does not exist. 

What we can do?

–       Discard Open Table button, open the table automatically; at beginning of program or at beginning of editing.

–       Before editing, check the table, if doesn’t open,

–          a)  open automatically or

–          b)  warn user and don’t load Edit Table form.

Probably most convenient is : disable Edit Record button until table is open.

First a mini procedure :

PROCEDURE Initialize()
   Main.btnEditRec.Enabled := .F.
RETURN // Initialize()

And then add this procedure ON INIT event of form main:
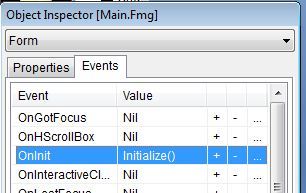
Last point: enable it after USE table:

PROCEDURE OpenTable()
   IF FILE( "CLIENTS.DBF" )
      USE CLIENTS
      Main.btnEditRec.Enabled := .T.
   ELSE
      MsgStop( "Clients.dbf file not found !")
   ENDIF
RETURN // OpenTable()

Run and see:

Before Open File :

After Open File:

Now we can pass to navigation:

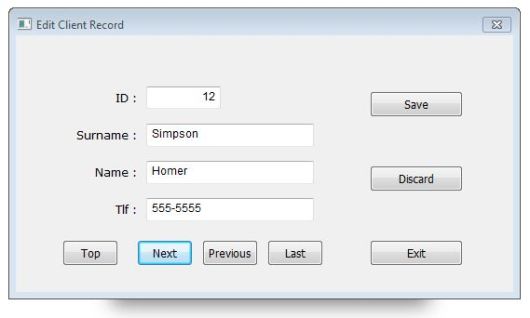
We need seven buttons: Go Top, Go Next, Go Previous, Go Last, Save, Discard, Exit.

Name: btnGoTop, Caption : Top,  Col : 50, Row: 220, Height: 28, Width: 60

Name: btnGoNext, Caption : Next,  Col : 130, Row: 220, Height: 28, Width: 60

Name: btnPrevious, Caption : Previous,  Col : 200, Row: 220, Height: 28, Width: 60

Name: btnGoLast, Caption : Last,  Col : 270, Row: 220, Height: 28, Width: 60

Name: btnSave Caption : Save,  Col : 380, Row: 60, Height: 28, Width: 100

Name: btnDiscard, Caption : Discard,  Col : 380, Row: 140, Height: 28, Width: 100

Name: btnExit, Caption : Exit,  Col : 380, Row: 220, Height: 28, Width: 100

Common: Font Name: Tahoma, Font Size: 9

Actions :

btnGoTop: ( DBGOTOP(), ReadData() )
btnGoNext: ( DBSKIP(), ReadData() )
btnPrevious: ( DBSKIP( -1 ), ReadData() )
btnGoLast: ( DBGOBOTTOM(), ReadData() )
btnSave: SaveData()
btnDiscard: ReadData()

btnExit: ThisWindow.Release

Note that actions of four first buttons include two actions, separated by comma and enclosed by parenthesis.  With this notation we can define more than one action together.

SaveData() is the inverse of  ReadData(): copy values of text boxes to table fields.

PROCEDURE SaveData()         // Save data from text boxes to table
   CLIENTS->CLI_ID   := EditReco.txbCLI_ID.Value
   CLIENTS->CLI_SNAM := EditReco.txbCLI_SNAM.Value
   CLIENTS->CLI_NAME := EditReco.txbCLI_NAME.Value
   CLIENTS->CLI_TLF  := EditReco.txbCLI_TLF.Value
RETURN // SaveData()

Discard is simply re-reading data from table.

The result:
To be continued …

Download source files